

Making AT-ST - Part 2
Don’t forget to check out the post before this, which is making AT-ST part 1. I had left off having completed the top, front and sides of the control cabin. The bottom piece I have also subsequently added on, which is black in colour to seal the whole box up.

Making AT-ST - Part 1
This time I decided to take on making the AT-ST. Or the long form is ‘All Terrain Scout Transport’. I have a caveat though, the final piece I made looks more like a fallen AT-ST. Read on to see what I mean.

Adding rhinestones and craft wire to amigurumi
Making Kuiil is basically like making a monkey, I think 😂. I added some monkey features to the cheeks, to the chin, some nostrils and an grumpy demeanor. And you’ve got a basic Kuiil. That’s where the fun part comes in, when start incorporating ingredients apart from just yarn.

Making Razor Crest - Part 2
Don’t forget to catch the previous post on making Razor Crest - part 1 before reading this. That post concluded with the basic skeleton of the Razor Crest.

Making Razor Crest - Part 1
This is a 2-part post on how I made the Razor Crest, which mainly showcases the basic components of the ship as well as how I had to do some trial and error to get the final amigurumi.

Making hdc bobble stitch on a chain
I have tried figuring out for a long time how to make a bobble stitch extend outwards. If you have seen my previous post on making bobble stitches as amigurumi limbs, then you know that I prefer to make the limbs as part of a continuous stitch from the main body, because c’mon, who likes sewing? ;)

Making a Mini Baby Yoda
There were many versions of Baby Yoda that were released after the Mandalorian was launched. Back then, I had already made a few versions of Yoda, which were all not particularly satisfactory.


Crochet Doll with Turnable Head
I haven’t made any reversible heads since my Harry Potter collection… after all, not many characters are two-faced. I was actually inspired by a Dr Jekyll and Mr Hyde piece made by geekyhooker 😂.

Using surface slip stitch to do Amigurumi Detailing
When making miniature Amigurumi, sometimes it can be difficult to add in detailing over the body and clothes. After all, there isn’t much room to work with but you still want them to look as detailed as possible within a small surface area.


Adding detailing to Mini Amigurumi
Just a background… I don’t like to add on limbs separately because it’s such a hassle. So I made an ‘extended bobble stitch’ for the limbs.

Making bobble stitches as Amigurumi limbs
Like most crocheters, I find joining up the limbs a real drag. Since I prefer to making most of my amis mini, I tend to make the limbs as part of a continuous seamless stitch when I’m crocheting the body.

Changing Crochet Colours
Changing colours can add a lot of variety and dynamics to your Amigurumi. Similarly, changing size can change the appearance of the final piece.

Increases & Decreases in stitches
To make the Amigurumi bigger, you need to increase the stitches. Likewise, if you intend to make it smaller, then you need to decrease the stitches.

How to do Double Crochet
A double crochet is 2 times the height of a single crochet and also higher than a half double crochet. It is also a great stitch to use for bobble stitches.

How to do Half Double Crochet
For a half double crochet, the stitch is taller than that of single crochet. I frequently use hdc to create a subtle bust appearance for my female amigurumi as it looks raised above usual sc in the round.
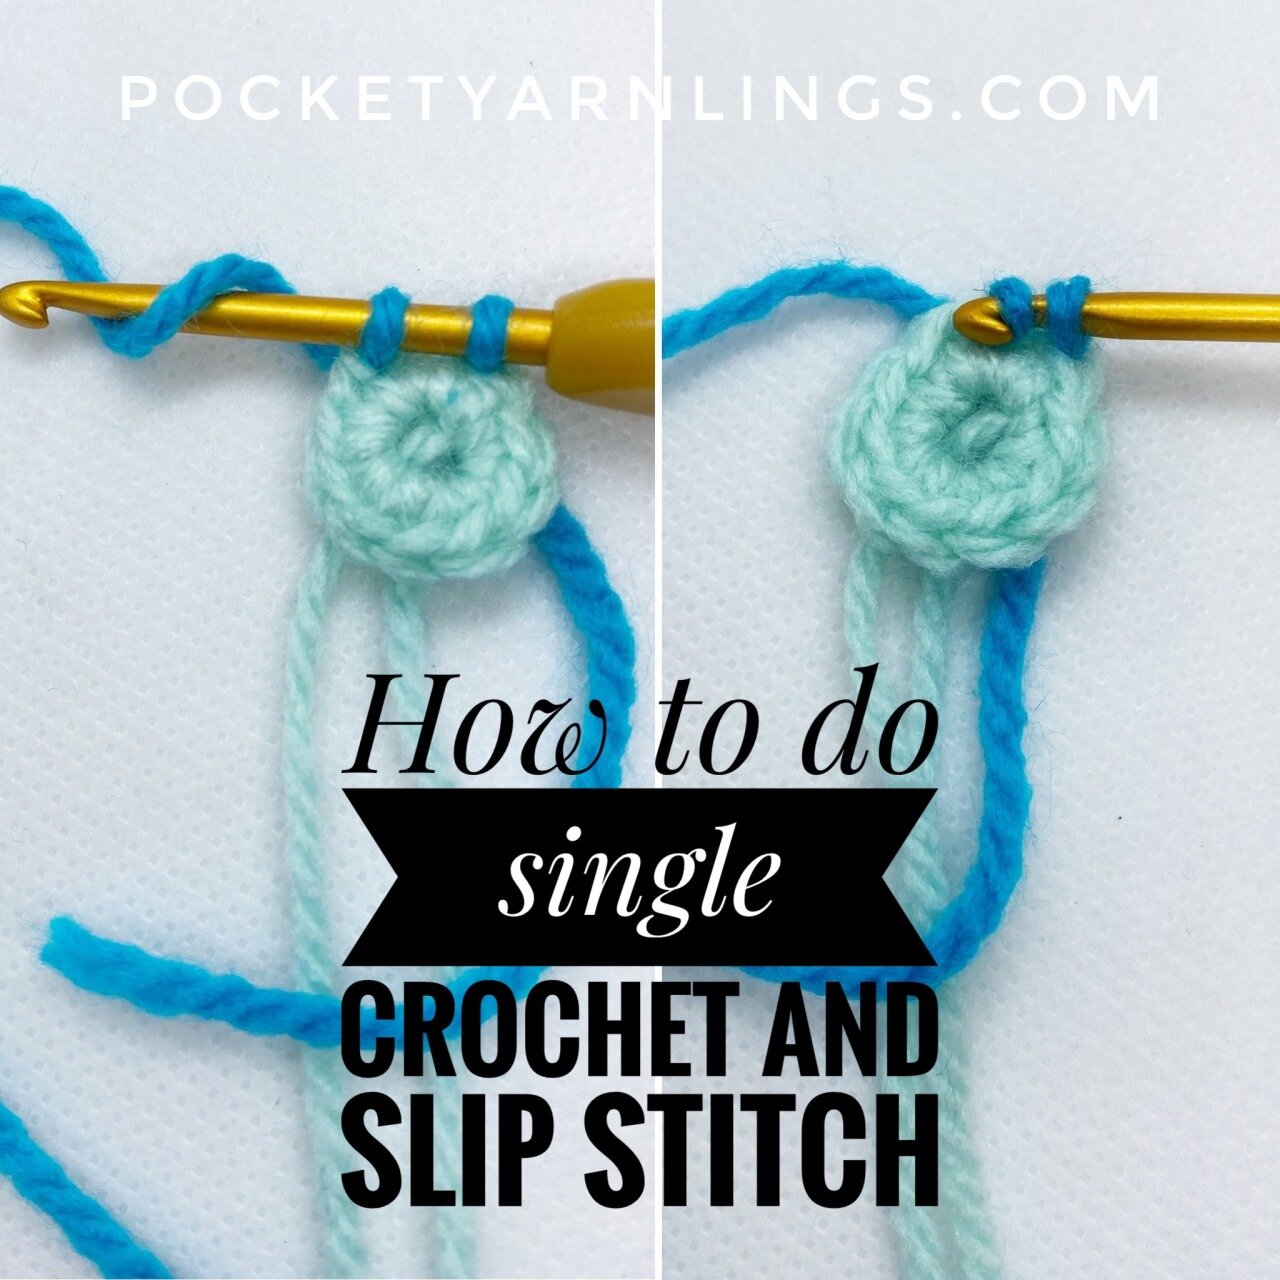
How to do Single Crochet and Slip Stitch
Single crochet is the simplest stitch to make and what is used most of the time. You can use it in a chain or in a round like a magic circle.

Starting with Magic Ring
In the previous post on starting with Ch2 and sc, we mentioned about how to start a round with that method but we do end up with a gap in the centre. When using the magic ring technique, you can pull the free end of the yarn taut such that the gap disappears!