

Making AT-ST - Part 2
Don’t forget to check out the post before this, which is making AT-ST part 1. I had left off having completed the top, front and sides of the control cabin. The bottom piece I have also subsequently added on, which is black in colour to seal the whole box up.
Gyros and Drive Engine
These are basically made up of simple structures like 2 small flattened balls on top of each other to make the gyros. The drive engine started off in an oval flat shape at the foundation and continued on to form a squarish pillow shape. Incidentally, here I also added on the ‘chin’- mounted blaster cannon holder. Which is basically the small dangling structure in the middle of the 2 front flaps, to place the guns later on.
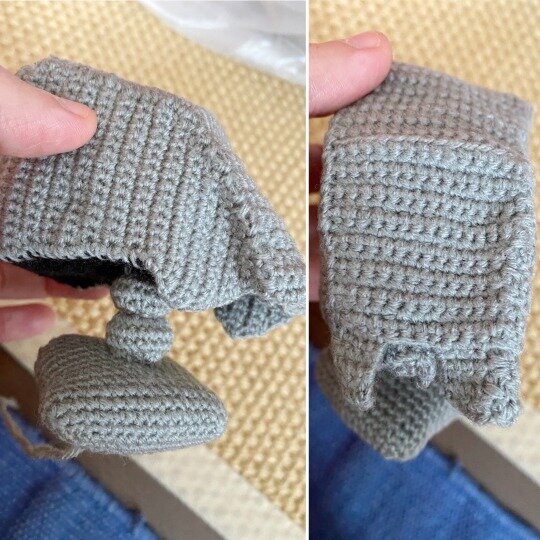
Legs
Because I decided to make this from the Mandalorian series so it’s technically the AT-ST Raider. The distinction is because of the painted legs in the show, one side is brown and the other side is maroon in colour.
My caveat comes in here, because despite putting craft wires inside the legs, making it stand up by withstanding the weight of the control cabin was not possible. I tried many times in various angles but I couldn’t achieve it … hence why it’s called the ‘fallen AT-ST’ 😂😂.

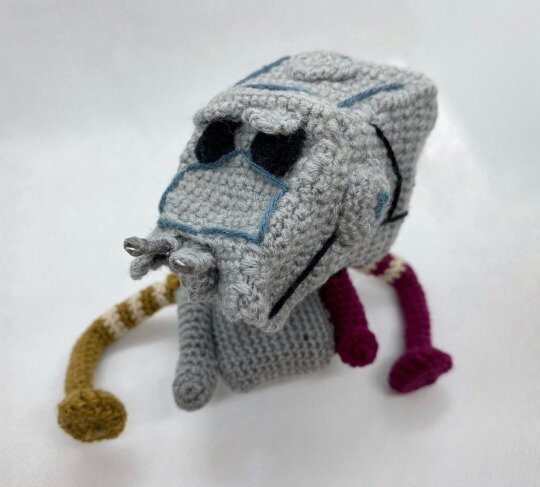
Detailing on the AT-ST
After the progressive assemblies are done, this is the part to start adding in the details! This is always my favourite part because you can start to see it all come together. I added in the windows and window covers, hatch on top, side launchers as well. It’s starting to look like it, isn’t it?!

Blaster cannons
Of course the raider wouldn’t be complete without it’s firepower. Just like how I did it for the Razor Crest I made earlier, I used some craft wires wrapped in grey yarn and stuck it on. Note to use superglue cos all the other types of glue I used just didn’t seem to get the job done.

The final fallen piece! Lol… I’ll showcase it in multiple views in my next post so you can see the front, back and sides. Don’t expect Chewie to be popping his head out though, it’s full of stuffing!
If you would like to make your very own AT-ST, which would look great as part of a hanging mobile by the way, go check it out here or down below->
Also, remember to see my older posts on making the Razor Crest. That was complicated and fun too!
Stay tuned for more views!

Note: This is for the PDF PATTERN to make the amigurumi, NOT the finished product.
Included
- 1 PDF patterns, total 8 pages
- For vehicle: Fallen Terrain Walker
- Final pieces measuring about 9cm tall (3.5 inches) and 6cm wide (2.5 inches) using sport yarn (weight 2) and crochet hook size 2.5mm. They can be made bigger with bulkier yarn and bigger hook.
Crochet skill level
- Intermediate (4/5)
- Some basic crochet skills are needed, such as the following: single crochet, slip stitch, half double crochet, double crochet, invisible decrease, changing colours.
- Free 30-page ebook available for complete beginners for common techniques used:
https://www.subscribepage.com/pyfreeebook
Crochet equipment
- Sport size yarn (weight 2)
- Crochet hook size 2.5mm
- Others - darning needles, stitch markers, glass eyes
- For ideas where to get the equipment or how they look like, check out my blog post:
https://pocketyarnlings.com/post/612521409855602688/my-crochet-tools-and-accessories
Features
- Each pattern features various views and angles of finished amigurumi for easier reference on assembly.
- No limb attachments, mainly attachments for detailing.
- Patterns longer as more elaborate, likely completed in few days (depending on skill level) or few hours (if done continuously)
- Final piece is mini-sized but adaptable, great for gifting.
Benefits
- Short and fast projects, no WIPs!
- Perfect as a gift, even if relatively last minute!
- Bundled patterns can be made into a hanging baby cot mobile for the nursery!
~~
After payment has been processed, you can download your PDF file immediately.
If you have any enquiry, please don’t hesitate to contact me here in Etsy. I will do my best to answer your question within 12 working hours.