

12 Nifty Types of Colour Changes in Amigurumi Crochet
Colour changes in crocheting amigurumi projects is really important, especially if you want your final toy to be unique and colourful! The technique to do colour change in crochet is fairly simple enough but did you know that it is slightly different in different crocheting situations? Here I go through them in further detail, starting with the basics first, then for taller stitches, then with basic situations (magic ring, chain) and finally how to conceal the colour changes. Let's get started!
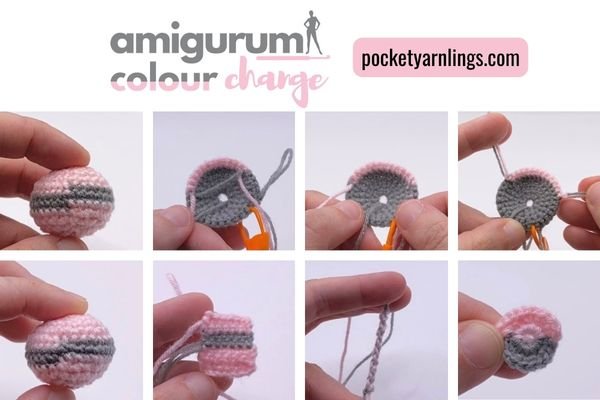
Table of Contents Show
For a start
The process of changing colour is roughly the same but can differ slightly in different situations. Here I will go through the steps in a round first because it is most commonly used for amigurumi, then I will go through the steps in the middle of row and at the end of the row.
How do I change the colour of my amigurumi round?
When changing colours in a round, when you have completed one round and move onto the next, the demarcation in colour change can be pretty obvious, especially when you are attempting something like stripes. After going through the basic steps involved, later I will talk about an easy way to make the transition less obvious.
The steps are as follows:
We are starting off with a pink yarn. Note that the change in colour here will only occur in the next stitch (just after the insertion in step 1).
1. Insert hook into the preceding stitch of the desired colour change. Yarn over pink, which is the original colour.
2. Draw pink yarn through stitch, should have 2 pink loops on hook.
3. Position the 2nd colour, grey yarn, further along the hook, with the free end facing closest to yourself.
4. Then yarn over grey yarn (new colour) this time, with stray end facing inwards.

5. Draw new grey yarn through both old pink loops on the hook.
6. Now you should have 1 grey loop on your hook. You can proceed onto making the 1st sc in the new colour.
7. Insert hook into the desired stitch (where you want colour change).
8. Yarn over, draw new grey colour through stitch, so you should have 2 grey loops on the hook.
9. Yarn over for a final time, then draw through both loops on the hook to complete the sc.

You have gone from pink yarn to grey one! Continue working in the rest of the round as suggested by the crochet pattern you are following.
How do you change the colour of yarn in the middle of a row?
The steps involved in crocheting colour change in the middle of the row is much like steps 1-9 above. Get the 2 loops on the hook in the old colour and position the new coloured yarn adjacent to the 2 loops, then draw new yarn through 2 loops. Then proceed to do a single crochet stitch as planned.
You could change from one colour to the next within the row and then back again within the same row, it would be the same technique throughout. If you decide to change the colour at the end of the row, then it differs slightly because of the chain 1 and turn at the end of the row.
How do you change colours in crochet at end of row?
Here are the steps for crocheting colours at the end of a row, including changing the colour for the chain 1 and turn right at the end. First off the crochet pattern, and then the steps involved.
Colour change at end of the row crochet pattern
Row 1: Ch7 (pink)
Row 2-3: Sc6 (pink), ch1 and turn (pink) - 6st
Row 4: Sc6 (pink), ch1 and turn (grey) - 6st
Row 5: Sc6 (grey), ch1 and turn (grey) - 6st
Row 6: Sc6 (grey), ch1 and turn (pink) - 6st
Row 7-8: Sc6 (pink), ch1 and turn (pink) - 6st
Steps involved:
1. Start off with chain 7 in pink.
2. In the next row, starting in 2nd chain from hook, sc6 in pink, then chain 1 and turn.
3. Continue the next 3rd and 4th rows in pink, (or up to you depending on long you want the rectangular crochet project).
3. In last stitch of row 4, insert hook, pull through to get 2 pink loops on hook.

4. Position new grey yarn further along the hook, away from the 2 pink loops.
5. Pull new grey yarn through 2 old pink loops.
6. Continue to chain 1 and turn in grey yarn, before moving onto the next row.

7. Then continue in row 5 using grey yarn, sc6 down the row, then chain 1 and turn in grey.
8. Finish up row 6 with sc6 in grey.

See how it differs slightly from the colour change in the middle of the row.
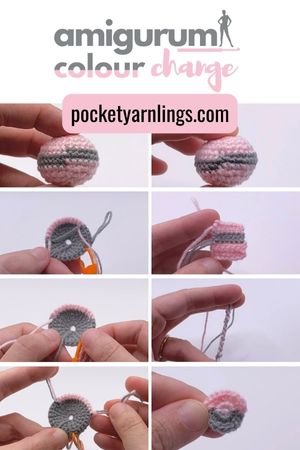
How to crochet stripes in the round?
There are many ways to crochet stripes in the round, including the first technique I mentioned right at the top here, which has an obvious demarcation between rounds. I decided to include another popular option here, specifically to help with stripes and minimize the obvious colour change between rounds. I call it slip stitch with 2 loops (there are some other techniques named slip stitch with 1 loop but I won't go into much detail about that here).

Here in this example, I made a spherical ball, with the initial colour in pink, then the change to grey yarn to make the stripe and eventually the change back to pink yarn again.
1. Insert hook into the preceding stitch of the desired colour change. Yarn over original colour, pink.
2. Draw pink yarn through stitch, should have 2 pink loops on hook.
3. Position the 2nd colour, grey yarn, further along the hook, with the free end facing closest to yourself.
4. Then yarn over grey yarn (new colour) this time, draw new grey yarn through 2 pink loops on the hook. You should have 1 grey loop left on hook.

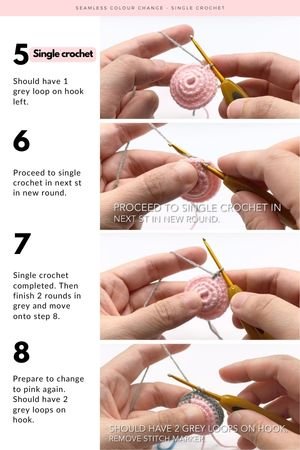
5. Proceed to slip stitch in the new round.
6. Pull grey loop through stitch and then the grey loop on the hook to form slip stitch.
7. You should have 1 grey loop on the hook and then proceed to complete the next 2 rounds in grey.
8. After finishing the 2 rounds in grey, you should have 2 grey loops on hook, before changing back to pink.

9. Grab new pink yarn with hook and draw through 2 grey loops on hook.
10. Continue slip stitch in new pink yarn into next round.
11. With the single pink loop on the hook, proceed to complete rest of the round in pink, here I have a spherical ball example.

So the colour change in done using slip stitch with 2 loops colour change!
Struggling with messy colour changes?
Learn how to switch colours cleanly (without jagged edges or obvious joins) with this simple amigurumi starter guide. Click here or on the image on the left.
Taller stitches
Now that you know how to do a simple colour change in single crochet, let us just change things up and start to work for taller stitches. If you have no idea what is half double crochet, double crochet or treble crochet, remember to check out this article first to get a hang of these basic crochet stitches first: 'How to Learn Basic Crochet Stitches step by step for Absolute Beginners - 6 Easy Steps!'.
How to change colour in half double crochet?
Essentially the steps are the same as in a half double crochet but this time with colour changes! For the initial grey yarn, I will work in hdc and when the colour change happens, it will change to hdc in pink. The steps are below:
1. Start off with yarn over first in grey, this is the original colour.
2. Insert hook, yarn over, pull through to get 3 grey loops on hook.
3. Get ready new pink yarn.
4. Pull pink yarn through 3 grey loops on hook.

5. You should have a single pink loop left on the hook, then yarn over in pink.
6. Continue to make a hdc in pink here. Yarn over this time in pink, insert hook into the next stitch, yarn over, pull through to get 3 pink loops on the hook.
7. Yarn over again, pull through all 3 loops on hook to get hdc in pink.

You have completed the half double crochet colour change!
How to change colour in double crochet?
The first 2 steps for a double crochet are the same as for half double crochet, likewise for this colour change example. After that, steps 3-7 are different:
1. Start off with yarn over first in grey, this is the original colour.
2. Insert hook, yarn over, pull through to get 3 grey loops on hook.
3. Yarn over again, pull grey yarn through only 2 of 3 loops.
4. Should only have 2 grey loops left on hook.

5. Pull pink yarn through 2 grey loops on hook.
6. Yarn over this time in pink, insert hook into the next stitch, yarn over, pull through to get 3 pink loops.
7. Yarn over, pull through 2 of 3 loops using pink yarn, yarn over again, pull through 2 remaining loops.

You have completed the double crochet colour change!
How to change colour in treble crochet?
A treble crochet stitch is slightly more complicated and definitely taller but the concepts of colour change are still the same if you see the steps carefully below:
1. Start off with yarn over 2 times in grey before inserting the hook.
2. Insert hook, yarn over, pull through to get 4 grey loops on hook.
3. Yarn over again, pull grey yarn through only 2 of 4 loops.
4. Then yarn over, pull grey yarn through 2 of 3 grey loops.

5. Should only have 2 grey loops left on hook.
6. Pull pink yarn through 2 grey loops on hook. You should have 1 pink loop left on hook.
7. Yarn over 2 times in pink this time, insert hook into the next stitch, yarn over, pull through to get 4 pink loops.

8. Yarn over, pull through 2 of 4 loops, then 2 of 3 loops.
9. You should have 2 pink loops left on the hook. Yarn over and pull through last 2 loops.

You have completed the treble crochet colour change!
Special situations
With sc, hdc, dc and tr colour changes completed, let us move onto some special situations for colour change, namely for a magic circle and for a foundation chain. There are many other examples also, like for bobble stitches, extended bobble stitches and for various types of crochet stitch decreases but here I have decided to list the most common 2 for simplicity.
How do I change the colour of a magic circle in crochet?
Before we get started, in case you have no idea what is a magic circle, which is super important to start off many types of amigurumi projects, then go check out this comprehensive article on '24 Easy Peasy things you need to know about Magic Ring in Crochet'. If you already know how to do a basic magic ring, then let's move on!
Magic ring crochet pattern with colour changes
Rnd 1: Magic ring (sc5 grey + sc5 pink) - 10st
Rnd 2: 2sc5 (grey), 2sc5 (pink) - 20st
The steps are as follows:
1. Start off with a magic ring in base grey coloured yarn.
2. Insert hook into the middle circle for total 4 times in grey. Then insert hook into big loop for the 5th time.
3. Pull through so that there are 2 grey loops on the hook.

4. Get new pink yarn ready further along the hook. Draw pink yarn through 2 grey loops.
5. Now continue to insert hook into big centre loop using pink yarn.
6. Then proceed onto sc1 with pink yarn, with the stray yarn tucked underneath.

7. Continue with single crochet total 5 times (sc5) in pink yarn after completing the initial sc5 in grey.
8. Pull on free grey yarn end taut to close up the loop (close up using the initial colour).
9. Final magic ring is made of sc5 in grey and then sc5 pink, with total 10st.

I hope this helps with clarifying any confusion about colour changes in the inital magic ring!
How do you change the colour of chaining?
I love doing colour changes in foundation chains, especially if they are alternating to create a quick colourful band! I often use this to pair up with amigurumi as their mini scarfs! You could always start off with this foundation chain and continue the colour changes into the 2nd row and subsequent rows as well. If you are not sure how to do a foundation chain, check out this article.
Foundation chain crochet pattern with colour changes
Row 1: Ch1 (grey), ch1 (pink), ch1 (grey), ch1 (pink), ch1 (grey), ch1 (pink), ch1 (grey), ch1 (pink), ch1 (grey), ch1 (pink), ch1 (grey), ch1 (pink), ch1 (grey), ch1 (pink), ch1 (grey), ch1 (pink)
The steps are as follows below:
1. Start with a slip knot in grey.
2. Place pink yarn further along the hook, while still keeping the hook inside the grey slip knot.
3. Draw pink yarn through grey loop on hook.

4. Keep the hook inside the pink loop.
5. Yarn over the grey yarn and pull through pink loop on hook.
6. Pull the ball end of the pink yarn to tighten the stitches.
7. Draw pink yarn through grey loop.
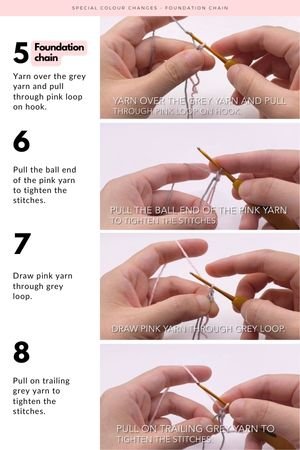
8. Pull on trailing grey yarn to tighten the stitches again.
9. Continue switching back and forth grey and pink yarn and pull through loop on hook.
10. Repeat the alternating process. Remember to pull the trailing grey and pink yarn to tighten the stitches along the way.

You have completed the foundation change colour change!
Conceal colour changes
Colour change concealment is probably something pretty unique to amigurumi. The outside of the project often looks pretty and neat but then when you flip it to the inside, you might sometimes see a mess of criss crossing colourful yarn (that's how my projects look!). So different crocheters employ different techniques for covering up the colour changes so that they are not apparent on the outside.
The methods are any 3 of the following, and I sometimes do use them interchangeably - seamless colour change, cut yarn and finally carry yarn. I will go through all these individually below, in relation to the pattern below.
Hemisphere crochet pattern with colour changes
Rnd 1: Magic ring sc10 (grey) - 10st
Rnd 2: 2sc10 (grey) - 20st
Rnd 3: Sc20 (grey) - 20st
Rnd 4: (Sc1, 2sc1) x 10 (grey) - 30st
Rnd 5: Sc12 (grey), sc12 (pink), sc6 (grey) - 30st
How do you change the colour of your amigurumi seamlessly?
Changing colour seamlessly can also be called crocheting colour changes with floating yarn. This is the method I use the most, mostly because I am lazy and this is the most convenient method. But beware that it does not distort your amigurumi project on the outside, which is a common problem if you crochet the changes too tightly.
Follow the steps below for this method:
1. Final appearance with colour changes from grey to pink to grey.
2. Change from grey to pink yarn using standard single crochet method right at the top of this post.
3. Pull pink yarn through 2 grey loops.
4. Continue single crocheting next 12st in pink yarn.

5. Throughout the initial 2 yarn strands are free floating.
6. Then get ready to switch back to grey yarn from pink yarn.
7. Pull across the trailing grey yarn.

8. Grab grey yarn with hook and pull through 2 pink loop.s
9. Here when you flip to the inside of the hemisphere, you can see the floating yarn behind.
10. Finish crocheting rest of round with sc6 more grey stitches.

You have completed the colour change while using floating yarn to conceal the colour changes!
Do you cut yarn when changing colours crochet?
This method involves cutting off the yarn every time you change colour. This leaves a lot of stray yarns inside the amigurumi, which have to be tied off at each colour junction.
The useful reasons to use this method would be there will be the least amount of amigurumi shape distortion with this method, less so than for the other 2 methods.
The steps are below:
1. Final appearance with colour changes from grey to pink to grey.
2. Pull pink yarn through 2 grey loops.
3. Complete first single crochet in pink yarn.
4. Leave initial pink and grey yarn free.
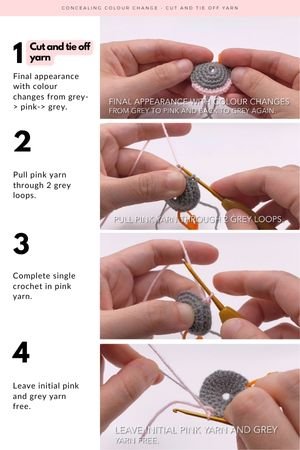
5. Continue crocheting pink yarn for another 12st.
6. Completed pink part before switching back to grey.
7. Cut off initial grey yarn to tie off, going to switch back to grey again soon.

8. You should be able to see the free pink and grey yarn strands.
9. Tie pink and grey yarn together to secure their positions.
10. Use new grey yarn again and pull through 2 pink loops.

Cut and tie off yarn to conceal colour changes!
How to carry yarn when changing colours in crochet?
This process involves tucking the floating yarn inside the working crochet stitches. The floating yarn is not present because it is tucked underneath the pink crochet stitches.
Using this method allows for the inside of the amigurumi to look very neat or can be employed in certain situations where both sides need to be exposed. The down side however, is that it can cause the individual crochet stitches to become bigger and poufier.
Here are the steps:
1. Final appearance with colour changes from grey to pink to grey.
2. Pull pink yarn through 2 grey loops.
3. Continue single crocheting next 12st in pink.
4. Place grey yarn just above the hook.

5. Yarn over using pink yarn, draw through, yarn over, draw through 2 pink loops.
6. Make sure grey yarn is tucked underneath the pink stitches.
7. Continue placing grey yarn on top of hook and crocheting over it with pink yarn.

8. There is no stray yarn, which makes this a very neat method.
9. Change back to grey yarn by pulling grey yarn through 2 pink loops and then single crochet.
10. Continue with sc6 in grey. This time with pink loop on top of hook.
11. Continue crocheting with grey yarn and carrying the hidden pink yarn along.

Carry yarn along to conceal colour changes!
Conclusion of colour changes in crochet
There you have it - 12 Nifty Types of Colour Changes in Amigurumi Crochet. They include crochet colour changes in a round, in the middle of a row, at the end of a row, in single crochet stitches and taller stitches, then in special situations like a magic ring or in a chain. Finally I talked about concealing the colour changes when crocheting in a round for amigurumi projects. If you found this useful, please remember to share it or pin this to Pinterest!
Also, grab this blog post article in PDF format below and get the step by step instructions neatly inside a booklet! Remember to share this page if you found it useful!
Struggling with messy colour changes?
Learn how to switch colours cleanly (without jagged edges or obvious joins) with this simple amigurumi starter guide. Click here or on the image on the left.