

7 Useful Ways on How to Make Amigurumi Neater?

Amigurumi crocheters know the importance of making their crochet pieces neat and uniform. Crochet projects are usually handmade, making sure that they look neat and attractive makes part of the crocheting process enjoyable.
Whether you are a crocheter just starting out with amigurumi or a seasoned amigurumi crocheter, you must be wondering how to make my amigurumi neater or how can I make my amigurumi better? Or on the flip side, perhaps you wonder why is my amigurumi uneven?
Here I will be going through 7 ways to make your amigurumi neater! Along the way, I will also include commonly asked questions and the answers to them and how they can make your amis neater.
Table of Contents Show
1. Is it better to crochet tight or loose? Why does my crochet curl?
Even tension throughout your crochet projects with no gaps can make your crochet look really neat. When you have a yarn that is too loose, you may notice that your crochet may be uneven.
On the other hand, when you are crocheting too tightly, the more curl you will get. Crocheters use something called a stitch gauge to help with standardizing the tension.
Stitch gauge shows how many stitches there are per inch of finished fabric. It measures both the width and height of your stitches when you are crocheting, and it determines how tight or loose your crocheted stitch pattern should be.
Oftentimes, gauge is especially important for certain crochet projects like garments. Keeping to this for amigurumi, even though not particularly essential, it helps with making the final ami neater.
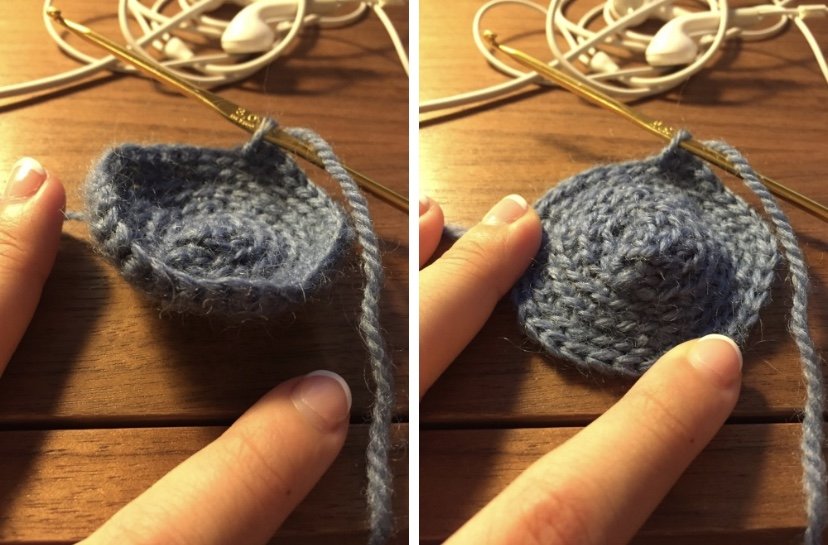
2. Why is my amigurumi circle pointy?
When you first start off your amigurumi in a spiral, assuming you are working from top down, there are various ways to do this and depending on which way you choose to do so, sometimes you might find your ami pointy.
The first way to prevent your amigurumi circle from being pointy is to use a wider starting round, for example instead of starting off with a magic ring of sc3, try using a magic ring of sc6. You will find that the circle or round will be flatter.
The second way to work around the pointiness is to always start an amigurumi round with a magic ring over using chain 2 and single crochet, even the latter method is much easier to pick up.
By starting off with a magic ring and a larger round with more stitches, you can make the beginnings of your amigurumi look neater and more polished.
3. Are you supposed to turn amigurumi inside out? Are you supposed to flip amigurumi?
Amigurumi is usually done with the right side facing outward and wrong side facing inward. Generally, whether you choose to work with the right side facing out or the wrong side is just a personal choice but generally most patterns involve the former. Using the latter instead sometimes causes a more fuzzy appearance on the outside which may be the desired effect.
As for determining which side is the right side and which side is the wrong one, there are a few ways to do this. The easiest method is the find the 'V' stitches versus the 'n' stitches, the 'V-'shaped ones are on the right side, which the small 'n-'shaped ones are on the wrong side.
Next, look for the position of the starting free end of yarn, it usually ends up on the inside of the amigurumi or on the wrong side. At the end of completing the amigurumi, you should not be able to see it.
Finally, when you are on the right side, you should technically be crocheting in a clockwise direction and the reverse is true for the the wrong side.
Crocheting the amigurumi in the right direction with the with right side facing outwards and the left side facing inwards helps create neater stitches on the outside and the fuzzy appearance of the wrong side will be hidden on the inside of the amigurumi.


💡 Want to learn all the basics of crocheting amigurumi in one place?
Grab my free 77-page Amigurumi Foundation eBook — your complete step-by-step guide to mastering tools, stitches, and beginner toy techniques (normally $17!).
4. How do you do invisible colour change in amigurumi?
When doing colour changes in amigurumi, it can create a jagged effect where it is obvious where the colour change is, this can be specifically more apparent when crocheting continuously in a round or when doing stripes.
When done properly, colour changes can be seamless and make the amigurumi look neater. As for how to do a basic colour change when crocheting, follow the tutorial in this blog post.
For creating the invisible colour change appearance, it is more important if the colour changes involve the full round, so for example, if there are multiple colour changes in the same round, this might not be so important.
There are many different ways to do colour changes in amigurumi, you use the single crochet method, slip stitch with 1 loop method, slip stitch with 2 loops method and the completed slip stitch method.
Not to mention the different scenarios in colour changes, like in a row, in a round, in a magic ring, at the end of a row. Basically that is too much to cover here, I even created a while Amigurumi Colour Change course on it!

5. How do you fix gaps in amigurumi?
To make your final amigurumi more polished and professional, try fixing big gaps in the amigurumi. Firstly, use tighter tension to minimize gaps, which can be achieved by considering going down one size for the crochet hook. Like I mentioned earlier about using even tension with a relevant gauge, also make sure the tension is not too tight that it causes curling.
Next up, stuff adequately inside the amigurumi and not excessively because the stuffing will show through the gaps. Try inserting the stuffing little by little until sufficient is inside so as to minimize excessive stuffing.
Finally, use the invisible decrease technique when reducing the size of the rounds instead of just regular single crochet decrease. This considerably decreases the gaps you can see in the amigurumi as well.

6. How do you weave in the ends of amigurumi and fasten off?
After you have closed up the amigurumi at the base (or even at the top), the next step will be to weave in the stray ends and conceal them within the amigurumi, which is something you don't have to do with other forms of crochet.
Using a darning needle and some scissors, thread the remaining stray yarn through a few stitches to anchor it down. Then draw out multiple stray yarn ends through same hole and tie a dead knot with them, cut it off and use the scissors to push the knots into the amigurumi itself.
Remember all stray yarn at the ends should be tied up and tucked inside the amigurumi so that you get a nice neat polished amigurumi at the end!

7. How do you secure amigurumi parts? How do I join amigurumi pieces together?
There are multiple ways to join up amigurumi pieces and secure them together. The most common way is by sewing, using a darning needle and yarn, and treating the yarn like it is sewing thread.
To join two pieces together, thread the needle with a few inches of yarn, then pull the needle through one of the pieces at the edge that you want to attach. Bring the needle back through the same hole, but on the other side. Repeat this until you have covered the whole length of the seam. To fasten off, you will need to bring the needle out of the last stitch, leaving a tail. When not done properly, sewing can sometimes lead to amigurumi pieces that pull apart and detach.
My preferred methods are by using seamless crocheting and surface crocheting which does not involve any assembly or sewing work. The reason for this is because these methods allows for better attachment and symmetrical work, which allows for the final amigurumi to appear neater.
Seamless crocheting basically refers to crocheting out from the main amigurumi body in a continuous round so that there is no subsequent sewing attachment needed.
Surface crocheting on the other hand, involves using a new set of yarn to crochet on another separate surface, whether it be a full or partial amigurumi body, or even an incomplete piece.
There is a lot to cover here about those methods, which are extensively explored in my Amigurumi Shaping Toolbox.

Conclusion
So as you can see, there are these 7 ways to make your amigurumi neater, which includes crochet with even tension, prevent pointy amigurumi by starting with a larger round, flip right side of amigurumi outwards, use invisible colour changes, fix gaps inside amigurumi, weave in the ends neatly and secure the amigurumi attachments tightly. Then you can achieve a neater, more polished and more professional amigurumi at the end!
If you want to try achieve all these with step by step pictorial tutorial instructions and video examples, remember to stay tuned for something coming really soon!
Whether you are a new crocheter and want to get started on amigurumis, or you are pretty seasoned crocheter and you want to improve your foundational techniques, there is definitely something useful for you!
💡 Want to learn all the basics of crocheting amigurumi in one place?
Grab my free 77-page Amigurumi Foundation eBook — your complete step-by-step guide to mastering tools, stitches, and beginner toy techniques (normally $17!).