

How do you Crochet Different Shapes in Amigurumi?
Crocheting involves creating various shapes to achieve different outcomes, 2D shapes like circles can be made into doilies or rectangles made into blankets. As for amigurumi, it often involves creating various 3D shapes, for instance spheres and cylinders instead. If you crochet already and want to have a hand at amigurumi, consider your mindset shift from creating some of these 2D shapes to 3D shapes.
If you are wondering how to crochet different shapes in amigurumi, we will start with basic flat 2D shapes first and then move onto their corresponding 3D figures and the categories will be as follows for easier reference:
Types of Shapes - 2D Shapes | 3D Shapes
Circle | Sphere, Cylinder
Oval | Ovoid
Triangle | Cone, Pyramid
Square | Cube
Rectangle | Cuboid
Table of Contents Show

Let us break it down into 5 sections, each corresponding to the initial base flat shape. First, we start off with the circle, sphere and cylinder. For each shape, there are step by step pictorial tutorials and an accompanying video as well.
Circle | Sphere | Cylinder
For this section, which is one of the fundamentals of making amigurumi, we will be exploring how to crochet circles, spheres and cylinders. Spheres are often made into heads and cylinders made into bodies.
1.1) How to crochet a Circle?
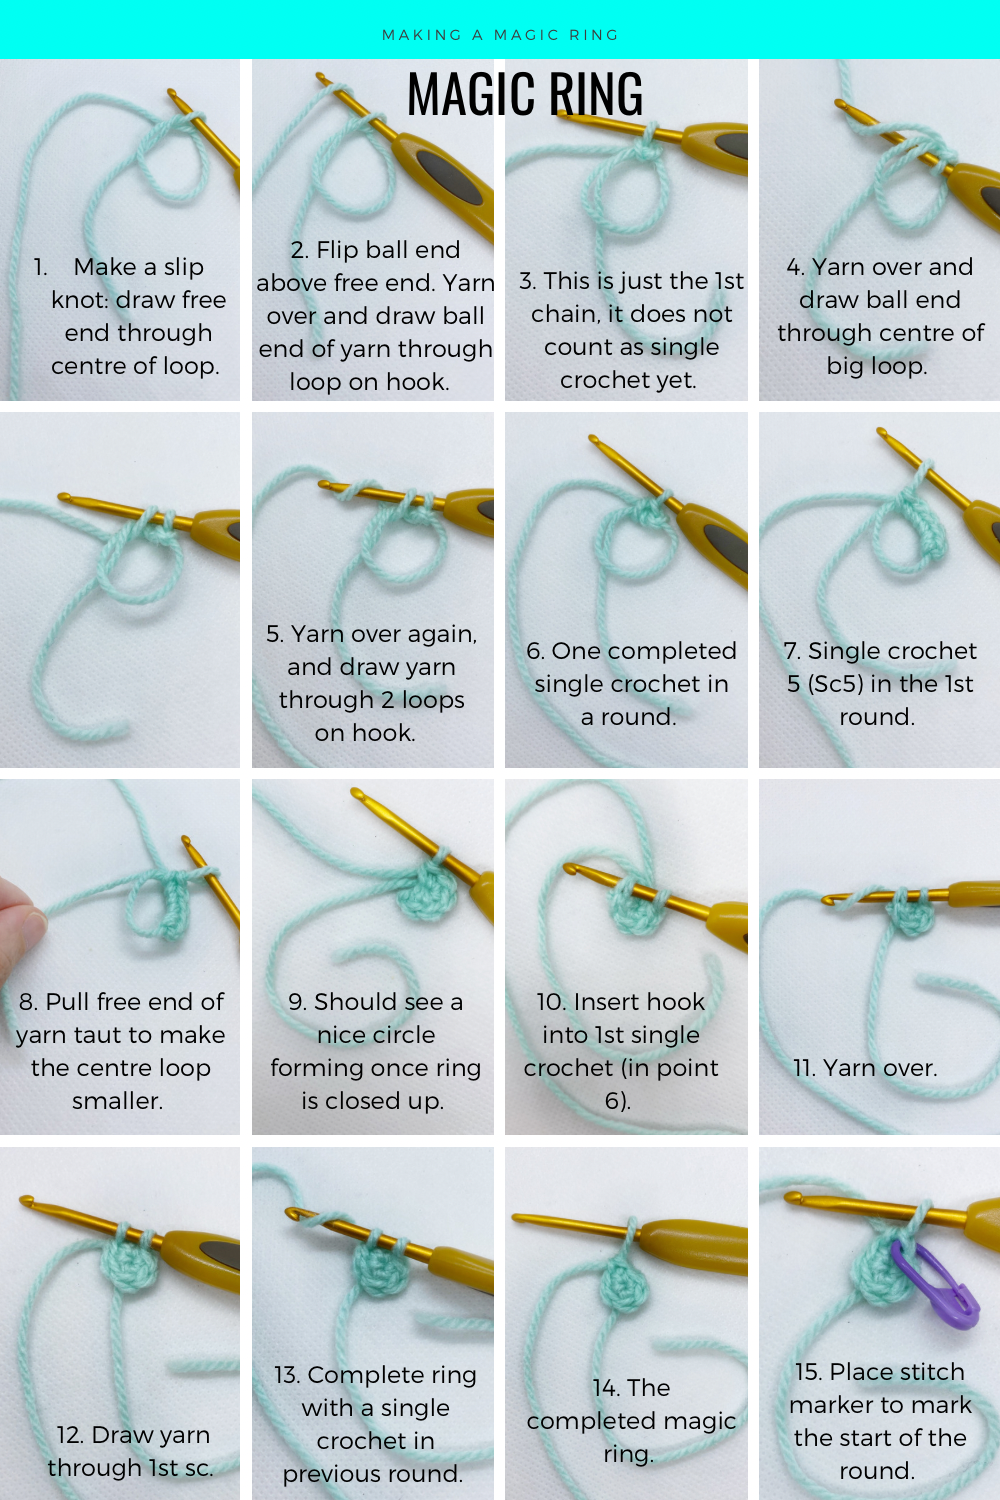
There are 2 ways I mentioned here that can be used to crochet a circle. The easier method is to use chain 2 and single crochet (2nd method below) but using that method might be a common reason for the amigurumi becoming too pointy at the beginning. My preferred method is to use the magic ring which also closes up the hole in the middle nicely.
1.1.1) Using magic ring to make a circle
The magic ring or magic circle or adjustable ring is one of the basic crochet stitches used in amigurumi and is the backbone of the pattern. For more information on how to get started with amigurumi in 8 simple steps, read more about it here. This is generally more difficult to master than the other basic crochet stitches and crocheters often have their own ways of creating this ring. See more in the video below for my method of making it! In this case, it is a magic ring of sc5.
Useful link to refer to:
🔍 Deep Dive: 24 Easy Peasy things you need to know about Magic Ring in Crochet »
1.1.2) Using chain 2 and single crochet to make a circle
This is the easier way to create a circle by starting with a chain 2 and then single crocheting into the 2nd chain from hook. However, this method tends to create a small hole in the centre of the amigurumi, while the magic ring closes up nicely. Also, like I mentioned before, using this method can create a pointy amigurumi head.

Useful link to refer to:
🔍 Deep Dive: 14 useful things you need to know about How to Crochet a Circle »
1.2) How to crochet a Sphere?
Let us move onto the 3D version of the circle, often used for amigurumi heads, which is the sphere. It starts off the same way, using a magic ring to form a circle. The pattern is as follows:
Round 1: Magic ring sc5 - 5st
Round 2: 2sc5 - 10st
Round 3: 2sc10 - 20st
Round 4: Sc20 - 20st
Add stuffing to the sphere.
Round 5: Sc2tog10 - 10st
Round 6: Sc2tog5 - 5st
Close up in FLO in last round.

Useful link to refer to:
🔍 Deep Dive: Mastering Crochet Balls: Step-by-Step Guide for Creating Perfect Spheres »
1.3) How to crochet a Cylinder?
Moving onto crocheting a cylinder which is the basis of many amigurumi bodies. In this case, to make the demarcation between the top lid and the sides more obvious, I decided to crochet into back loop only for round 3. After determining the length of cylinder you want, close up bottom by decreasing all around similarly in back loops only.
Round 1: Magic ring sc5 - 5st
Round 2: 2sc5 - 10st
Round 3: Sc10 BLO - 10st
Round 4: Sc10 - 10st
Round 5: Sc10 - 10st
(Continue until desired length of cylinder.)
Round 6: Sc2tog5 BLO - 5st
Close up in FLO in last round.

To see how to close up the cylinder, which is not shown in the video above, check out my updated video over here right below. It is part of my Shape Building Challenge.
Useful link to refer to:
🔍 Deep Dive: How to Crochet a Tube in 10 different useful styles »
This concludes the section for round shapes, with the basic circle made using 2 different methods and then progressing onto spheres and cylinders. Next up are the oval shapes.
Oval | Ovoid
This section will be talking about oval shapes and ovoid, with the latter being the 3D version. You could also similarly create a cylinder-like structure but this time with an oval for the base.
2.1) How to crochet an Oval?
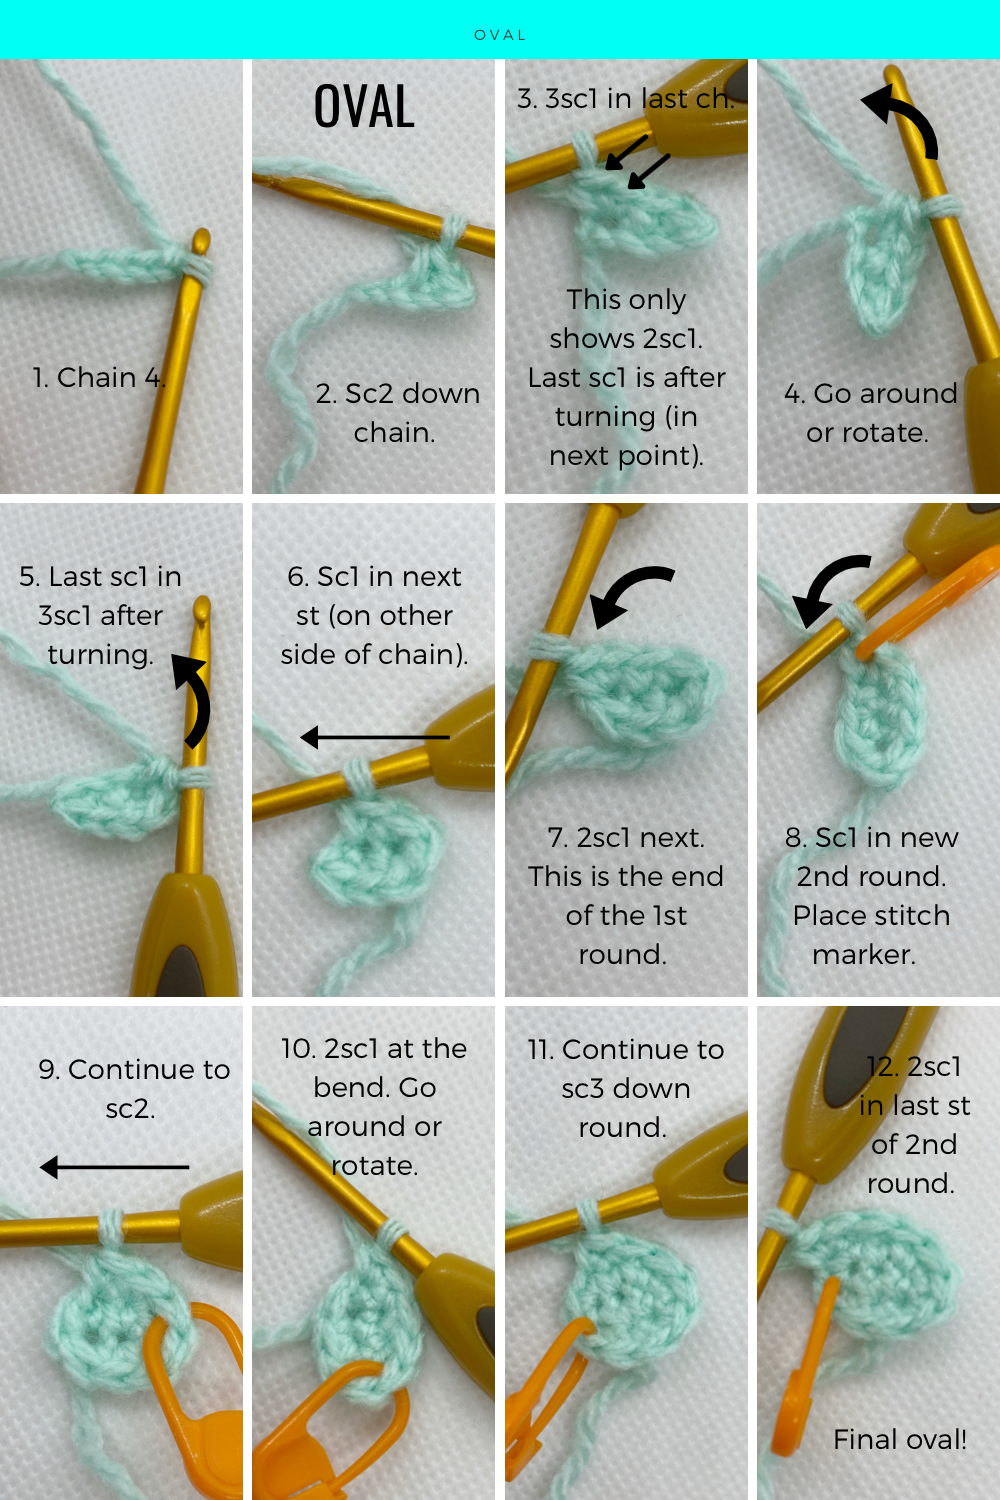
Ovals are a slight variation from making circles and based on the length of the initial foundation chain, you can vary the oval’s longitudinal length. I have used these shapes to create some unusual head shapes for amigurumi and even occasionally, certain parts of vehicles. Even for making air pod cases using yarn, I would start with this same shape! The oval pattern is as follows:
Round 1: Chain 4
Round 2: Starting from 2nd ch from hook, sc2, 3sc1 in same last ch, go around, turning as you go, sc1 on other side, 2sc1 - 8st
Round 3: Sc3, 2sc1 at bend, go around, turning as you go, sc3 on other side, 2sc1 - 10st
Useful link to refer to:
🔍 Deep Dive: 8 extraordinary ways on How to Crochet an Oval Pattern »
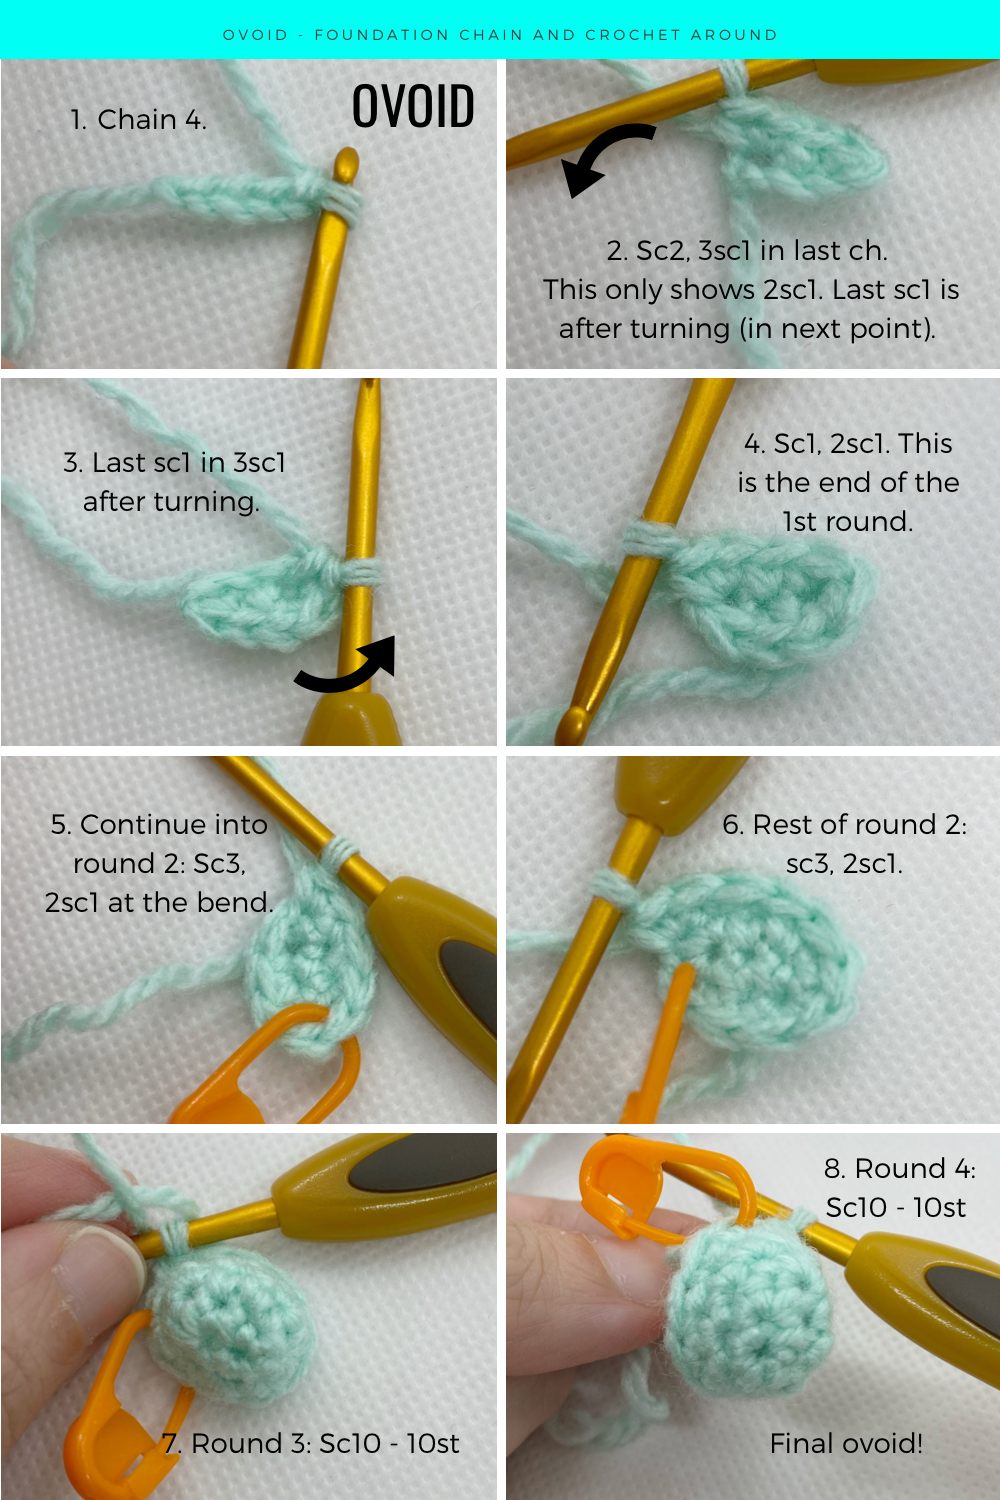
2.2) How to crochet an Ovoid?
An ovoid shape would be a 3D oval shape and can be used in unusual amigurumi body shapes or even in some of the vehicles I made in the past (like this AT-AT gyros and drive engine). It is similar to crocheting a sphere but with the base as an oval instead. In this example, I started the same way as the oval above but chose not to close up the base. Closing up the base is a bit trickier, you could do it by decreasing at the bottom or using a cluster stitch. See the following pattern:
Round 1: Chain 4
Round 2: Starting from 2nd ch from hook, sc2, 3sc1 in same last ch, go around, turning as you go, sc1 on other side, 2sc1 - 8st
Round 3: Sc3, 2sc1 at bend, go around, turning as you go, sc3 on other side, 2sc1 - 10st
Round 4: Sc10 - 10st
(Continue until desired height of ovoid.)
Round 5: Sc3tog1, sc2tog1, sc3tog1, sc2tog1 - 4st
Close up in FLO in last round.
To see how to finish up the whole ovoid (or oval ball), which is not shown in the video above, check out my updated video over here right below. It is part of my Shape Building Challenge.
Useful link to refer to:
🔍 Deep Dive: 8 extraordinary ways on How to Crochet an Oval Pattern »

Master the simple shapes behind every adorable toy — and start creating amigurumi your child will love.
Triangle | Cone | Pyramid
Here there are 3 ways I have to used crochet triangles, all with different effects at the end (I have some other tricks to making triangles but for simplicity here I will just include 3.) They include using decreasing crochet stitches, increasing crochet stitches and increasing stitch height. The 3D versions of the triangles that are included here are a cone and a pyramid.
3.1) How to crochet a Triangle?
Let’s start with the 3 methods to crochet a flat 2D triangle. I find the 3rd method creates the nicest and most regular looking triangle.
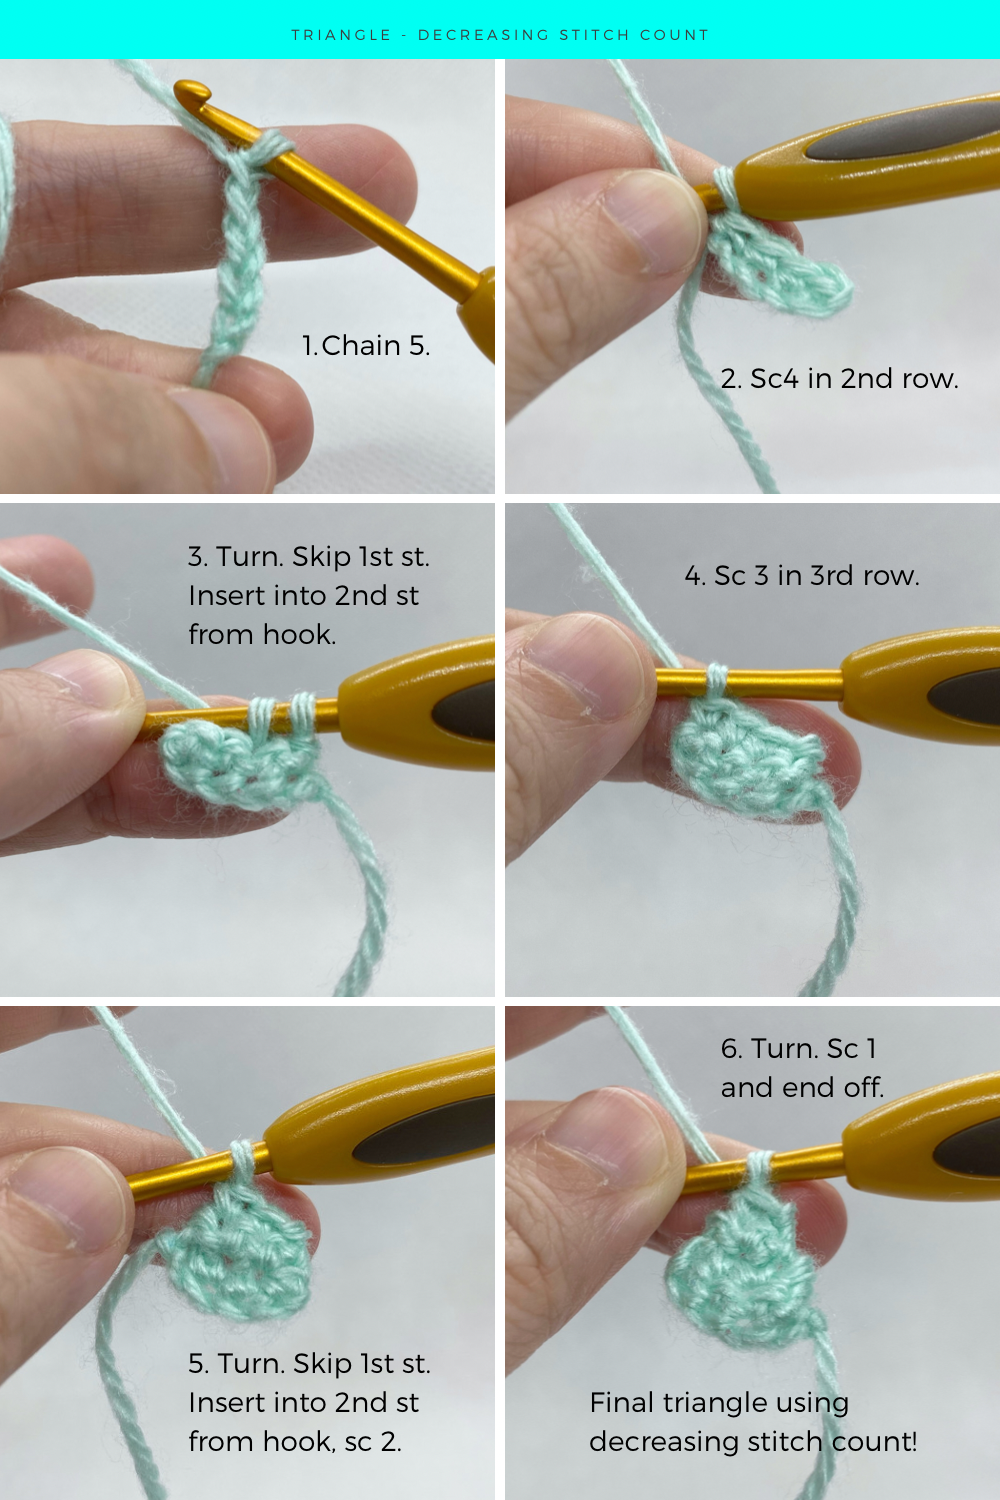
3.1.1) Using changes in stitch count to make a triangle - decreasing crochet stitches
The first method of crocheting a triangle involves using decreasing crochet stitches to start from a chain and then decreasing the length down. Do note that the chains and turns at the end of the rows do not add to the final stitch count. See the pattern that follows:
Row 1: Chain 5
Row 2: Working into 2nd ch from hook, sc4, turn - 4st
Row 3: Skip 1st st, sc3, turn - 3st
Row 4: Skip 1st st, sc2, turn - 2st
Row 5: Sc1 and end off - 1st
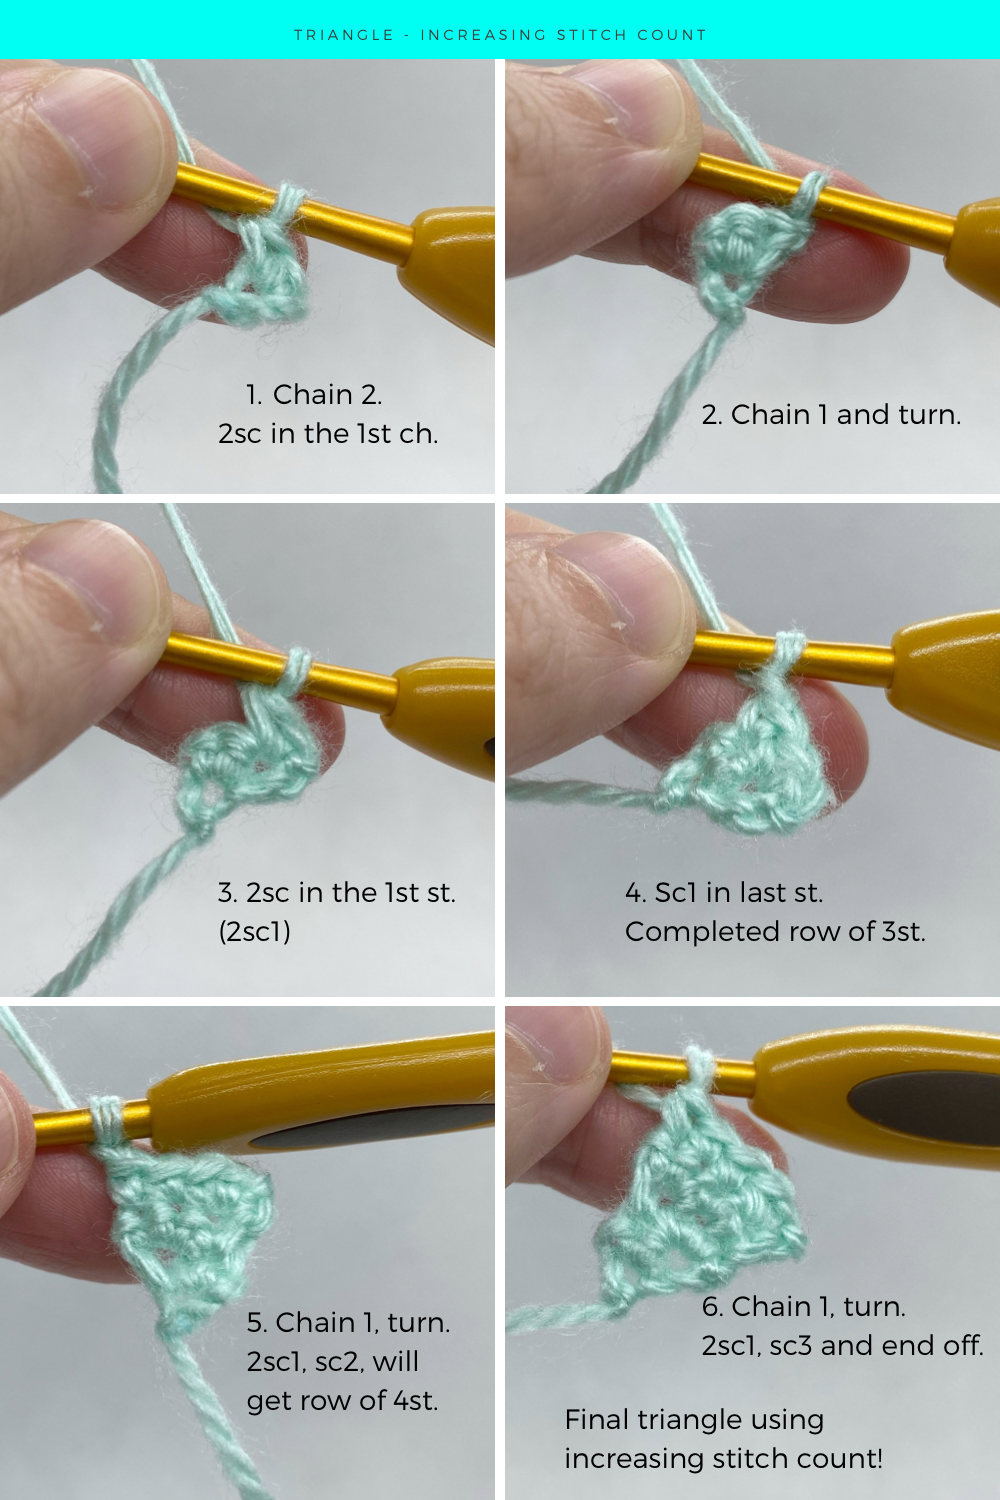
3.1.2) Using changes in stitch count to make a triangle - increasing crochet stitches
Then the second method involves starting from a short chain and increasing the length up. It looks pretty similar to the previous method to create a triangle. Often, these triangles can be made into ears for some animal amigurumi like making cats. The pattern is as follows:
Row 1: Chain 2
Row 2: 2sc1 into 2nd ch from hook, ch1 and turn - 2st
Row 3: 2sc1, sc1, ch1 and turn - 3st
Row 4: 2sc1, sc2, ch1 and turn - 4st
Row 5: 2sc1, sc3 and end off - 5st
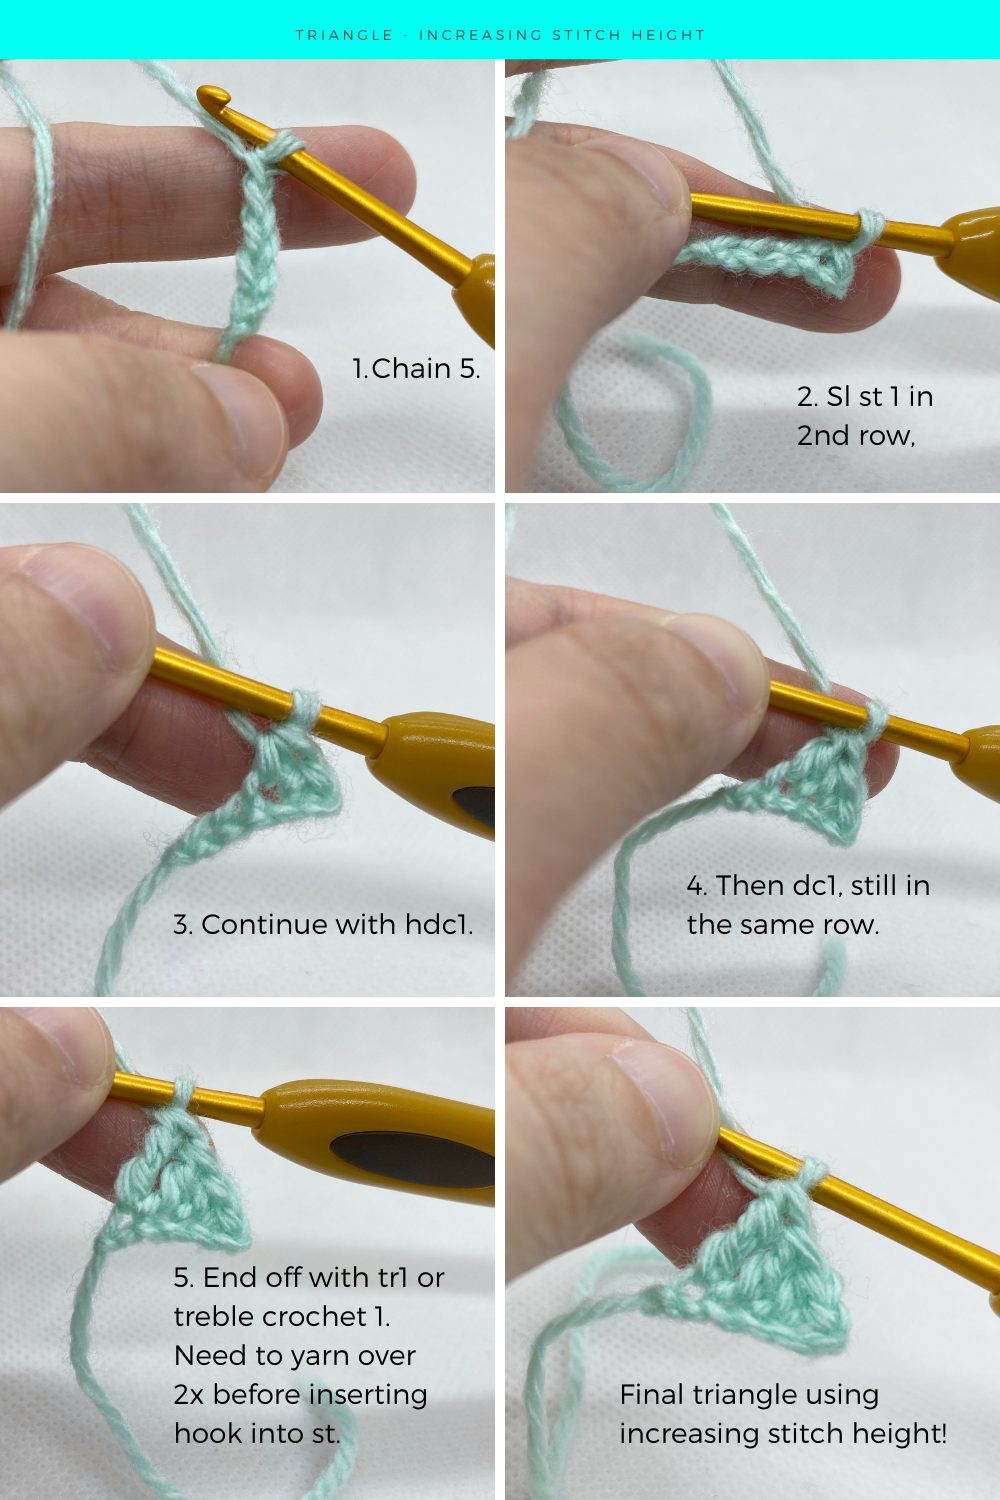
3.1.3) Using increases in stitch height to make a triangle
This last method is my favourite method for crocheting a triangle and it involves increasing the stitch height all along a chain. Using this method creates the nicest and most even looking triangle but the bigger it gets, the more obvious the gaps are in between the tall stitches. It is still great for creating smaller triangles. See the pattern below:
Row 1: Chain 5
Row 2: Sl st 1 in 2nd ch from hook, hdc1, dc1, tr1 - 4st
Useful link to refer to:
🔍 Deep Dive: 6 Super Easy ways on How to Crochet a Triangle Pattern »
3.2) How to crochet a Cone?
Naturally, the most common form of a 3D triangle used in amigurumi would have to be a cone. It can be made into a hat, snout or if it is extended and tapered, into a biconvex shape, which can be made into a head shape too. In this case, I have chosen to start with a chain and single crochet, instead of a magic ring, because it creates a more pointy effect. See more of what I mean in the pattern below:
Round 1: Chain 2, 3sc1 into 2nd ch from hook - 3st
Round 2: Sc2, 2sc1 - 4st
Round 3: Sc3, 2sc1 - 5st
Round 4: Sc4, 2sc1 - 6st
(Continue until desired height of ovoid.)
Round 5: Sc2tog3 BLO - 3st
Close up in FLO in last round.

Useful link to refer to:
🔍 Deep Dive: 9 Different Creative Exciting Ways for How to Crochet Cones »
3.3) How to crochet a Pyramid?
The next 3D triangular shape after the cone here is crocheting a pyramid. In this case, there are more steps involved and some sewing as well. To start off the pyramid, follow the same steps involved in making the triangle using the increasing stitch count method. The steps are as follows below:
Row 1: Chain 2
Row 2: 2sc1 into 2nd ch from hook, ch1 and turn - 2st
Row 3: 2sc1, sc1, ch1 and turn - 3st
Row 4: 2sc1, sc2, ch1 and turn - 4st
Row 5: 2sc1, sc3, ch1 and turn - 5st
Row 6: Sc5 FLO, ch1 and turn - 5st
Row 7-9: Sc5, ch1 and turn - 5st
Row 10: Sc5 FLO, turn - 5st
Row 11: Skip 1st st, sc4, turn - 4st
Row 12: Skip 1st st, sc3, turn - 3st
Row 13: Skip 1st st, sc2, turn - 2st
Row 14: Sc1 and end off - 1st
Using a new set of yarn, surface sc5 along side (not slants). Continue to use the same decreasing method as above, from rows 11-14 to create another triangle along the side. Repeat the same surface crocheting on the opposite side. You should get a symmetrical star-like appearance at the end.
With a square as a base, fold up the 4 triangles on each of the 4 sides, then sew them together along the slants of each triangle on either side. Add some stuffing before sewing up all sides using whipstitch method, to get your final pyramid!

Square | Cube
4.1) How to crochet a Square?
Let’s move onto making a flat 2D square, which can be used in making simple coasters, for my amigurumi, I have made them into mini capes. We will start off simple with a foundation chain and crocheting into rows, then end off with single crocheting all around 4 sides of the square. See the following pattern:
Row 1: Chain 5
Row 2: Sc4, ch1 and turn - 4st
Row 3-5: Repeat Row 2 - 4st
Turn and rotate whole piece, sc1 in last st, then place stitch marker here. Continue in rounds now, instead of rows.
Round 1: Sc1 in last st (as mentioned above), sc2 along side, 2sc1 in corner, turn and rotate, sc2 along bottom, 2sc1 in corner, turn and rotate, sc3 along side, turn and rotate, sc4 - 16st
The final completed square should have 16 st in the round, with the edges in all sides tidied up nicely.

Useful link to refer to:
🔍 Deep Dive: 10 Helpful Things you need to know about How to Crochet a Square »
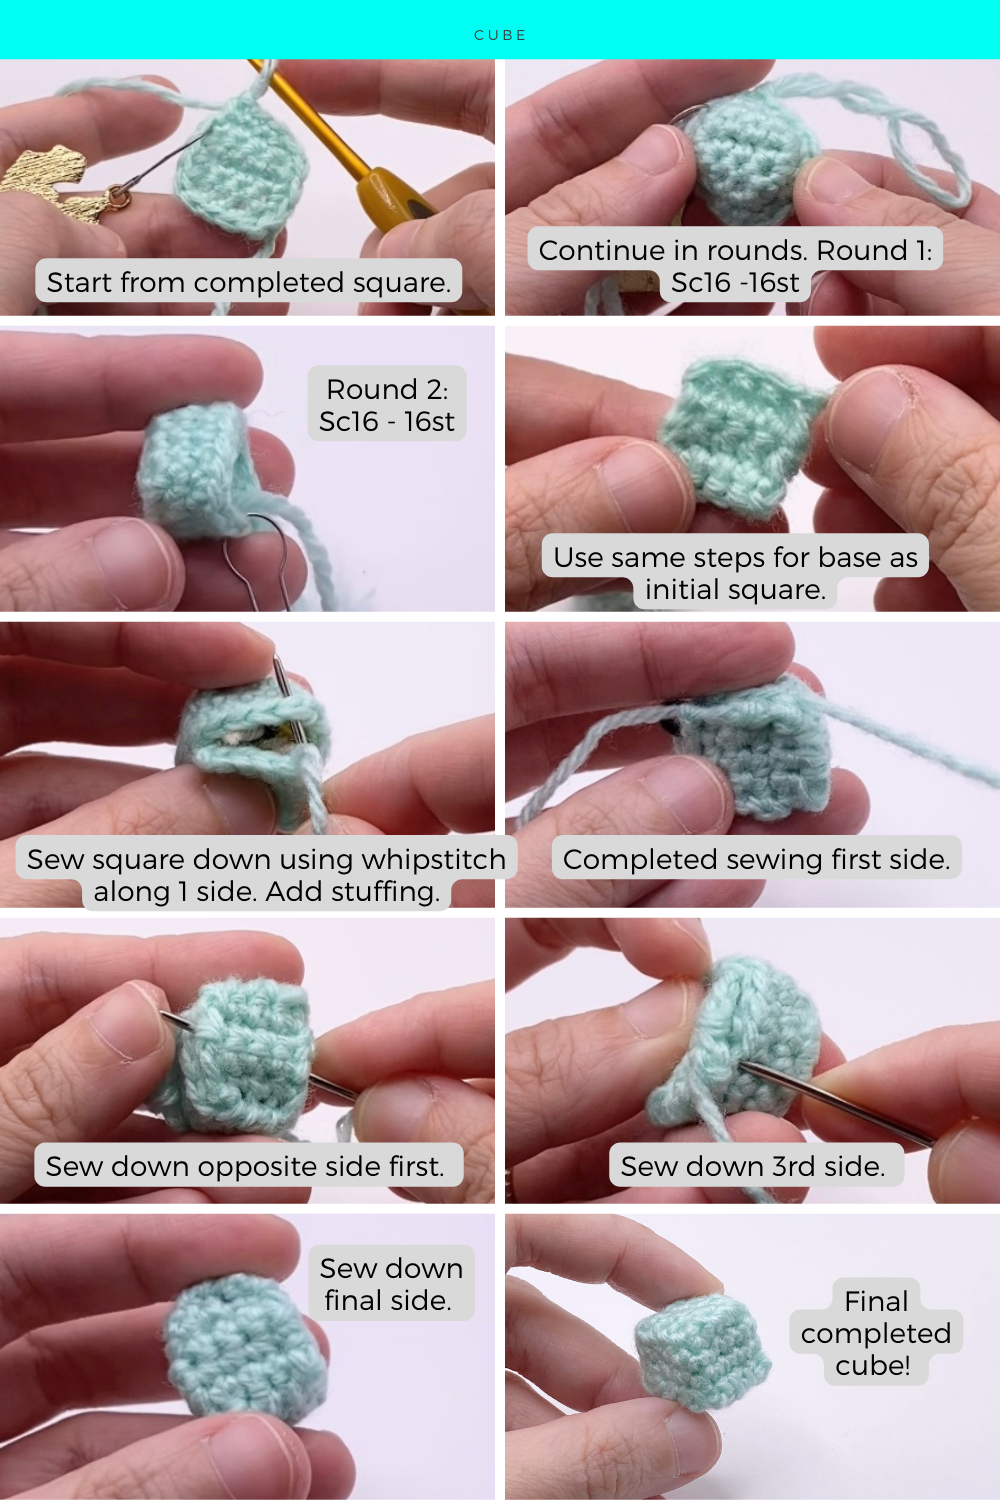
4.2) How to crochet a Cube?
The 3D version of a square would be a cube with all 6 sides being the same size as the square. We will similarly start off the same way as the square above, then continue into rounds and end off with the same square covering the last side. The pattern is as follows below:
Row 1: Chain 5
Row 2: Sc4, ch1 and turn - 4st
Row 3-5: Repeat Row 2 - 4st
Turn and rotate whole piece, sc1 in last st, then place stitch marker here. Continue in rounds now, instead of rows.
Round 1: Sc1 in last st (as mentioned above), sc2 along side, 2sc1 in corner, turn and rotate, sc2 along bottom, 2sc1 in corner, turn and rotate, sc3 along side, turn and rotate, sc4 - 16st
Round 2-3: Sc16 in a round - 16st
Using a separate new piece of yarn, create the same square again:
Row 1: Chain 5
Row 2: Sc4, ch1 and turn - 4st
Row 3-5: Repeat Row 2 - 4st
Add stuffing to the first piece that has 5 sides, then close up the last side with the second square piece by sewing them together using whipstitch. Use this method of crocheting a cube to make mini amigurumi presents or even amigurumi furniture.
Useful link to refer to:
🔍 Deep Dive: 9 Practical Things you need to know about How to Crochet a Cube »
Rectangle | Cuboid
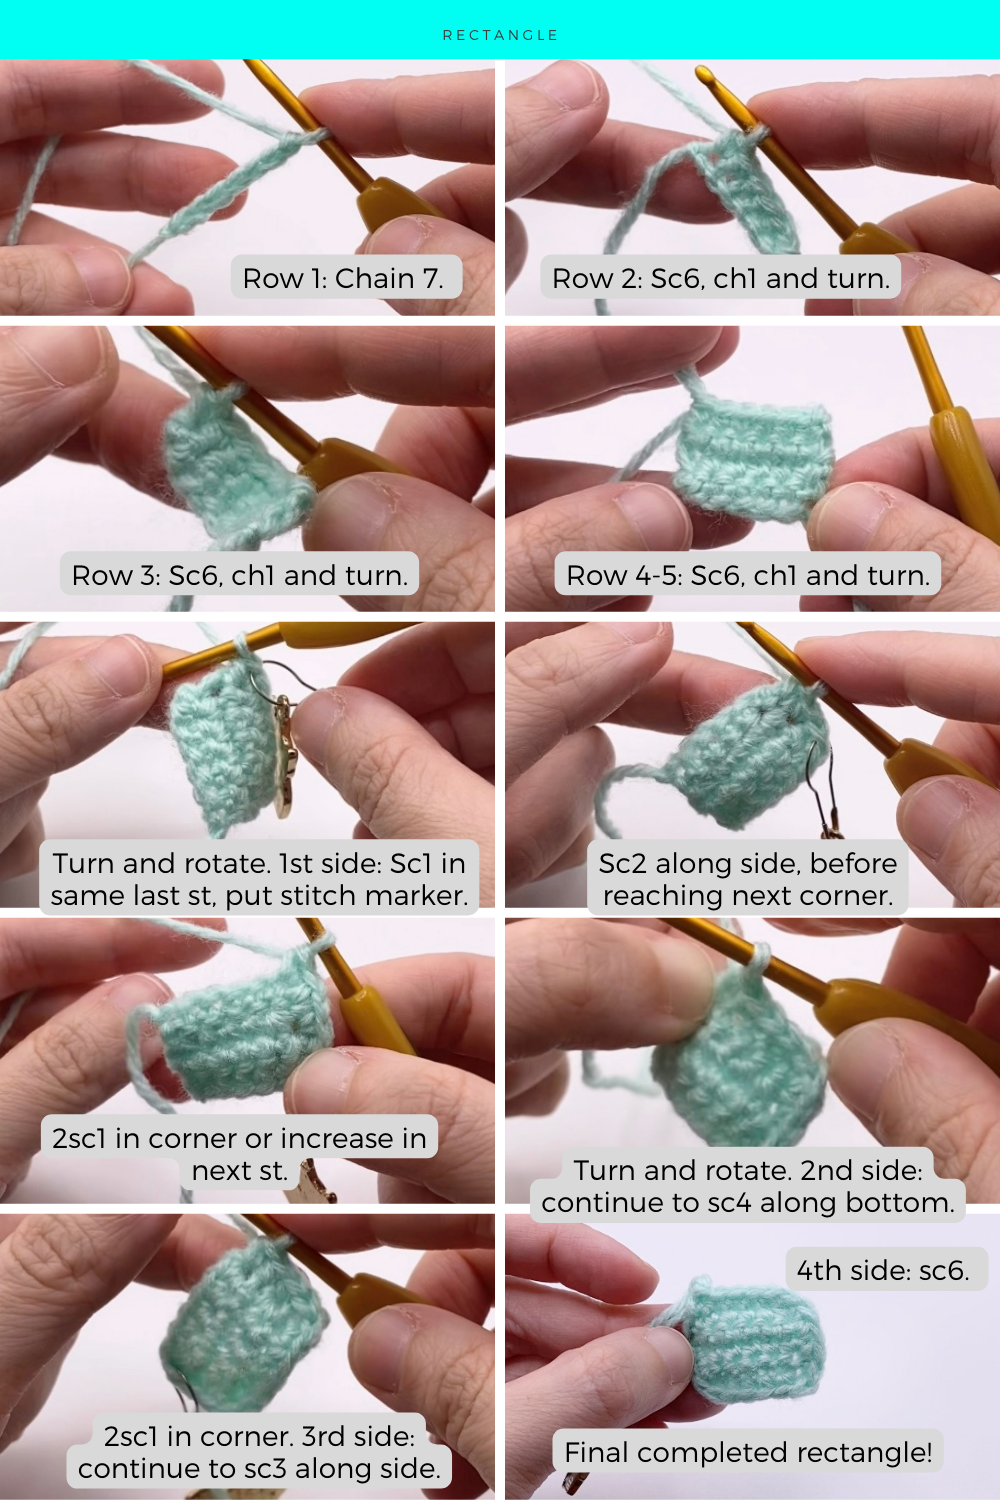
5.1) How to crochet a Rectangle?
Crocheting a rectangle is very similar to crocheting a square, just that the sides are uneven. This time I start off with a chain of 7 instead but the total number of rows are similar to the square pattern, before moving onto the rounds.
Row 1: Chain 7
Row 2: Sc6, ch1 and turn - 4st
Row 3-5: Repeat Row 2 - 4st
Turn and rotate whole piece, sc1 in last st, then place stitch marker here. Continue in rounds now, instead of rows.
Round 1: Sc1 in last st (as mentioned above), sc2 along side, 2sc1 in corner, turn and rotate, sc4 along bottom, 2sc1 in corner, turn and rotate, sc3 along side, turn and rotate, sc6 - 20st
The final completed rectangle should have 20 st in the round, with the edges in all sides tidied up nicely. I have used this method before to create capes for my amigurumi.
Useful link to refer to:
🔍 Deep Dive: 12 Actionable Techniques you need to know about How to Crochet a Rectangle »
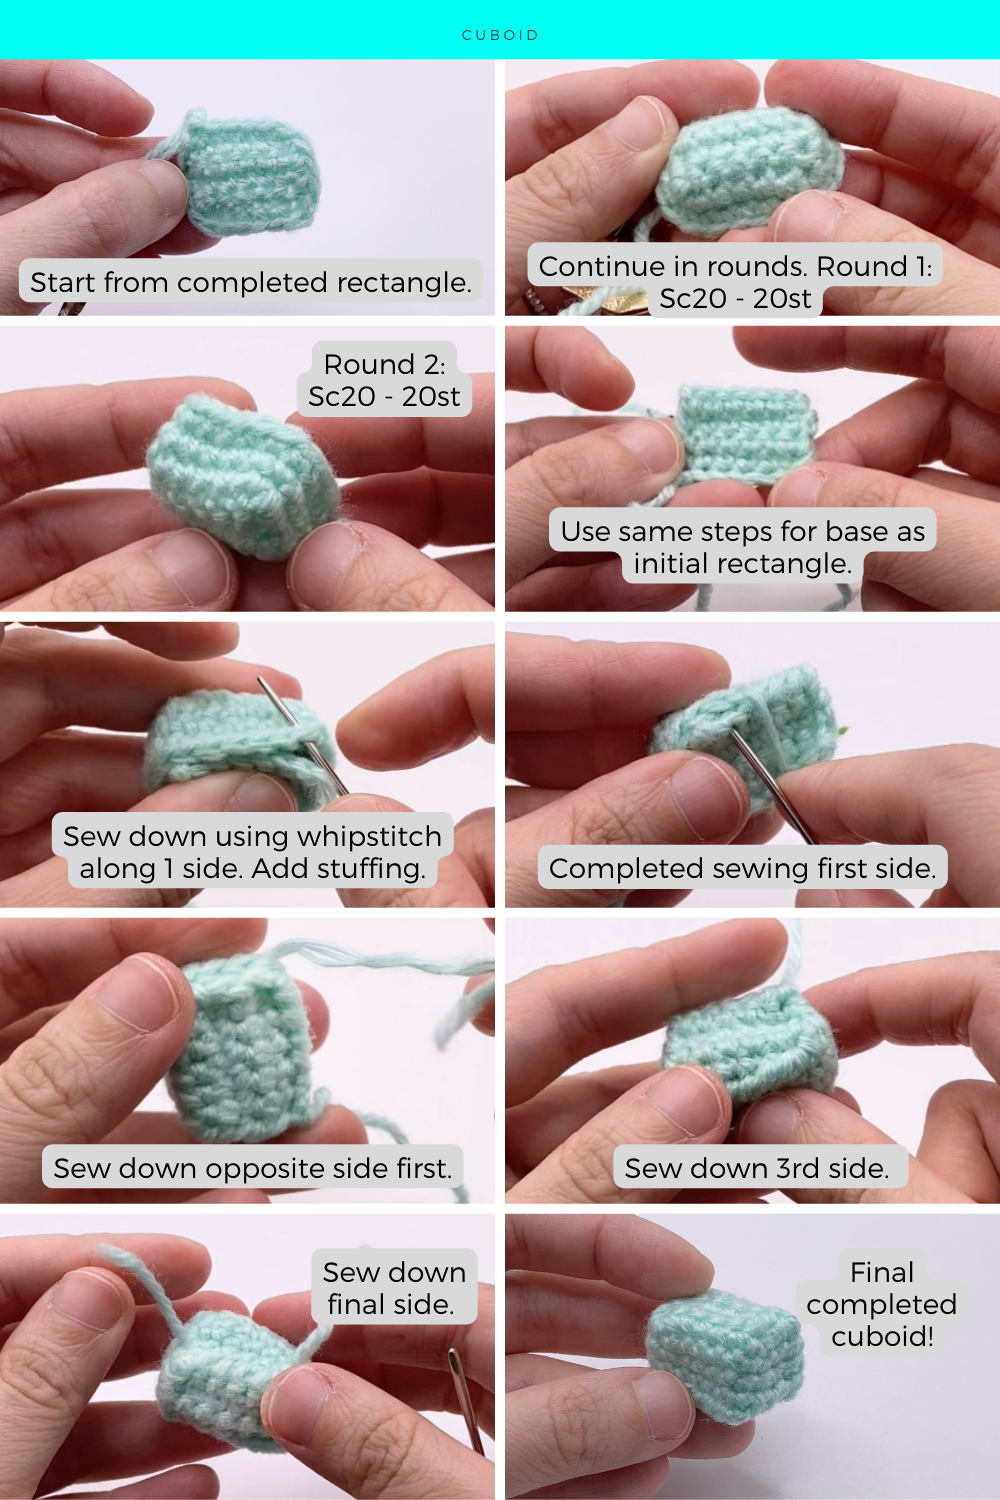
5.2) How to crochet a Cuboid?
Conversely, a 3D rectangle would mean a cuboid, with 4 sides being rectangular and longer and the last 2 opposite sides smaller like a square.
We will similarly start off the same way as the rectangle above, then continue into rounds and end off with the same rectangle covering the last side. The pattern is as follows:
Row 1: Chain 7
Row 2: Sc6, ch1 and turn - 4st
Row 3-5: Repeat Row 2 - 4st
Turn and rotate whole piece, sc1 in last st, then place stitch marker here. Continue in rounds now, instead of rows.
Round 1: Sc1 in last st (as mentioned above), sc2 along side, 2sc1 in corner, turn and rotate, sc4 along bottom, 2sc1 in corner, turn and rotate, sc3 along side, turn and rotate, sc6 - 20st
Round 2-3: Sc20 in a round - 20st
Using a separate new piece of yarn, create the same rectangle again:
Row 1: Chain 7
Row 2: Sc6, ch1 and turn - 4st
Row 3-5: Repeat Row 2 - 4st
Add stuffing to the first piece that has 5 sides, then close up the last side with the second rectangular piece by sewing them together using whipstitch. I have used this method to create a couch and a similar more long-winded version to create an ice cream truck.
Useful link to refer to:
🔍 Deep Dive: 12 Actionable Techniques you need to know about How to Crochet a Rectangle »
So here we have discussed how to crochet some basic 2D and 3D geometric shapes to create different kinds of amigurumi. From using spheres and cylinders for amigurumi bodies, to cones for ears or snouts, and then cubes or cuboids to create furniture or vehicles. These shapes make up the foundation to creating all kinds of amigurumi using your crochet hook and imagination!
If you would like to learn more detailed and elaborate shaping to add character to your amigurumi dolls, without spending hours testing and frogging, see more on amigurumi shaping in my free starter guide below, which you can download immediately! ->
Master the simple shapes behind every adorable toy — and start creating amigurumi your child will love.
What’s Next
🟠 Mastering Crochet Balls: Step-by-Step Guide for Creating Perfect Spheres »
Learn how to crochet smooth, consistent spheres — the foundation for heads, bodies, and round amigurumi shapes.
🟦 How to Crochet a Tube in 10 different useful styles »
Master cylindrical shapes used for arms, legs, bodies, antennae, and more.
🔺 9 Different Creative Exciting Ways for How to Crochet Cones »
Learn the shaping needed for snouts, hats, spikes, noses, and pointed features.