

How to Get Started with Amigurumi in 8 simple steps
With the simplest amigurumi doll head pattern, I will illustrate how to pick up the following 8 crocheting techniques that are essential to making Amigurumis. They include the following:
Magic ring
Single crochet
Increase in stitches
Colour change
Invisible decrease
Stuffing
Fastening off
Sewing eyes
In this guide, I will show how to crochet amigurumi for beginners step by step with pictures. For each section, I will review
how to read the pattern for that round,
step by step pictorial tutorial for learning the technique in that round
an accompanying gif to illustrate the steps in motion and
the final picture of how the amigurumi looks up to that stage.
Table of Contents Show
What do I need to start on Amigurumi?
There is an extensive list of supplies that can be obtained to make amigurumi but for the purposes of what we are going through here, we really only need the basics.
If you are just starting out crocheting or amigurumi, you only need a crochet hook, a darning needle and some yarn. For the purposes of this short pattern, you only need 2 colours. Get these ready:
3.0mm Crochet Hook
Darning needle
Acrylic 4 ply White yarn - 2.8 yards or 25g
Acrylic 4 ply Beige yarn - 2.8 yards or 25g
Paper Clip to mark start of rounds (in place of stitch markers before buying)
Recycled yarn or polyfill stuffing
Which corresponds to just tools 1, 2, 3 and maybe 4 and 5 below. See more about the rest of the equipment here if you are keen to do more elaborate crocheting.

What are the Crochet Terms for amigurumi?
We will start off with the breakdown of the crochet terminology specifically for amigurumi. Then I will showcase a short pattern first then break down each round individually with the technique involved.
St = stitch (refers to number of stitches in the round)
Sc = single crochet
2sc1 or inc = single crochet increase
Sc2tog1 = single crochet decrease
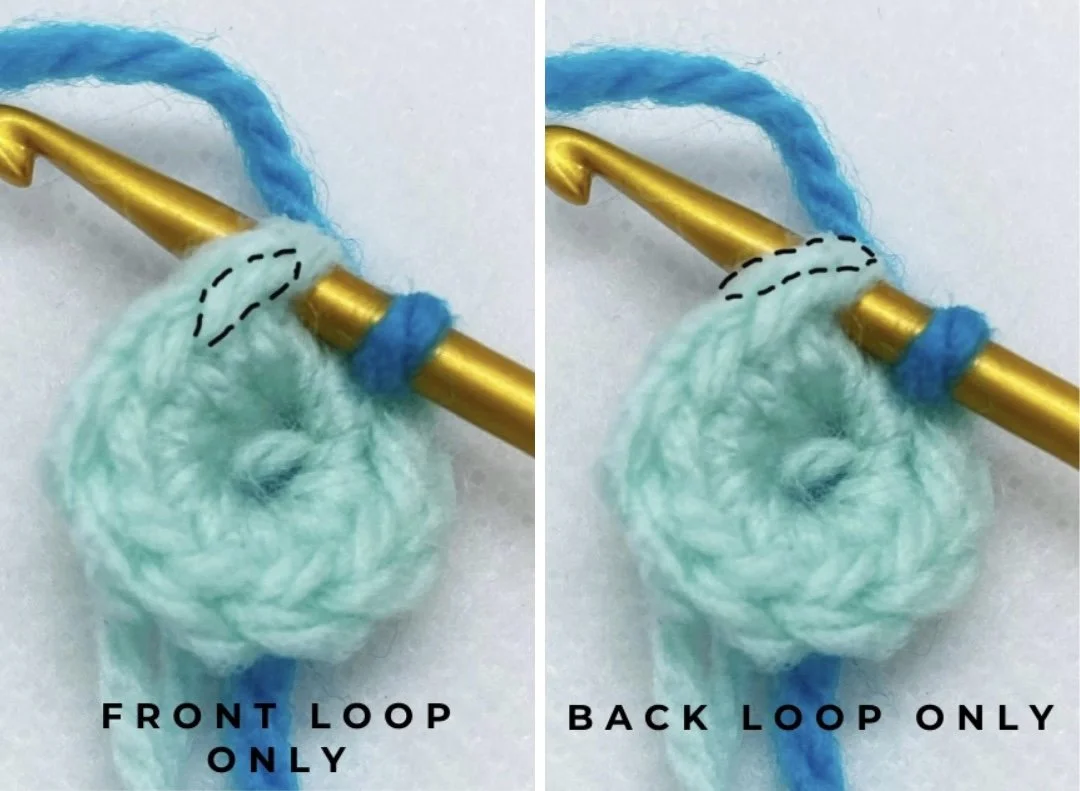
FLO = front loop only
BLO = back loop only
Some additional notes, for the purposes of my pattern, I tend to use 2sc1 as a reference to an increase compared to the usual inc abbreviation. Also, the sc2tog1 or the single crochet decrease refers to an invisible decrease, which I will explain more of later on.
What is a Simple Amigurumi Pattern to start off with?
Let’s talk about the crochet pattern first, here it is in its entirety, before we break it down round by round, with the relevant technique involved.
For maximum simplicity here, we will just make a spherical head as it is the fastest to make and is adequate enough to showcase all the basic 8 components of crocheting amigurumi.
Amigurumi Head Pattern
Start off with white yarn.
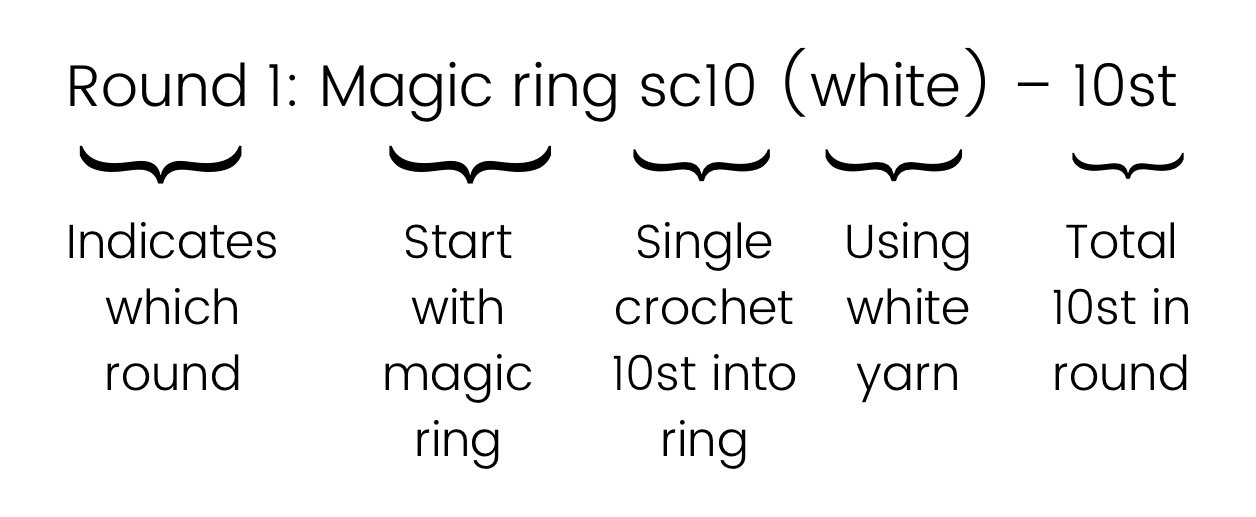
Round 1: Magic ring sc10 (white) – 10st
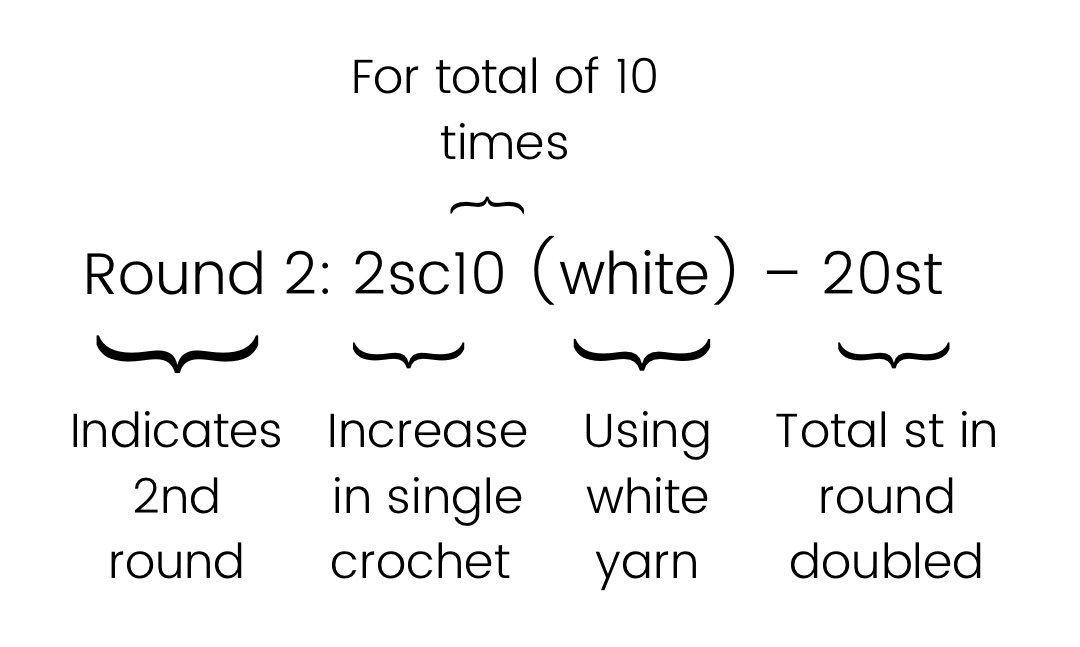
Round 2: 2sc10 (white) – 20st
Round 3: Sc20 (white) – 20st
Round 4: (Sc1, 2sc1) x 10 (white) – 30st
Get ready to change from white to beige yarn.
Round 5: Sc30 (beige) – 30st
Round 6: (Sc1, sc2tog1) x 10 (beige) – 20st
Round 7: Sc20 (beige) – 20st
Add stuffing to the head.
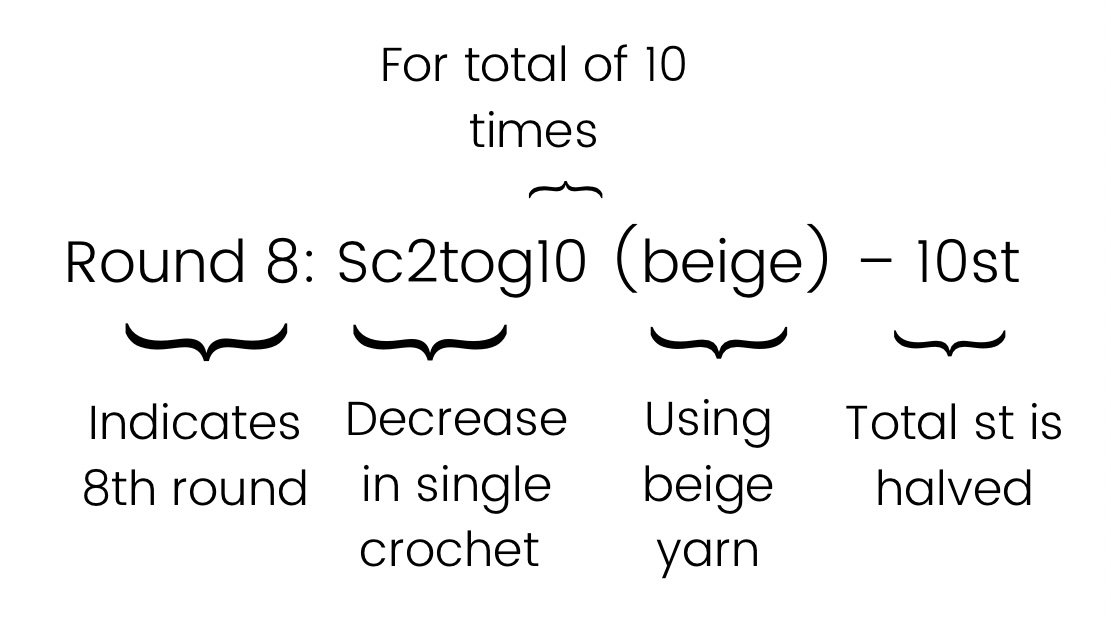
Round 8: Sc2tog10 (beige) – 10st
Round 9: Sc2tog5 (beige) – 5st
Close up in FLO, using beige yarn.
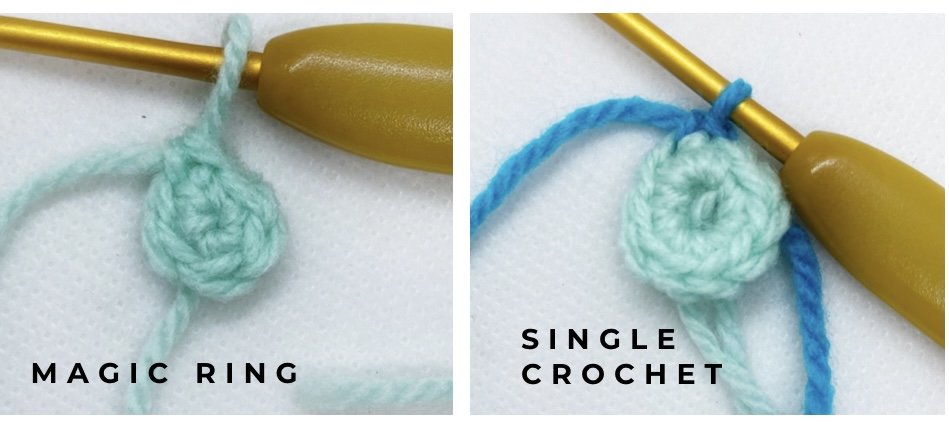
Step 1) How to start off with a Magic Ring?
Now that you have seen the full pattern, let’s move onto the steps in making a magic ring step by step by reviewing the first round.
Round 1: Magic ring sc10 (white) – 10st
See the breakdown of pattern below.


The steps involved in making a magic ring include the following, for right-handers:
Cross the free end of yarn over the ball end.
Pinch the ball end through loop.
Flip yarn on the left hand.
Hold down the pinched loop and insert hook into the loop.
Yarn over the hook and pull through to create a chain.

Then move onto the next section which is how to proceed to single crochet into the magic ring. After the first and second steps, check out the video summarizing both techniques if it is easier to follow.
Step 2) How to perform a Single Crochet in a round?
In Round 1, after the initial magic ring was made, single crochet of 10 stitches was made into the first round. The steps for single crocheting into the magic ring is also in the second part of the video below.


The steps involved in performing a single crochet into the magic ring include:
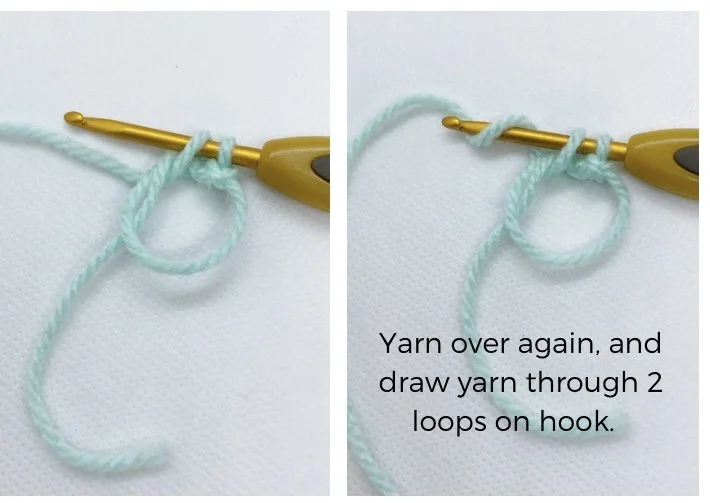
Insert hook into chain made earlier.
Yarn over and draw ball end of yarn through centre of the big loop, should get 2 loops on the hook.
Then proceed to yarn over again, and draw yarn through 2 loops on the hook.
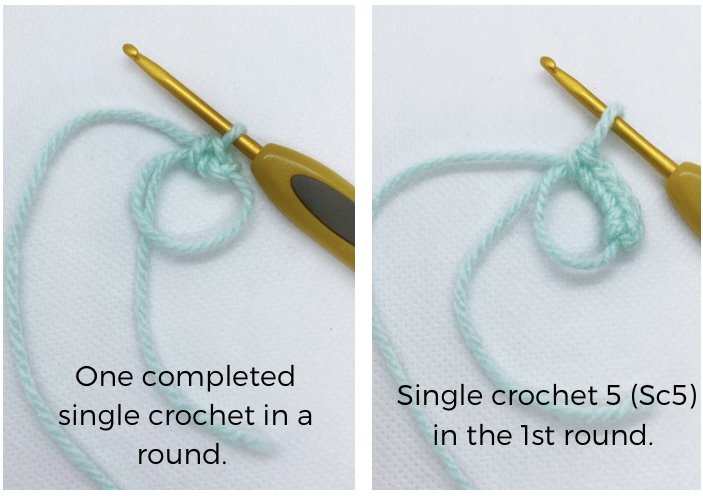
Continue to single crochet 10st in the round (in the pictures it only shows 5), so that you end up with 10st in total.
Pull free end of yarn taut to make the centre loop smaller.
Close up loop so that you end up with a nice circle at the end.
To see steps 1 and 2 involving how to make a magic ring and how to single crochet into the loop, see in the summary video below.
Crocheting magic ring
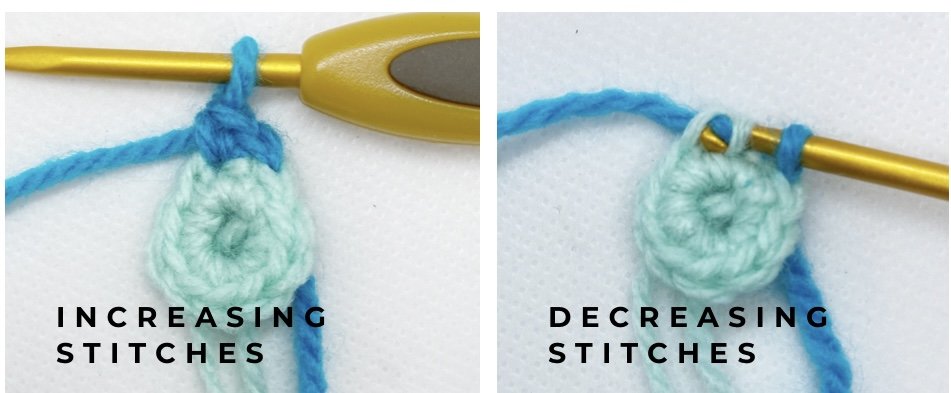
Step 3) How to Increase in crochet?
Increases in crochet in the same stitch results in longer or thicker stitches in crochet, while in amigurumi, it results in a wider round. Deciding to do an increase all around in one round, will make that round wider in circumference compared to the previous round.
In this case, completing Round 2 of the pattern below after finishing Round 1, will result in a flat circle.
Round 2: 2sc10 (white) – 20st
Or some patterns will be look more like this
Round 2: Inc all around (white) - 20st
See pattern breakdown next for what it means.
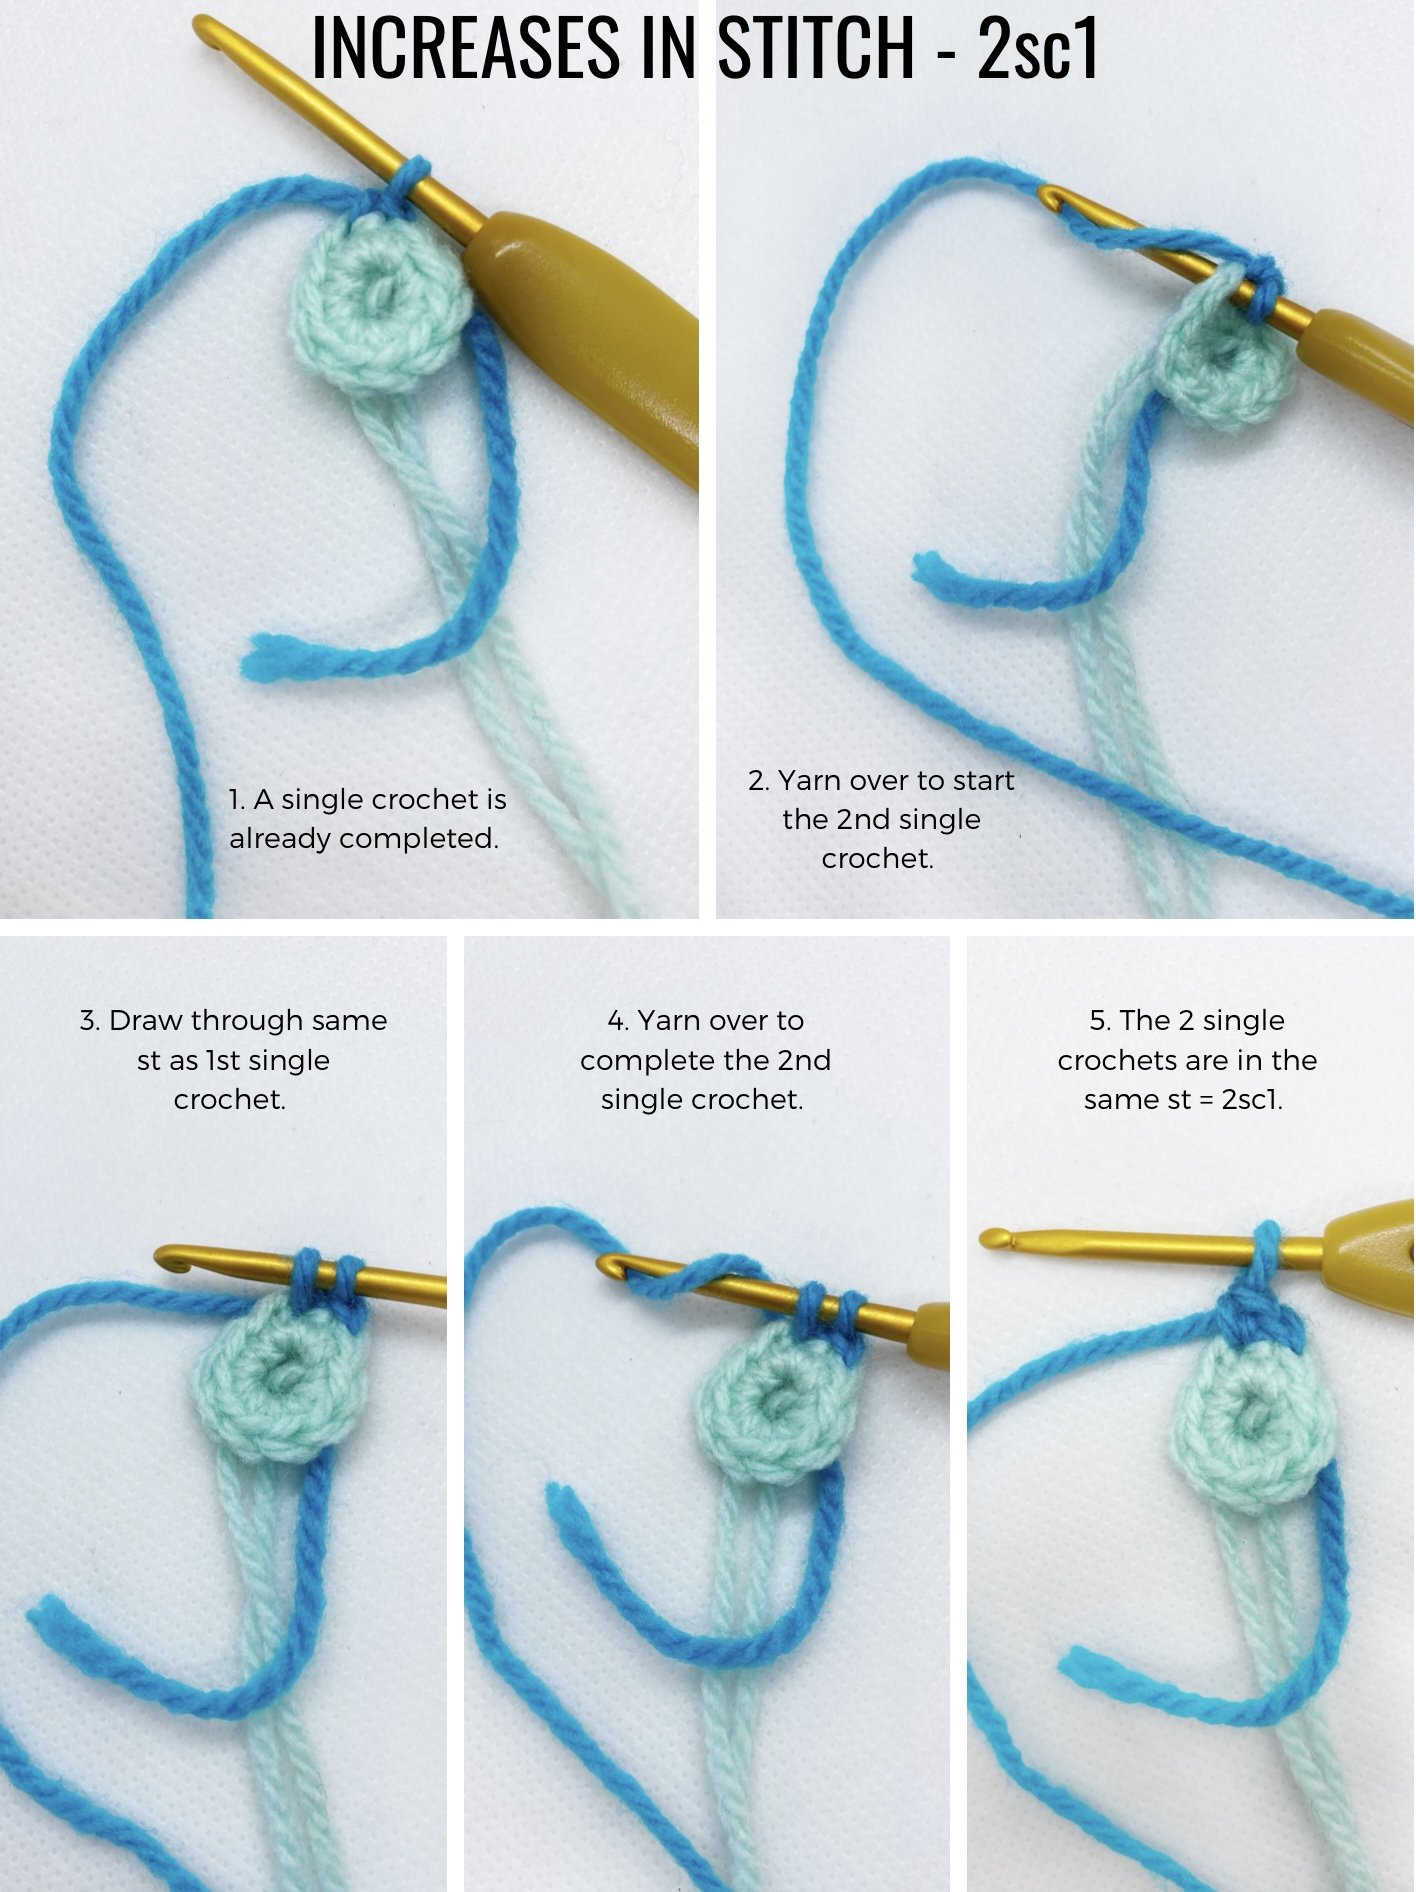
The steps involved in increase in single crochet include:
Perform a single crochet at the start of Round 2.
Then proceed to insert hook back into the same first stitch.
Yarn over and draw yarn through same stitch, so that you will get 2 loops on hook.
Continue to yarn over again, and draw yarn through 2 loops on the hook.
Continue to increase all around Round 2, so that you end up with 20st in total.
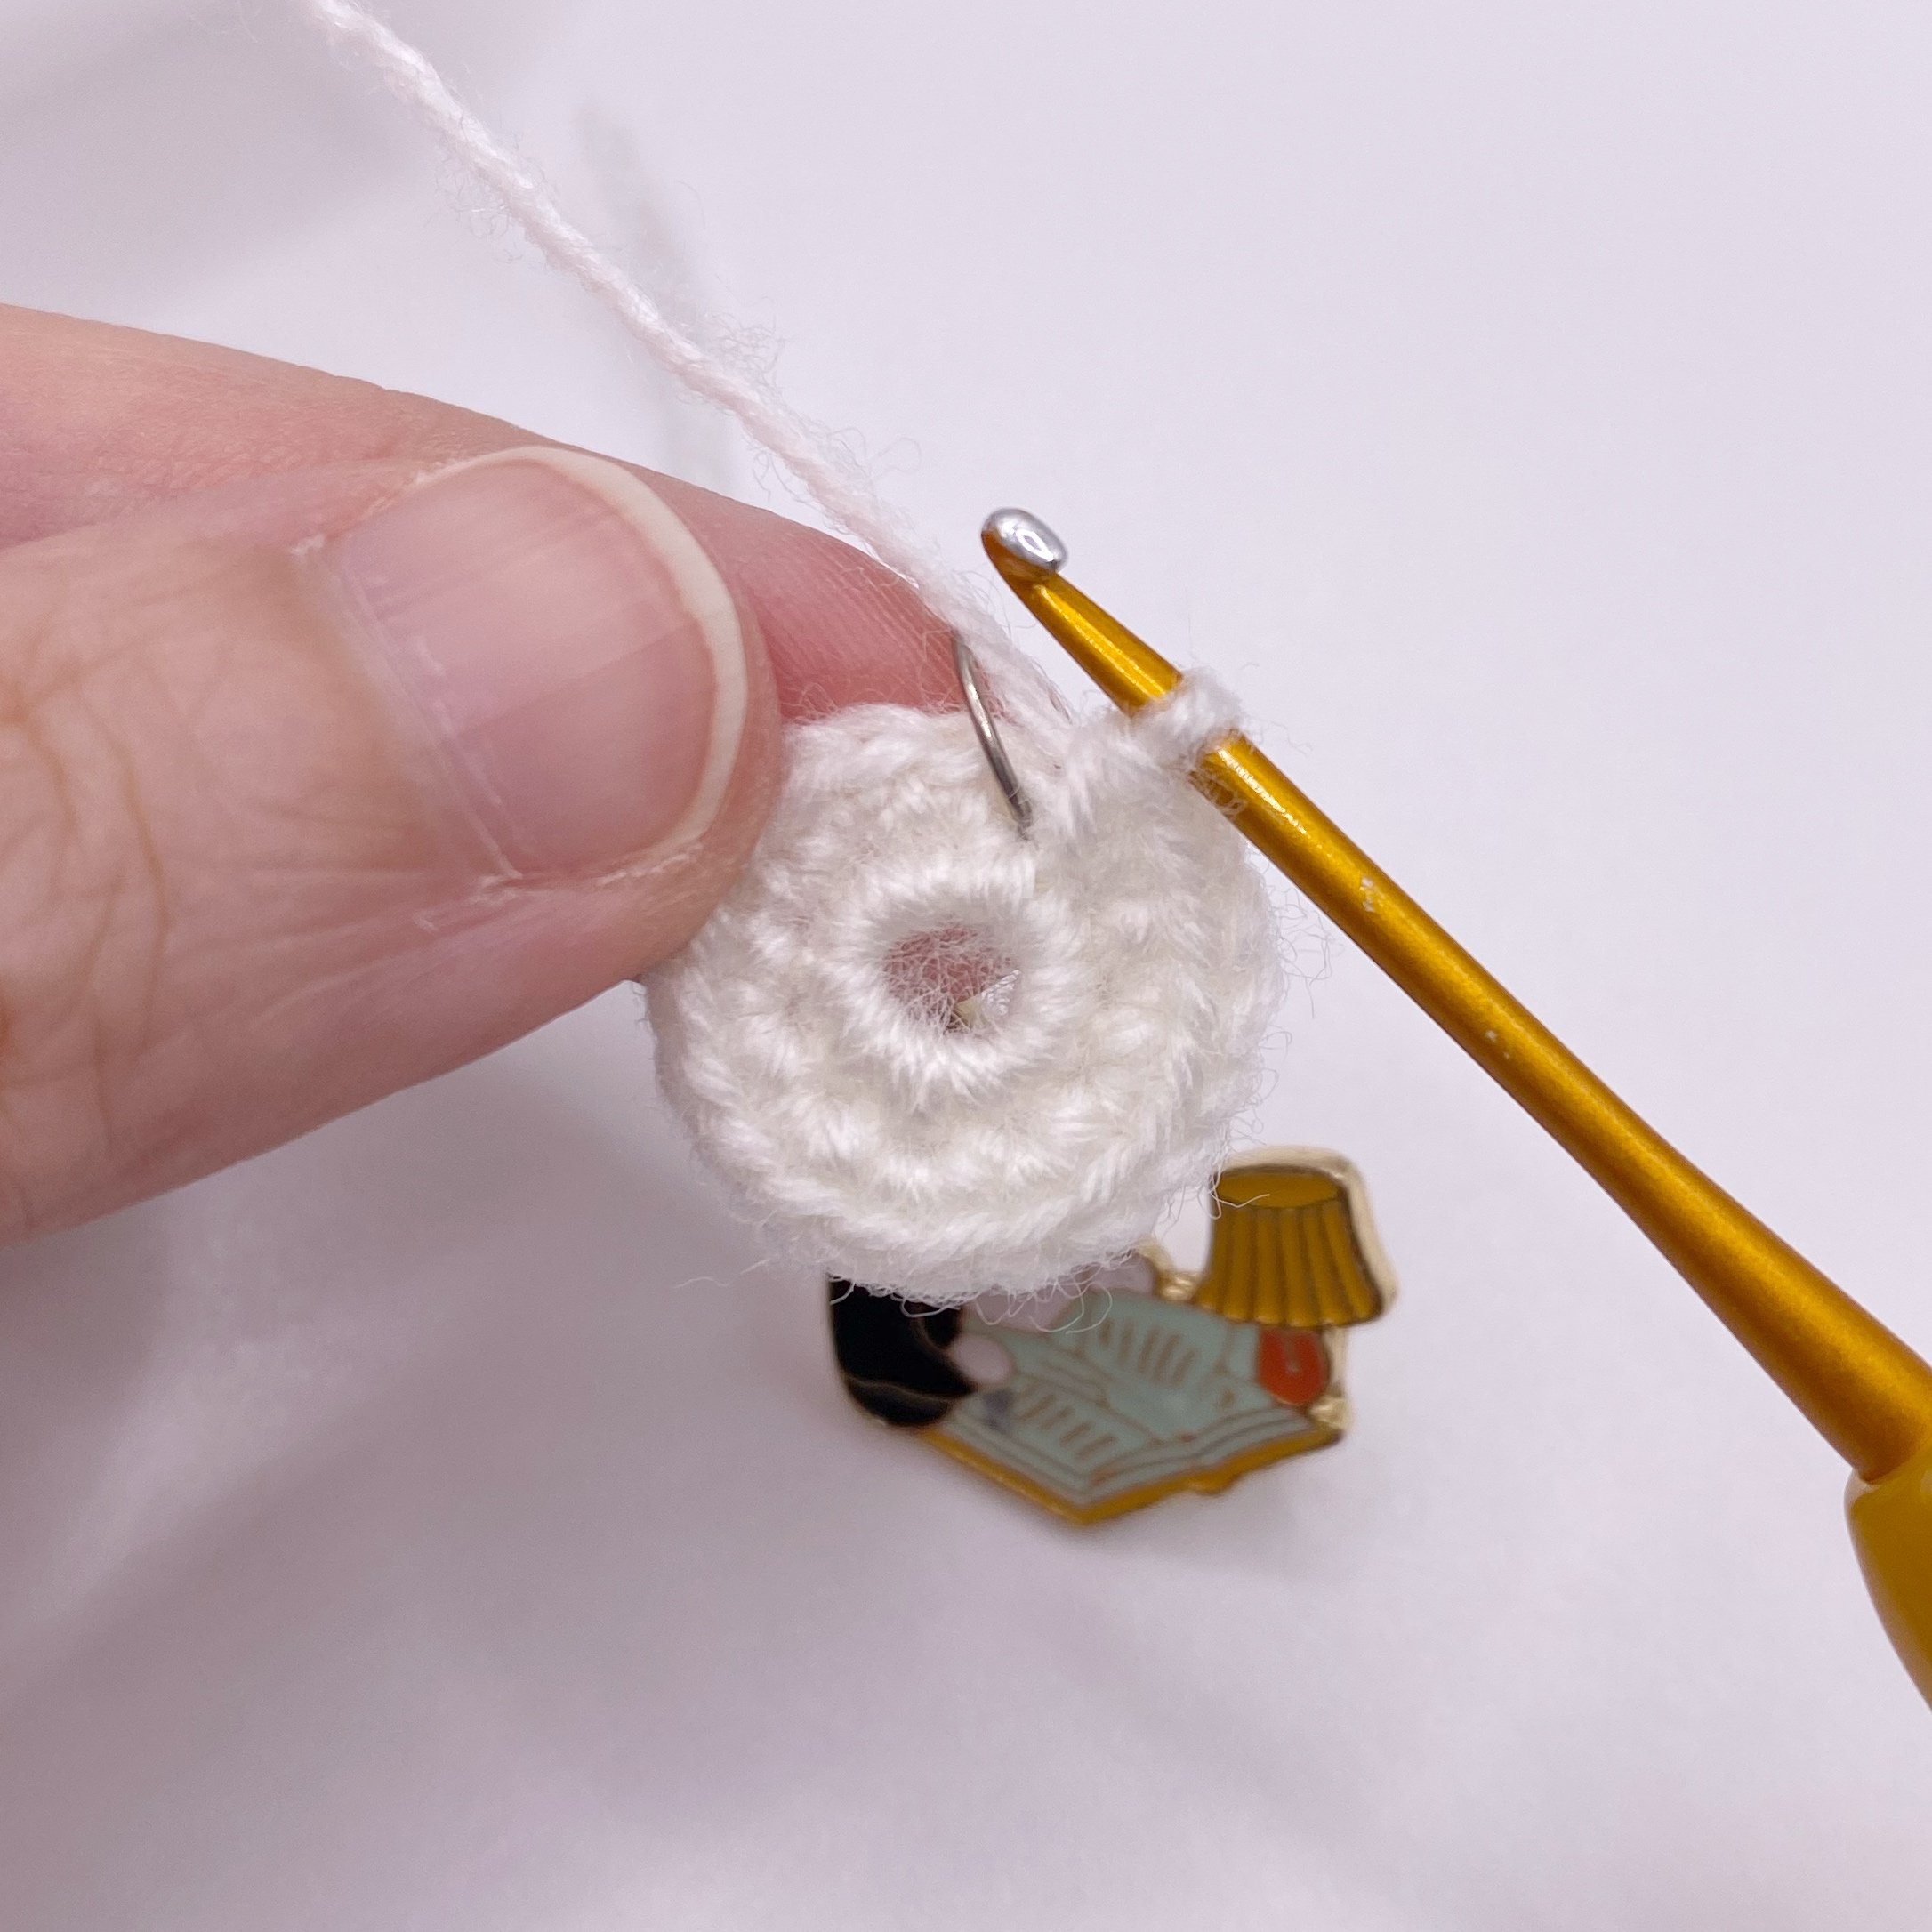
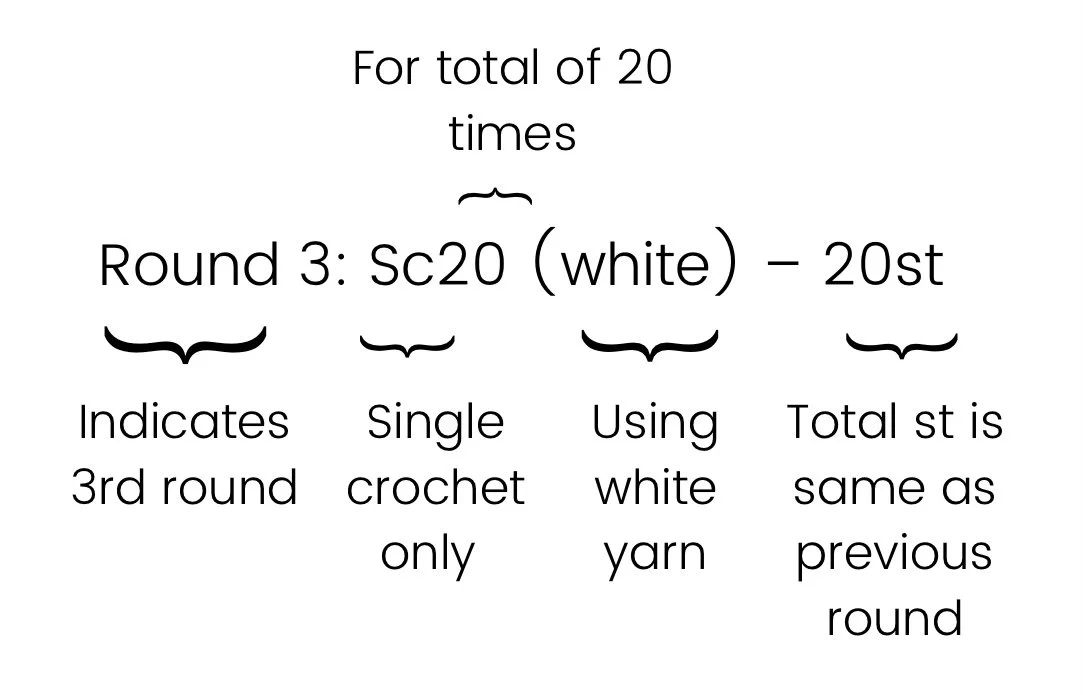
Let’s continue with the next 2 rounds. For Round 3, it’s just a matter of single crocheting all around the round, similar to how it was done for the magic ring above and further illustrated in the steps below again. This time, we won’t be crocheting into a ring but into each stitch in the round.
Round 3: Sc20 (white) – 20st
See the pattern breakdown below.

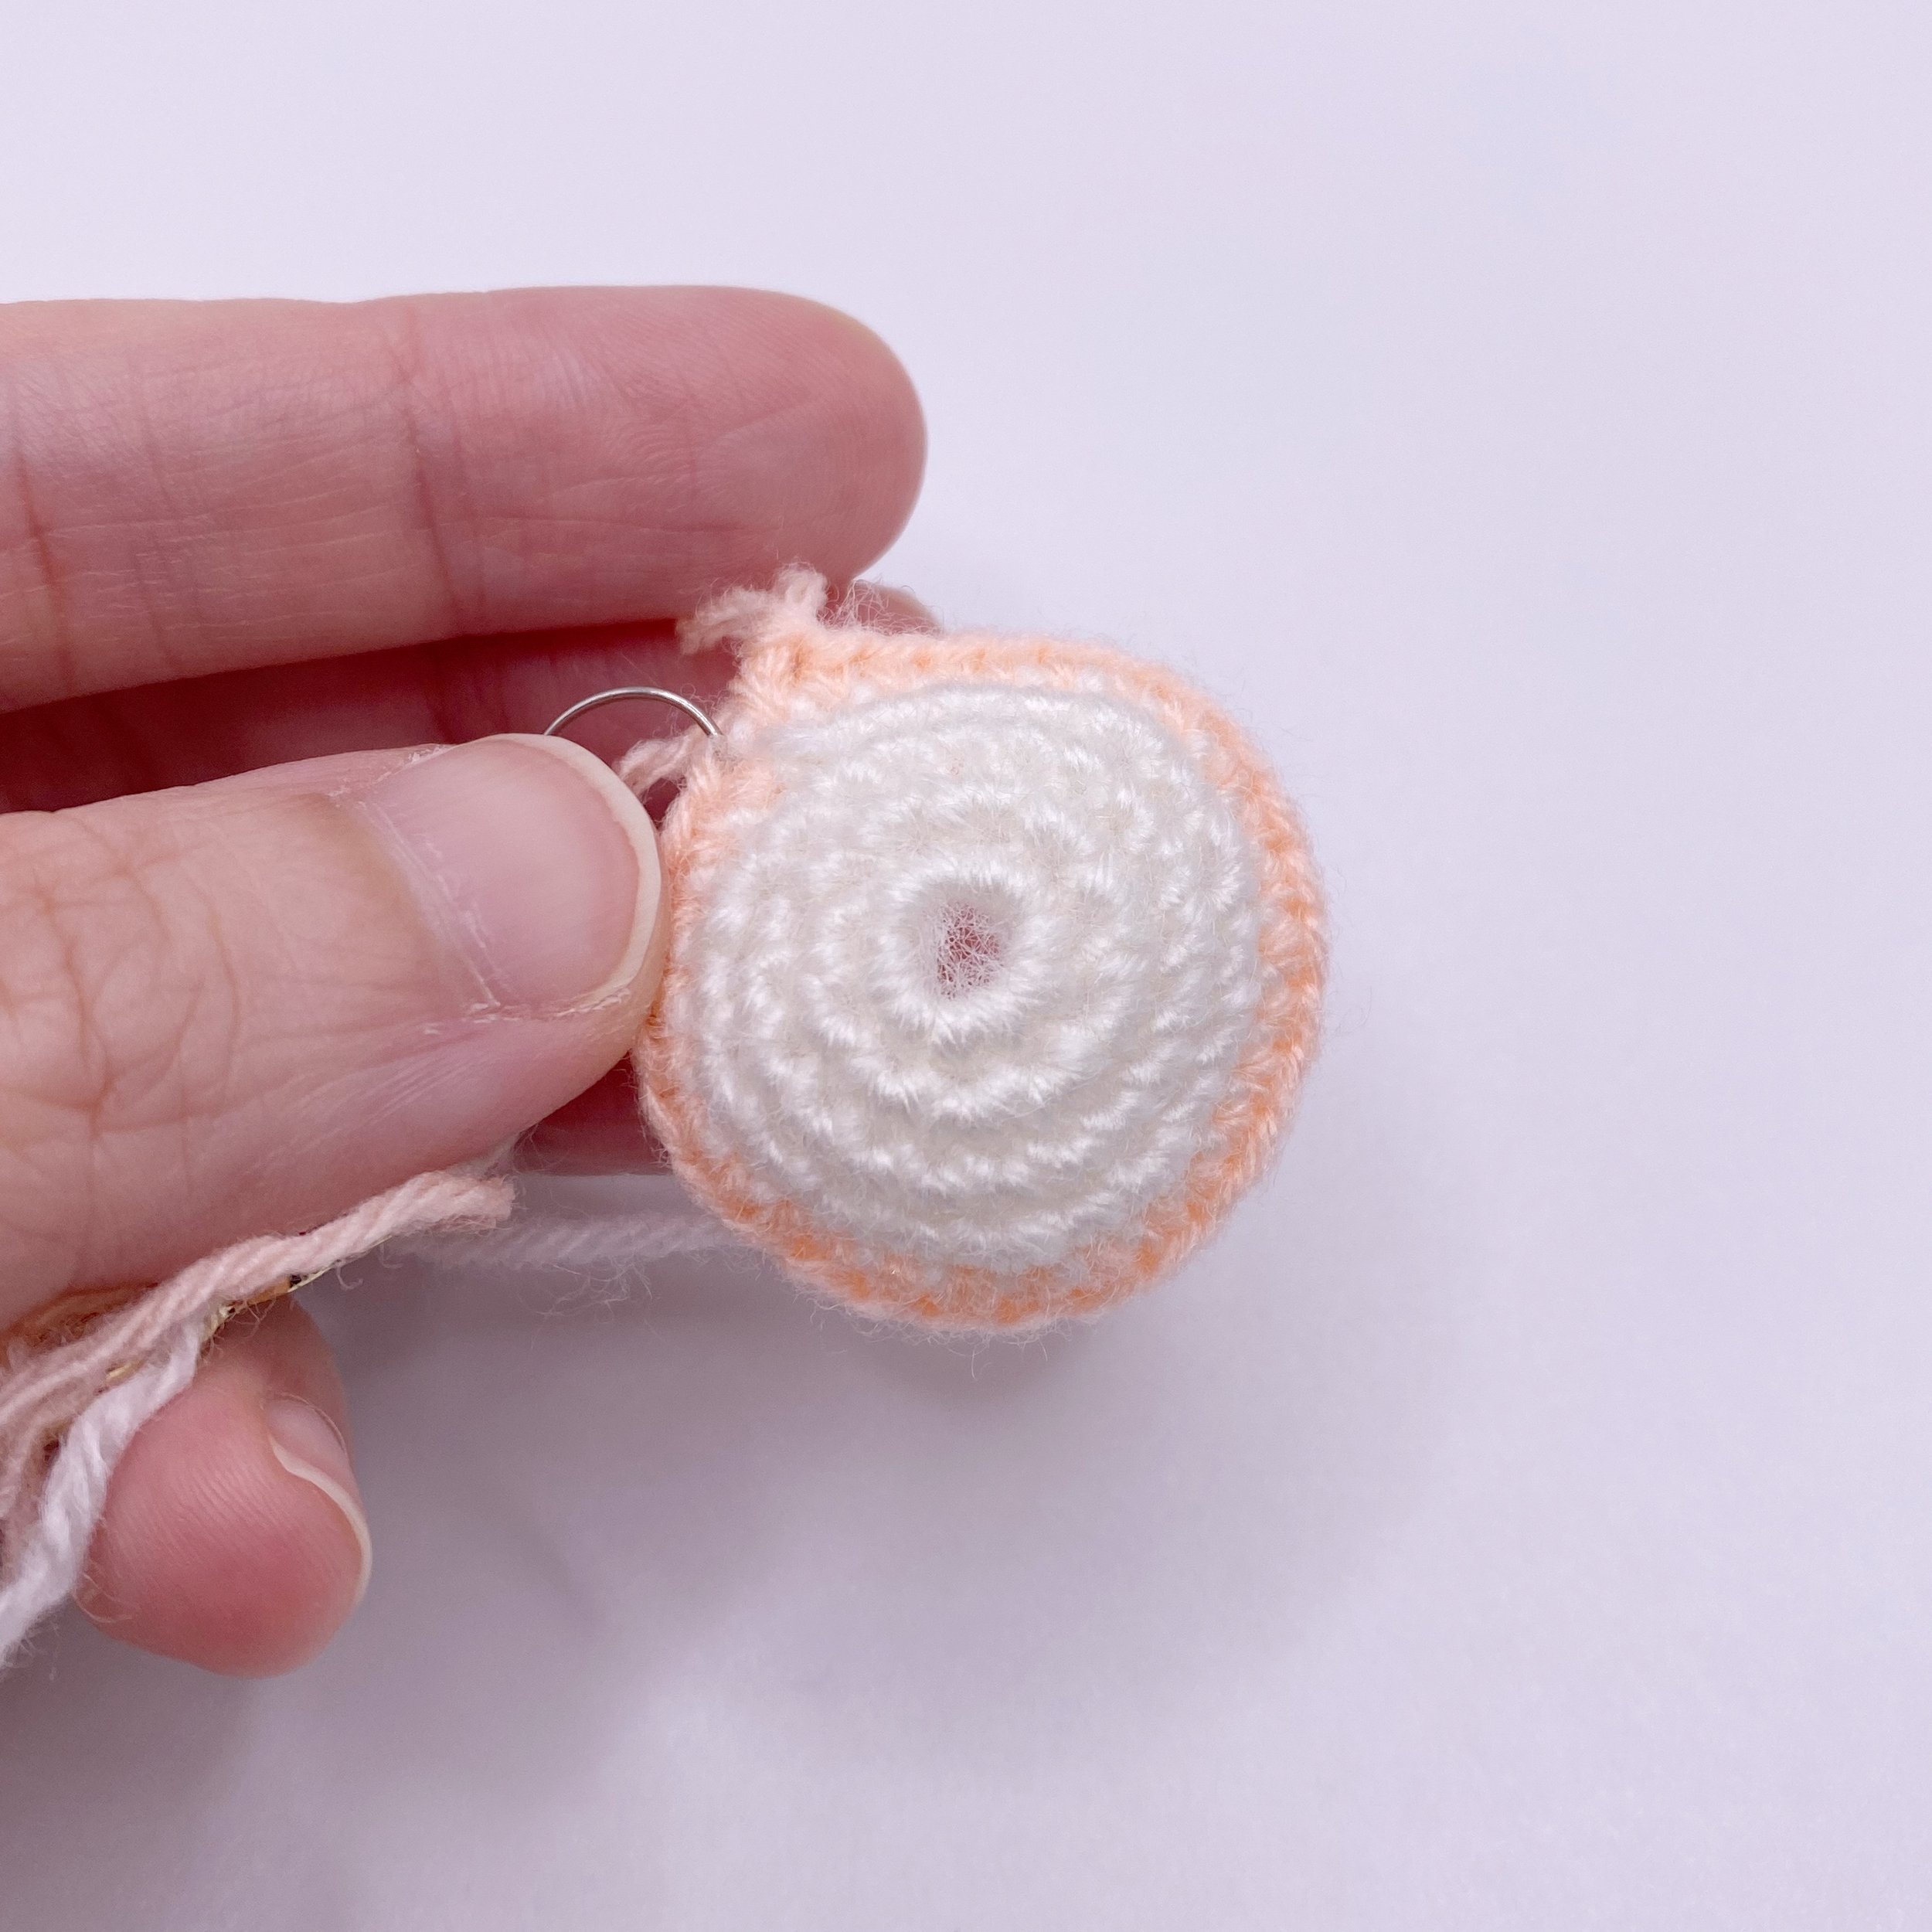
After finishing Round 3 with 20st and single crochet all round, move onto Round 4.
Round 4: (Sc1, 2sc1) x 10 (white) – 30st
See the pattern breakdown below.
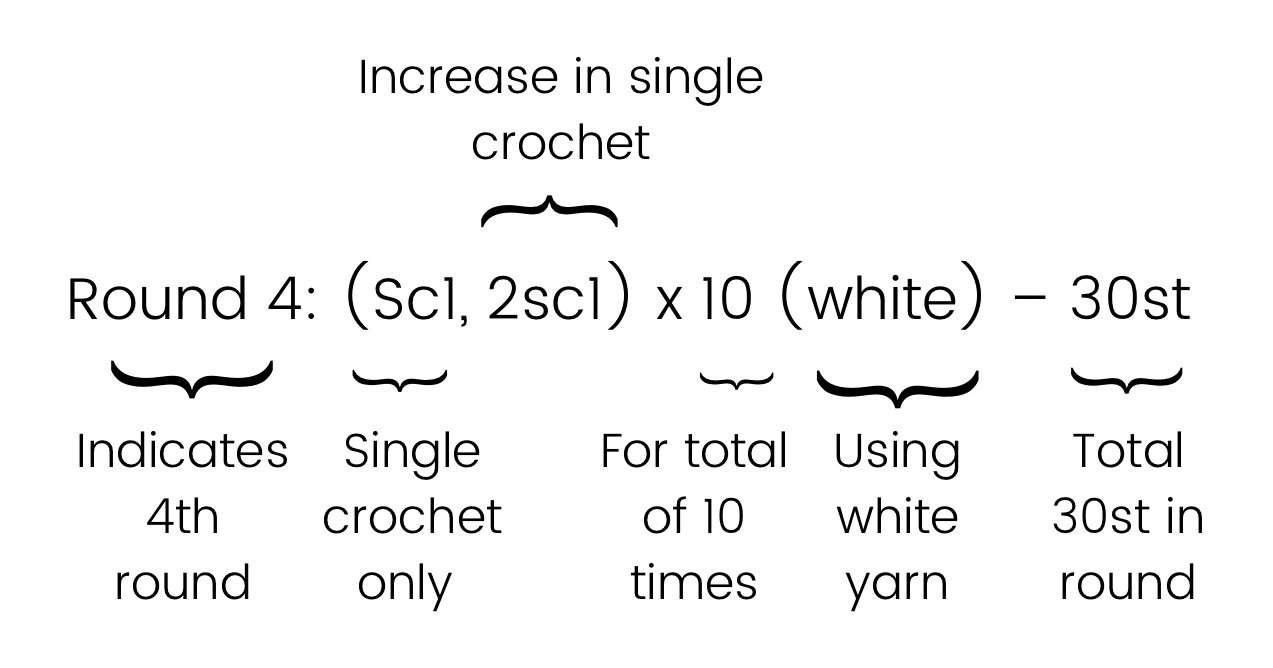

As for Round 4, we will be alternating single crochet and an increase in the round, which is basically alternating the previous 2 techniques shown above. To continue, repeat this (sc1, 2sc1) all around the round for total 10 times to get 30st at the end of Round 4.

💡 Want to learn all the basics of crocheting amigurumi in one place?
Grab my free 77-page Amigurumi Foundation eBook — your complete step-by-step guide to mastering tools, stitches, and beginner toy techniques (normally $17!).
Step 4) How to Change Colour in crochet?
For the next round in Round 5, we will be changing from white to beige yarn for the whole of the round. Here I will be illustrating the techniques using a different set of colours but it’s all essentially using the same method.
Round 4: (Sc1, 2sc1) x 10 (white) – 30st
Get ready to change from white to beige yarn.
Round 5: Sc30 (beige) – 30st
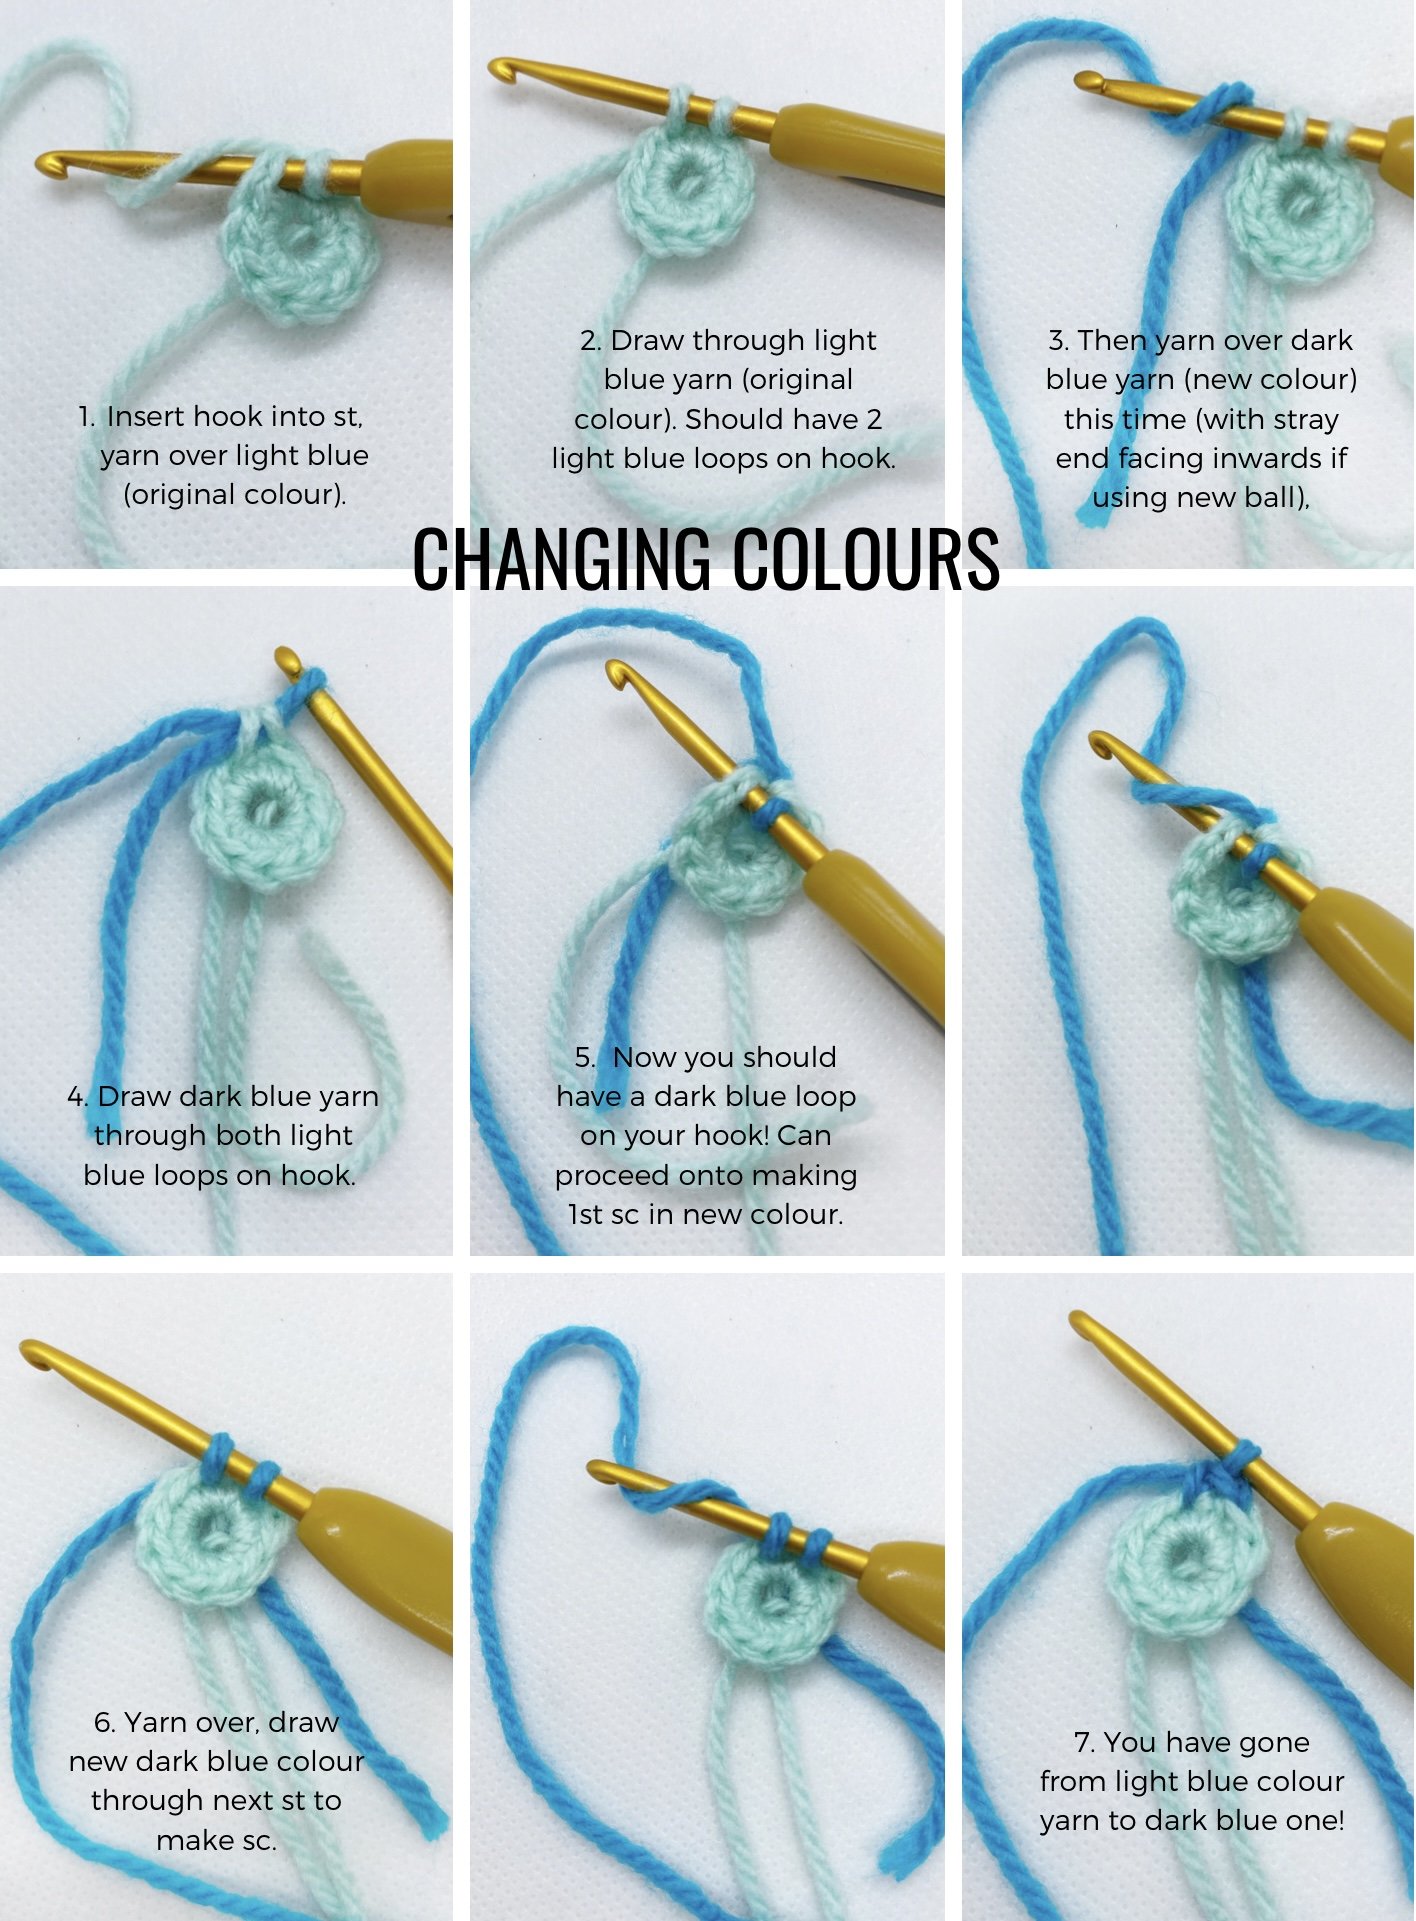
The steps involved in changing colours include:
Insert hook into last stitch of Round 4 using the first colour (white).
Draw through yarn of first colour (white), should get 2 loops on hook.
Use hook to yarn over the new second colour (beige) yarn and draw through both loops on hook.
With new coloured (beige) yarn on hook now, proceed to single crochet in next st.
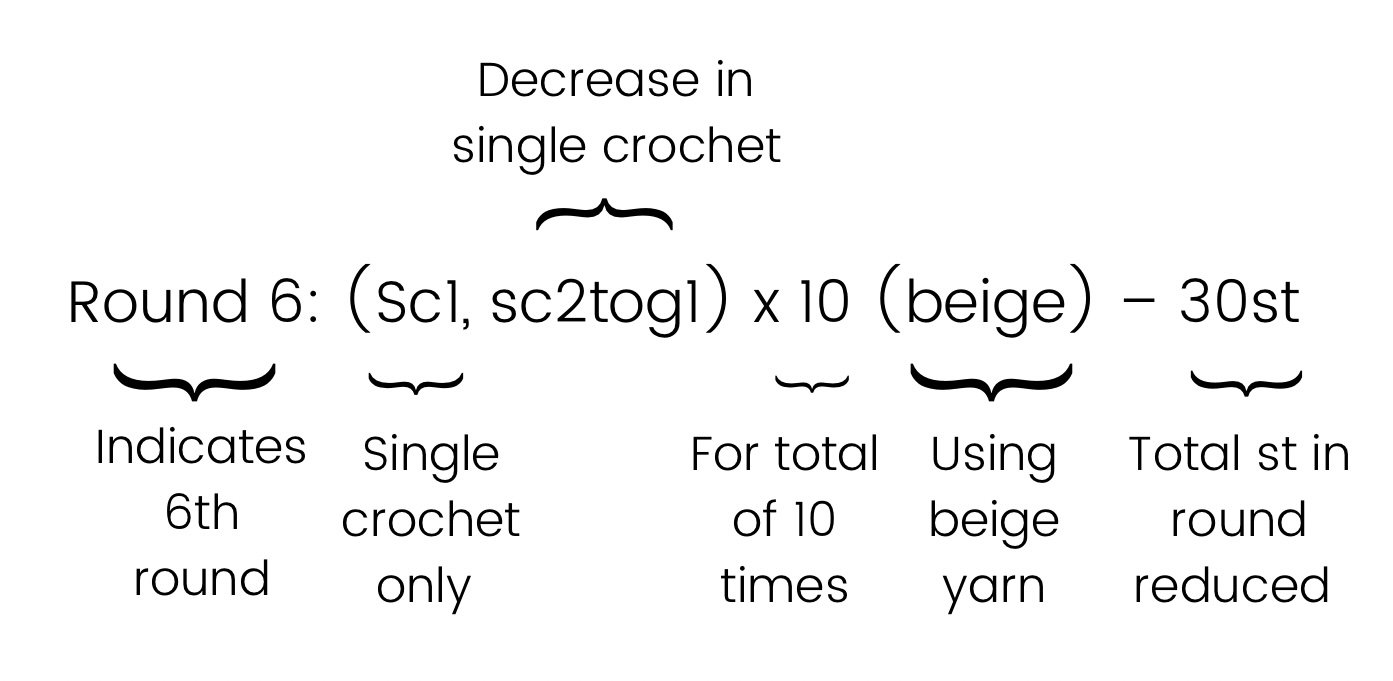
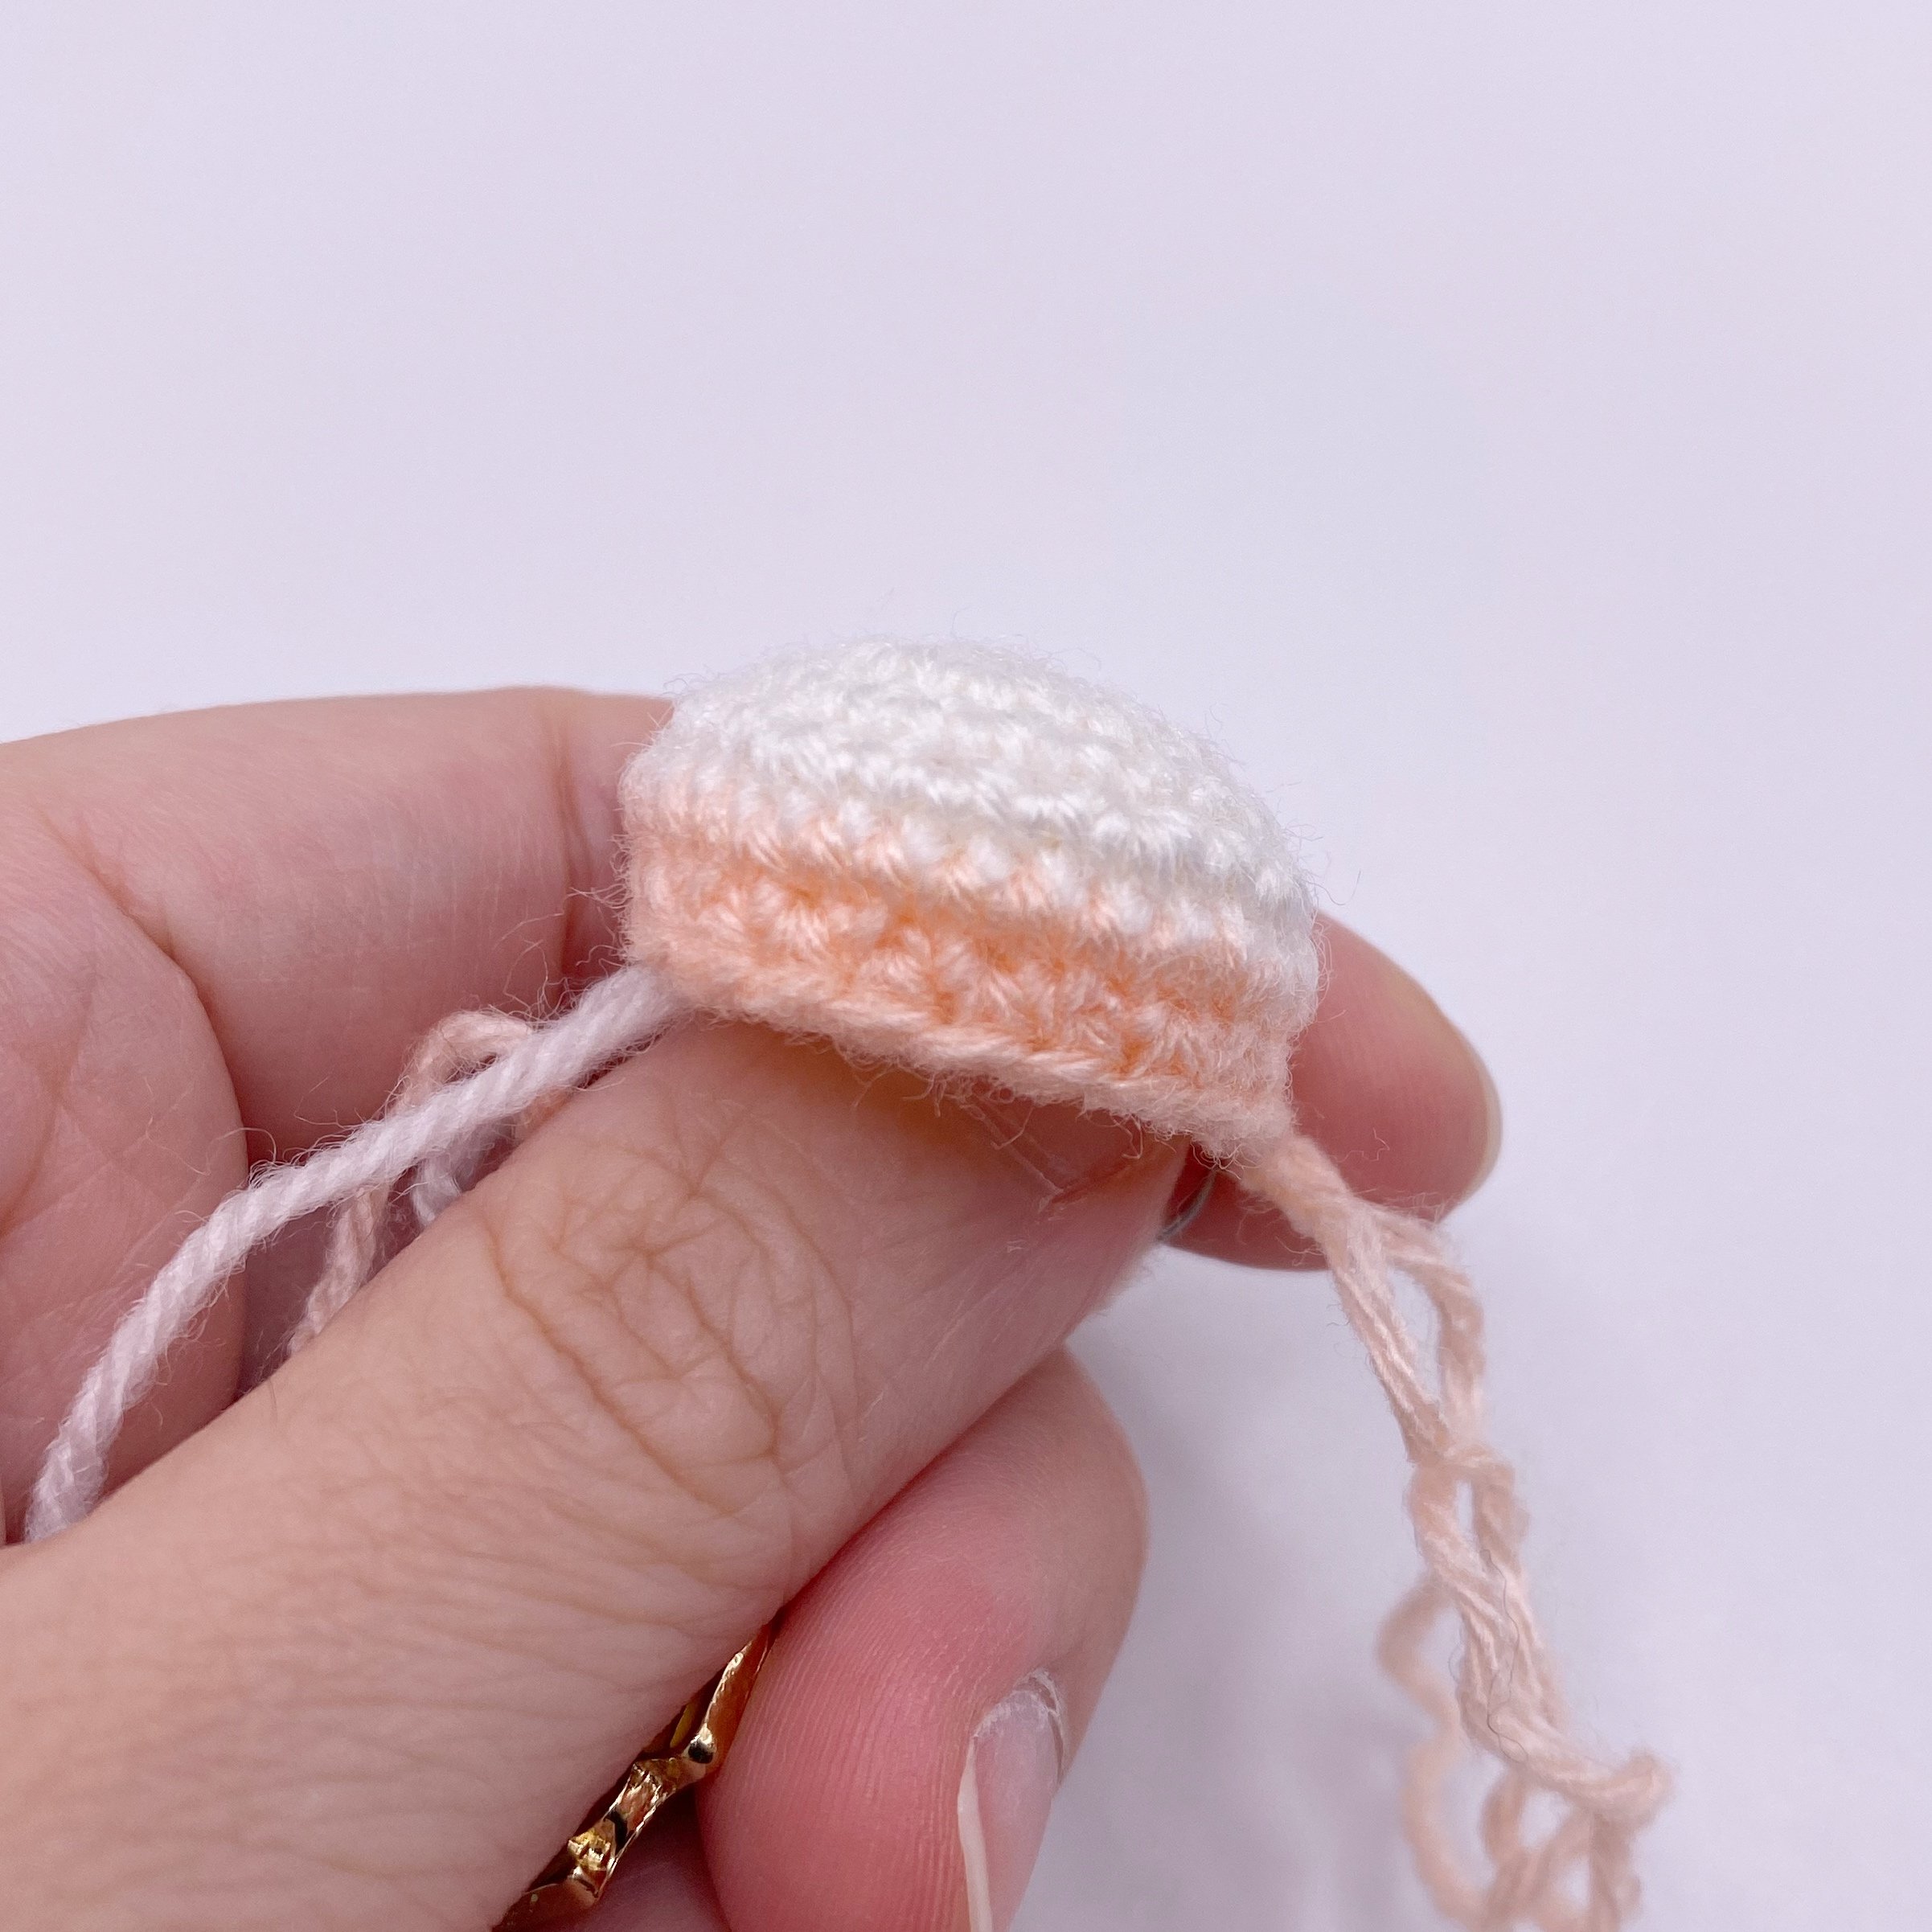
Step 5) How to do an invisible decrease in crochet?
After completing Round 5, we will proceed to start to narrow the sphere by moving onto Round 6, which has alternating single crochet and decrease all around. Sc2tog1 refers to single crochet decrease and in this case (and all my amigurumis in general), I use the invisible decrease.
Using invisible decrease helps to reduce the problem of gaps in the amigurumi after it is completed and stuffing placed inside.
Round 6: (Sc1, sc2tog1) x 10 (beige) – 20st
See the pattern breakdown below. Review the steps involved in creating a Sc2tog1 before tackling Round 6.
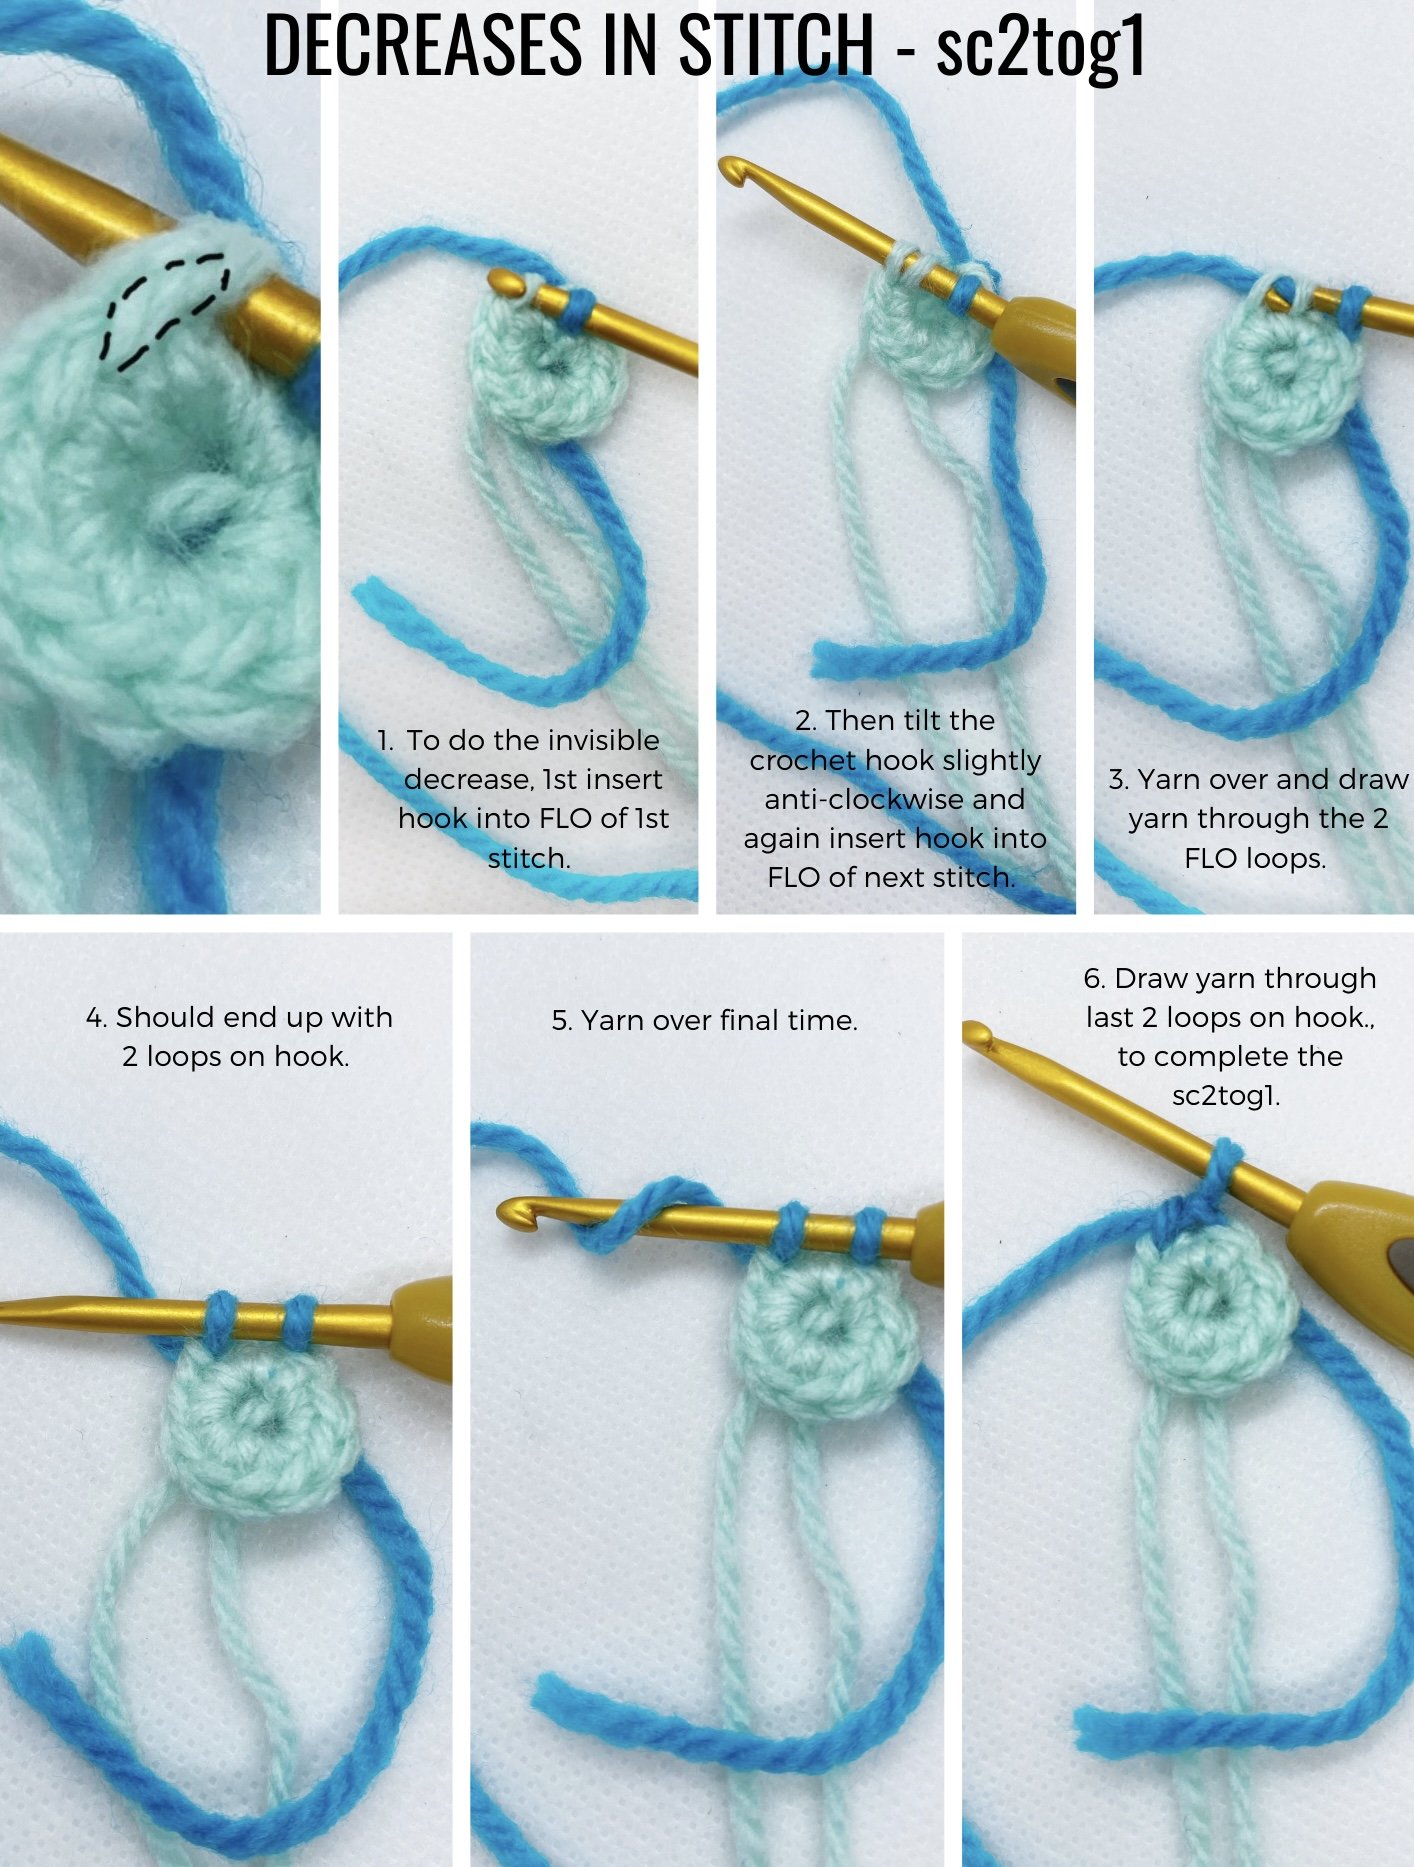
The steps involved in invisible single crochet decrease include:
Insert hook into front loop only (FLO) of next stitch.
Then tilt hook slightly anti-clockwise and insert hook into FLO of next stitch.
Yarn over and draw yarn through the 2 FLO loops, so that you end up with 2 loops on hook.
Yarn over for final time and draw yarn through last 2 loops on hook.
For Round 6, alternate single crochet and invisible decrease, for total of 10 times, to get 30st in all.
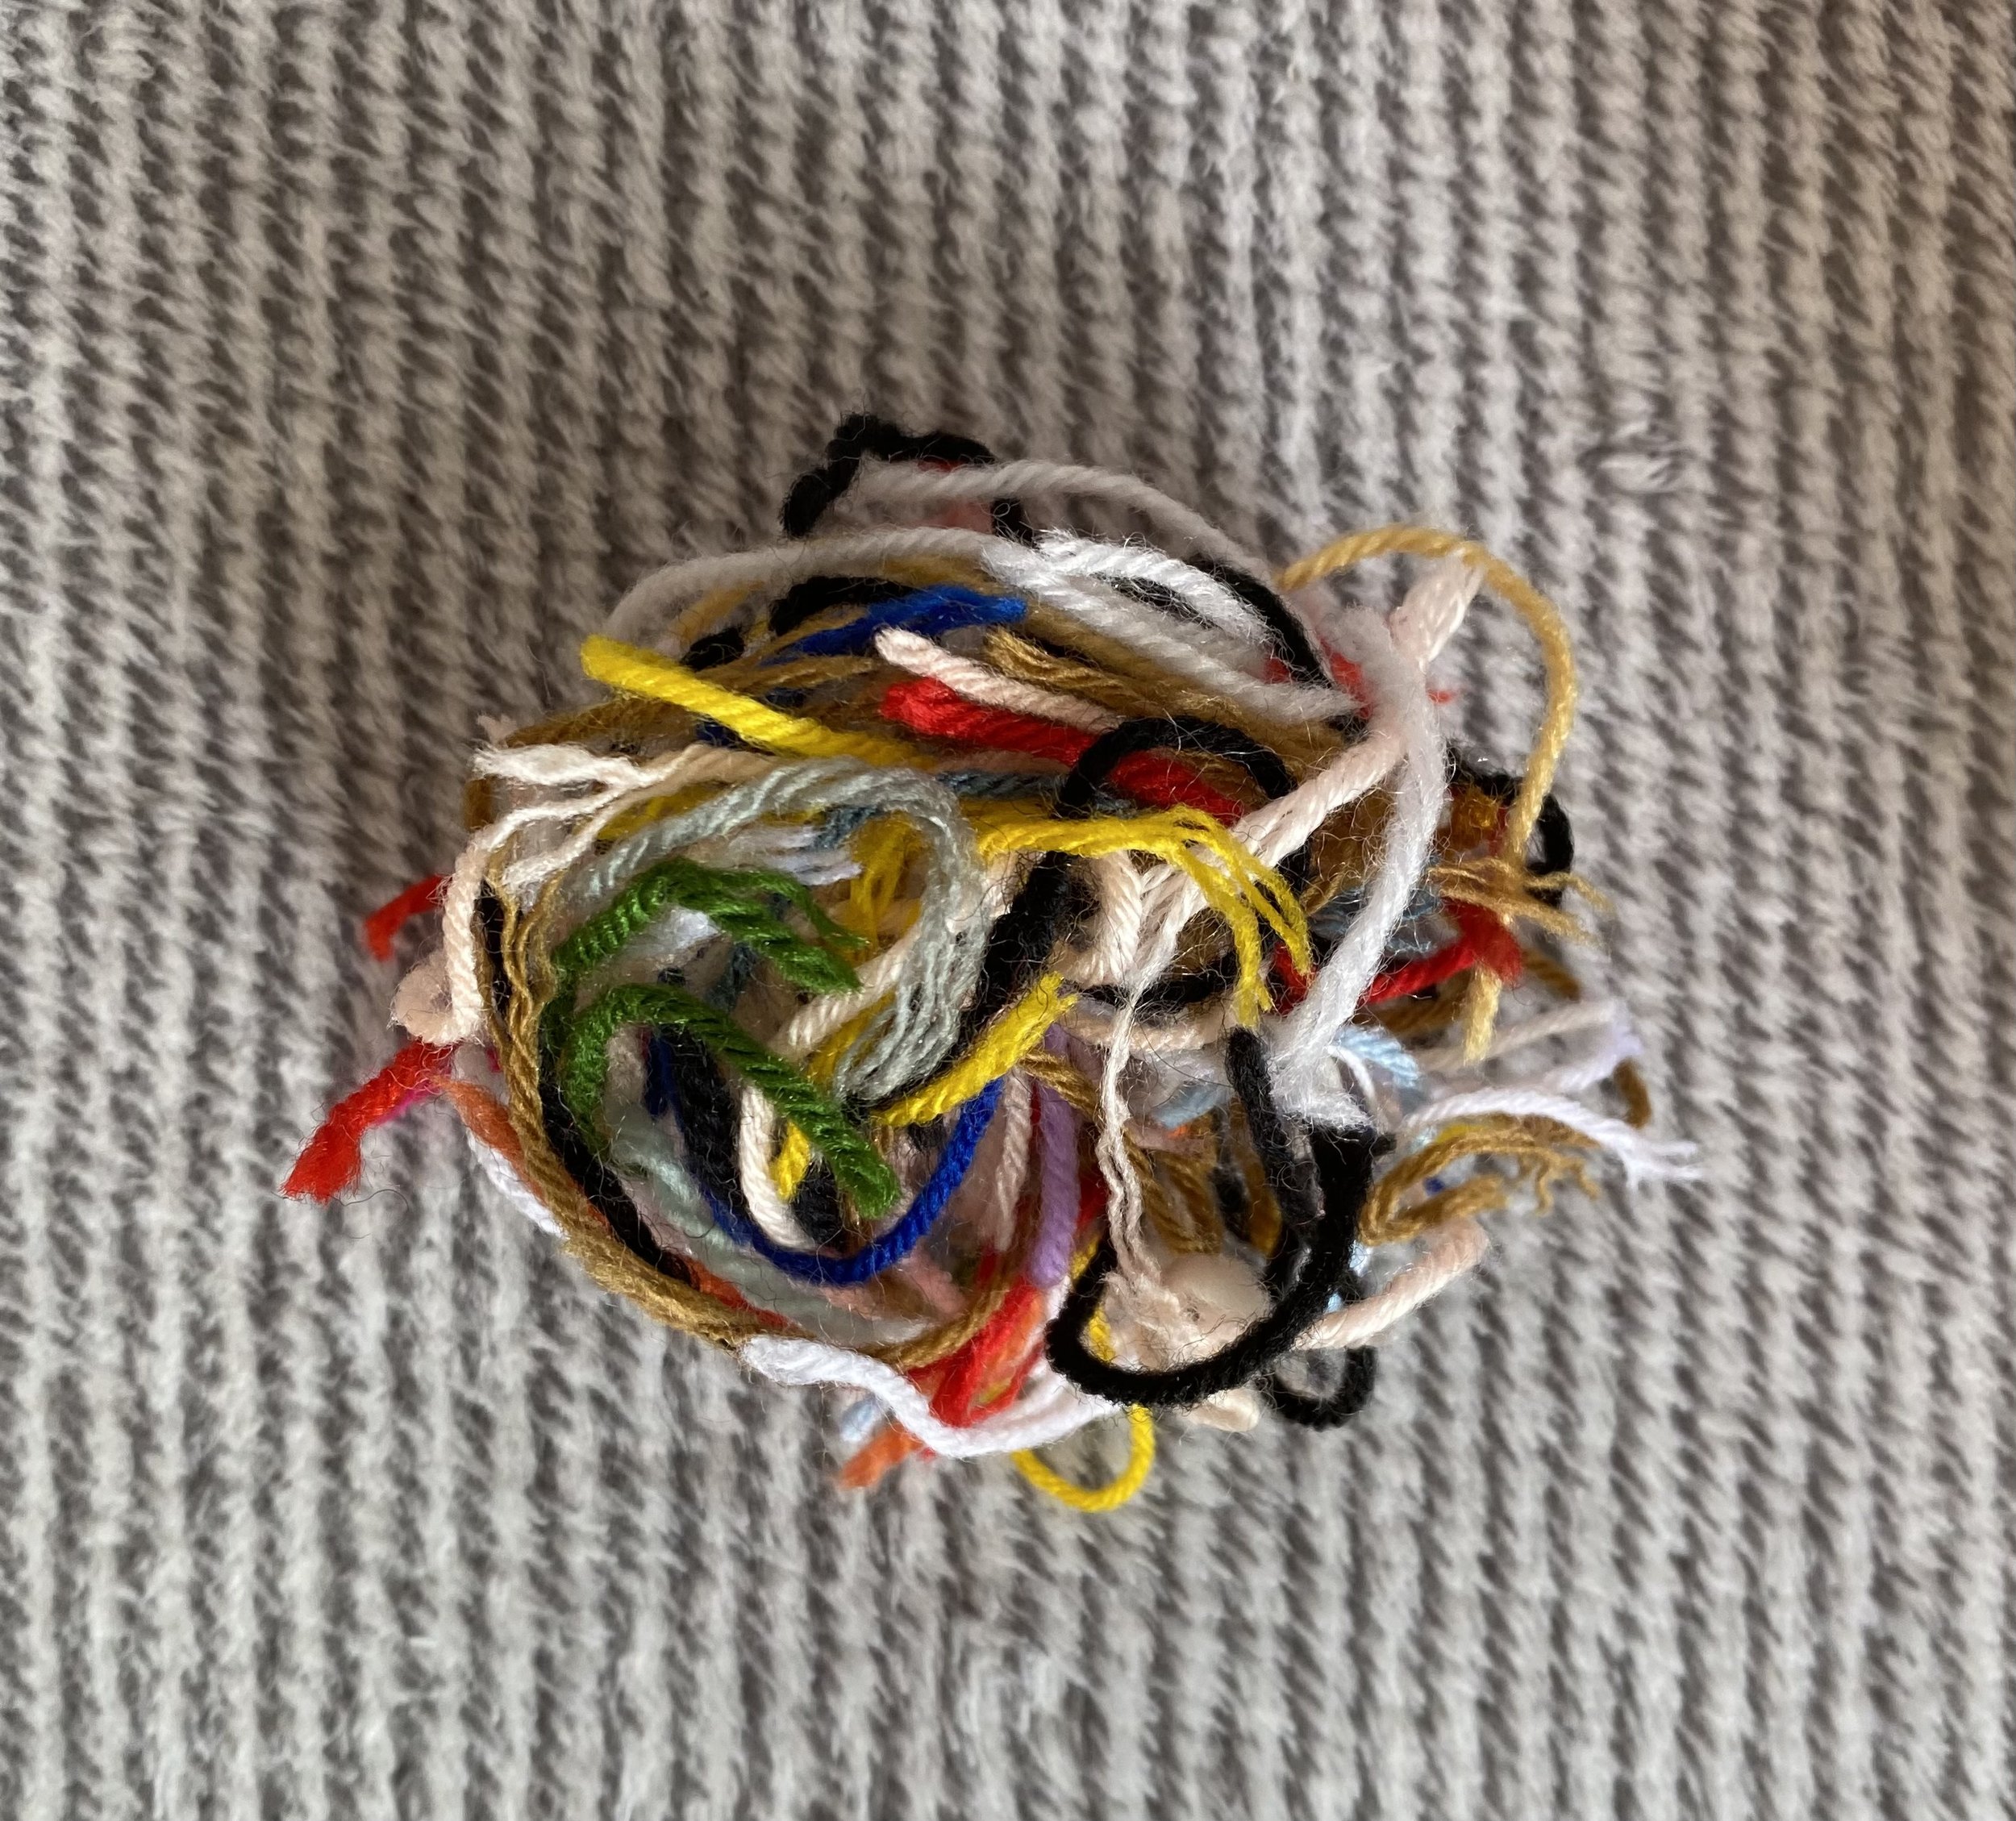
Step 6) How to Add Stuffing to amigurumi?
Most crocheters use polyfil or recycled yarn to stuff their Amigurumis. I like to recycle where I can, so for the most part, I use packing peanuts (recycled from my dad). Check out this post on how I managed to use 9 different ways to recycle in my amigurumis.
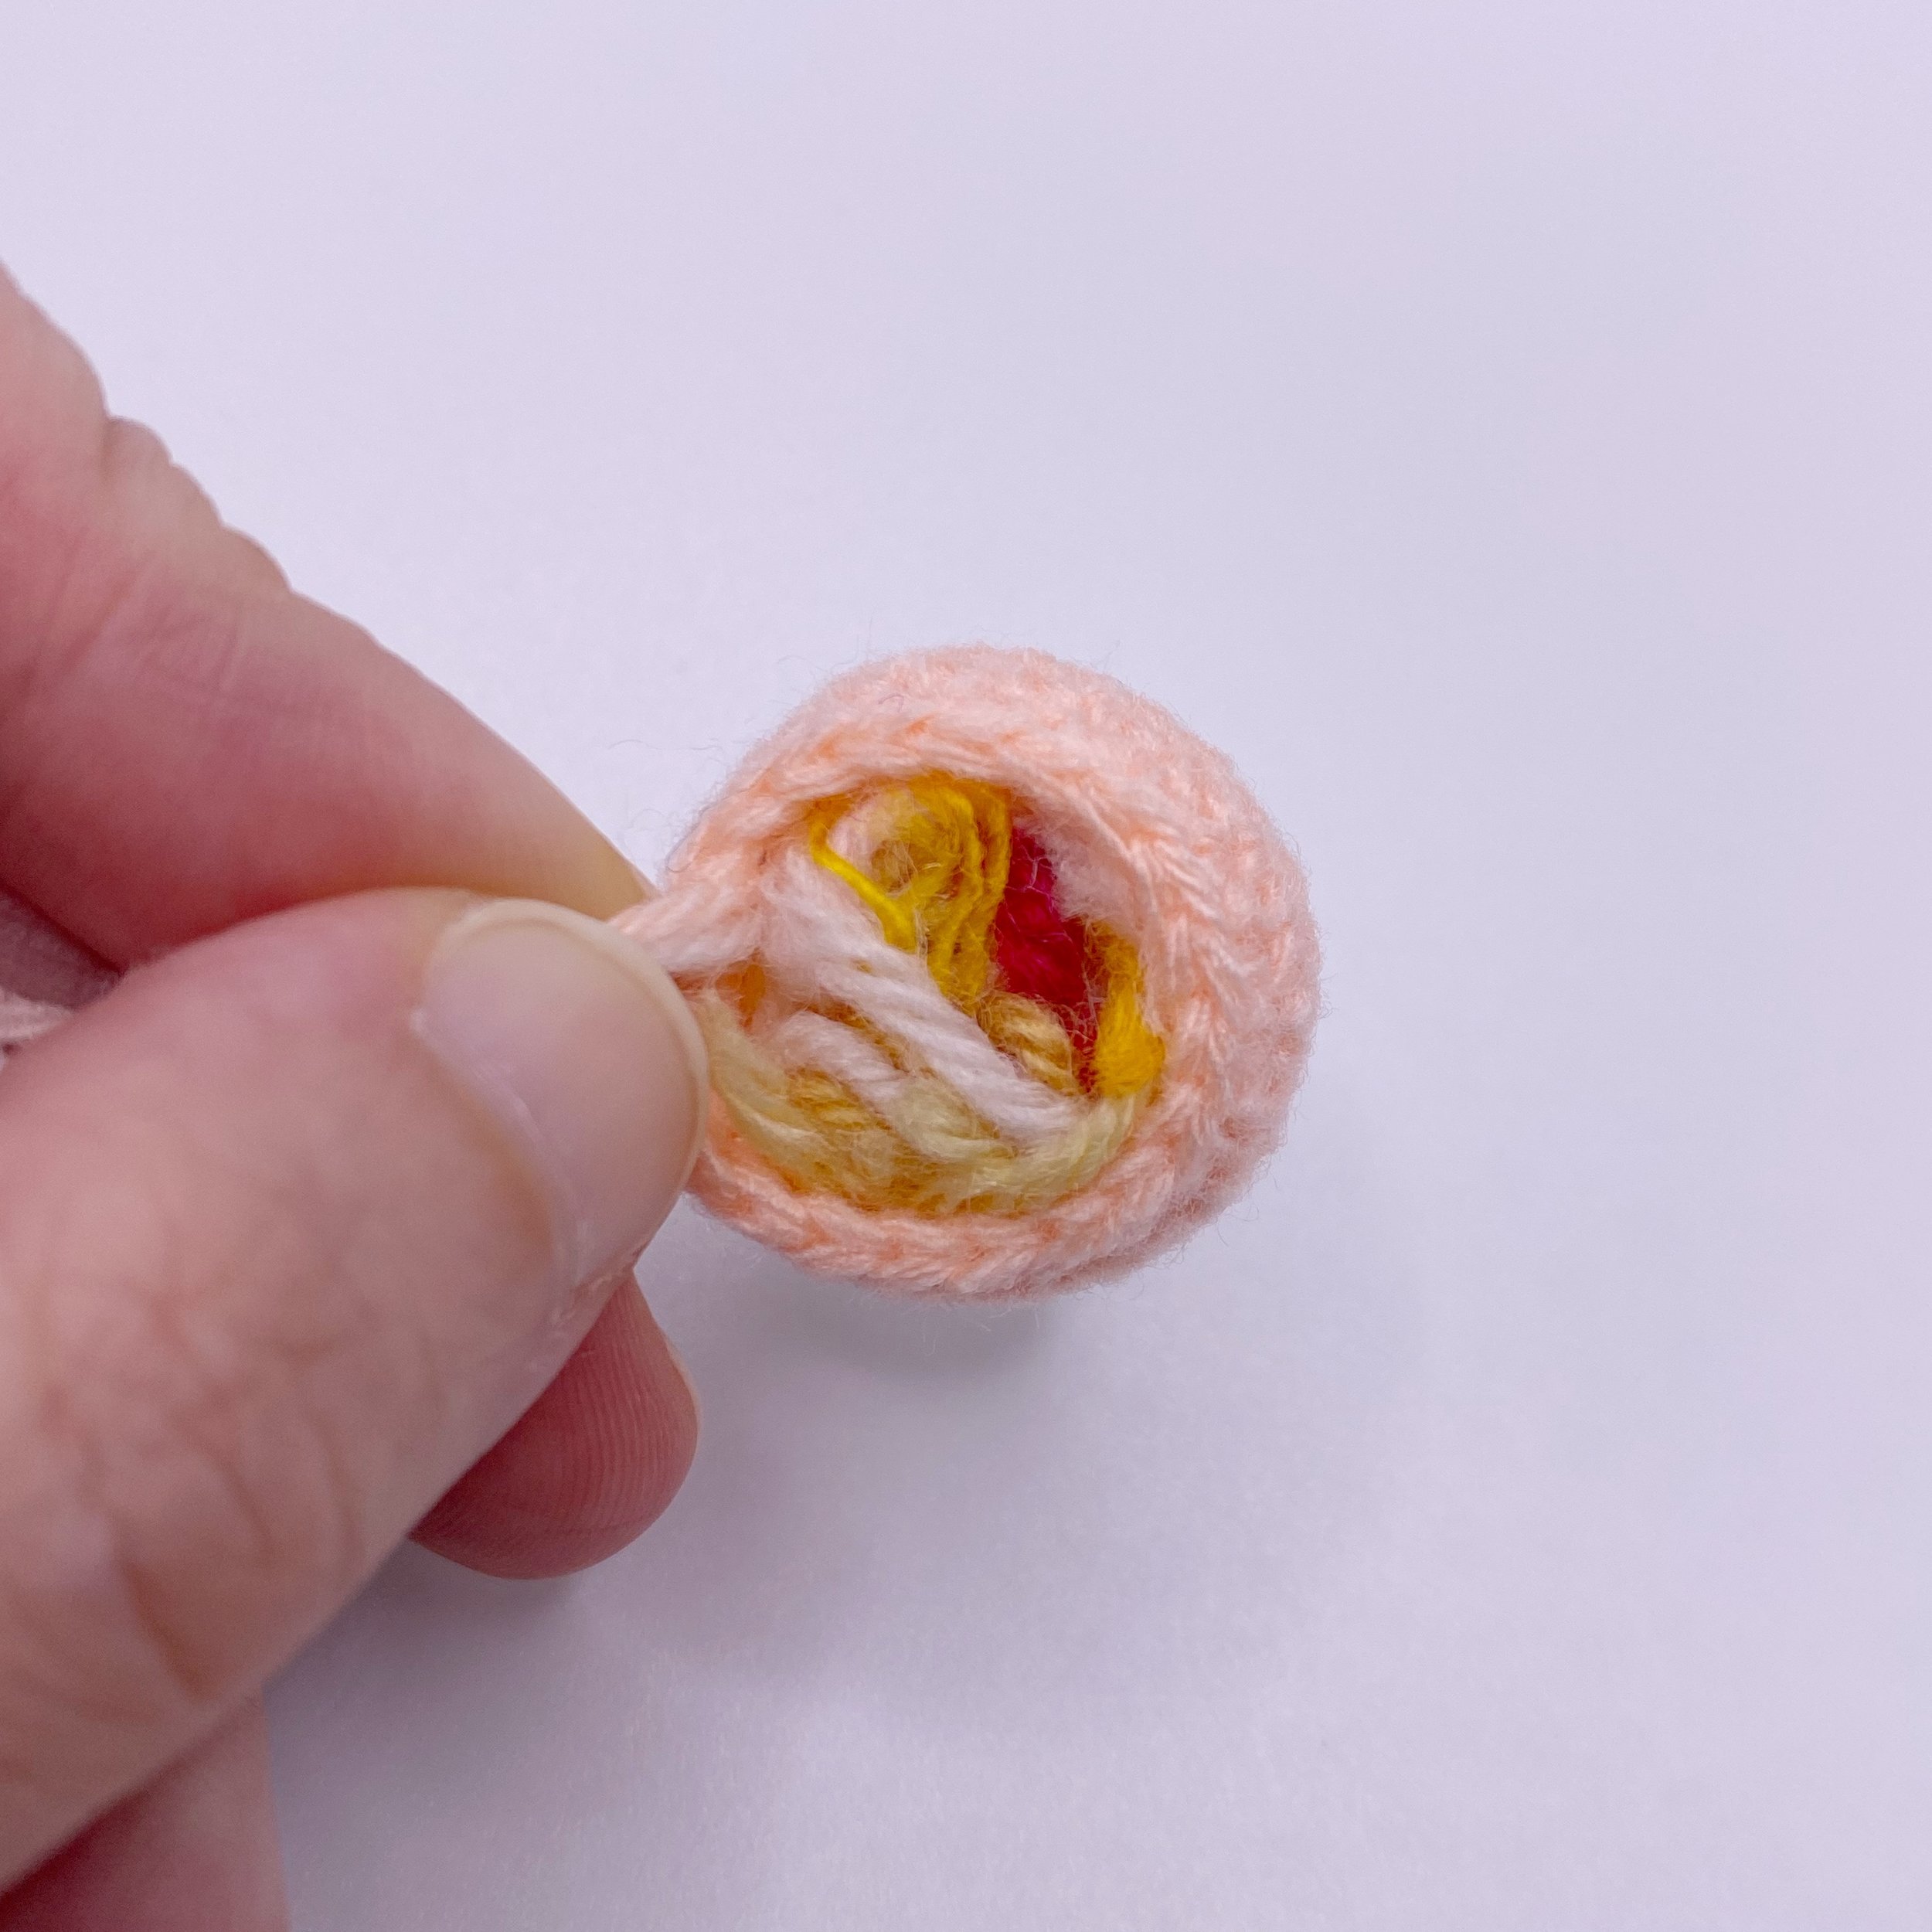
Continue with Round 7 with keeping the same number of stitches in the round. After this, Round 8 will continue decreasing in stitches so this would be a good time to add stuffing.
Round 7: Sc20 (beige) – 20st
Add stuffing to the head.
Step 7) How to Fasten Off amigurumi?
Just before fastening off, there will be a few preceding rounds that are slowly decreasing so that the hole at the bottom should start closing up. In this case, it corresponds to Round 8 and 9 before the closing up and fastening off
Round 8: Sc2tog10 (beige) – 10st
See the pattern breakdown below.
Round 9: Sc2tog5 (beige) – 5st
Continue decreasing from Round 8 to 9 by halving the number of stitches in the round. Just follow the steps for the invisible single crochet decrease as mentioned in Step 5 earlier. When the round has reduced down to just 5 stitches in the last Round 9, it is time to close up and fasten off.
Close up in FLO, using beige yarn.
(Just follow the steps in the images below, the rounds don’t really correspond. :)

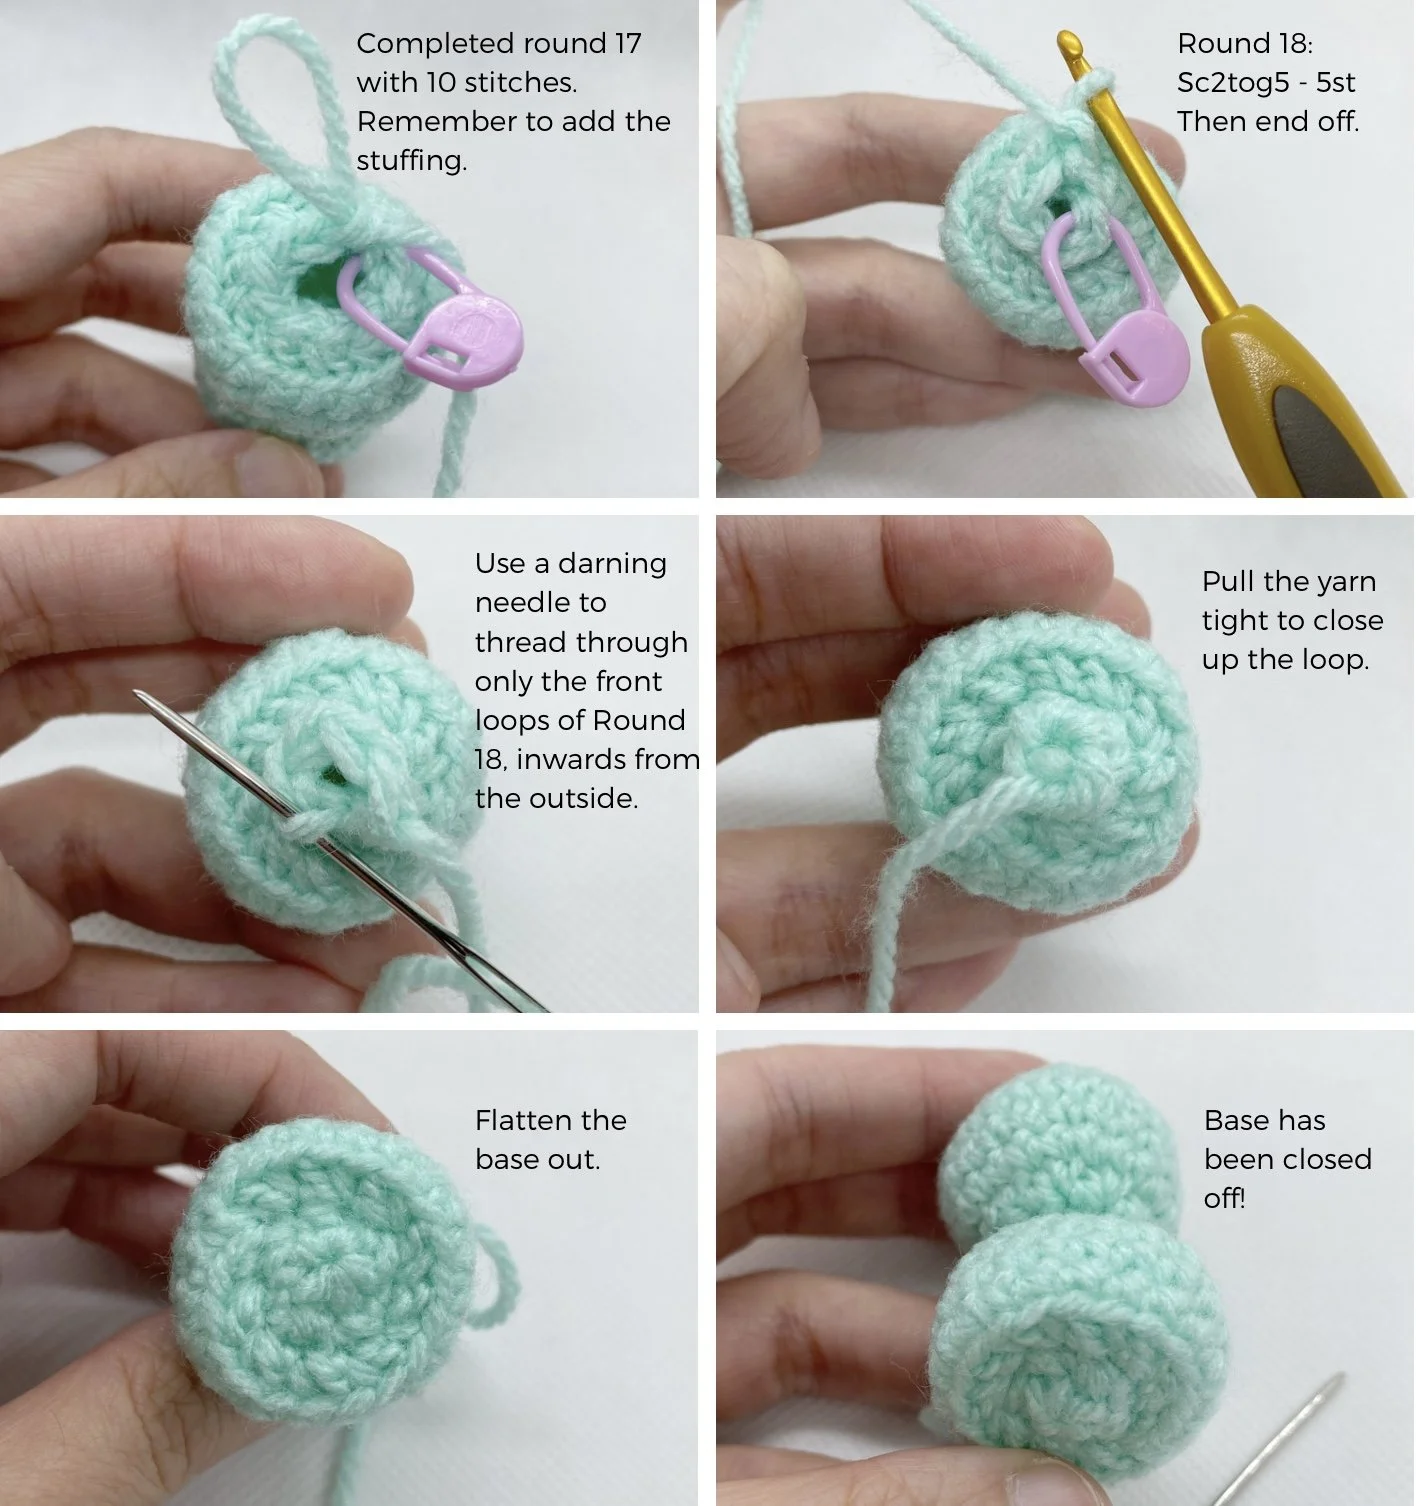
The steps involved in closing up in FLO include:
Leave a long tail and cut off for sewing.
Use a darning needle to thread through only the front loops of the last round.
Pull the yarn tight to close up the loop.
Insert needle through whole piece and thread through, cut then end off.
Fasten off amigurumi

Step 8) How to Sew On amigurumi eyes?
For baby safe amigurumi, I would recommend using this method. Specifically I did not include safety eyes in this tutorial so that there is one less equipment to get hold off and so that it is safer for young children to play with. I have many other tutorials for making eyes but this should be the easiest (apart from clipping on safety eyes).
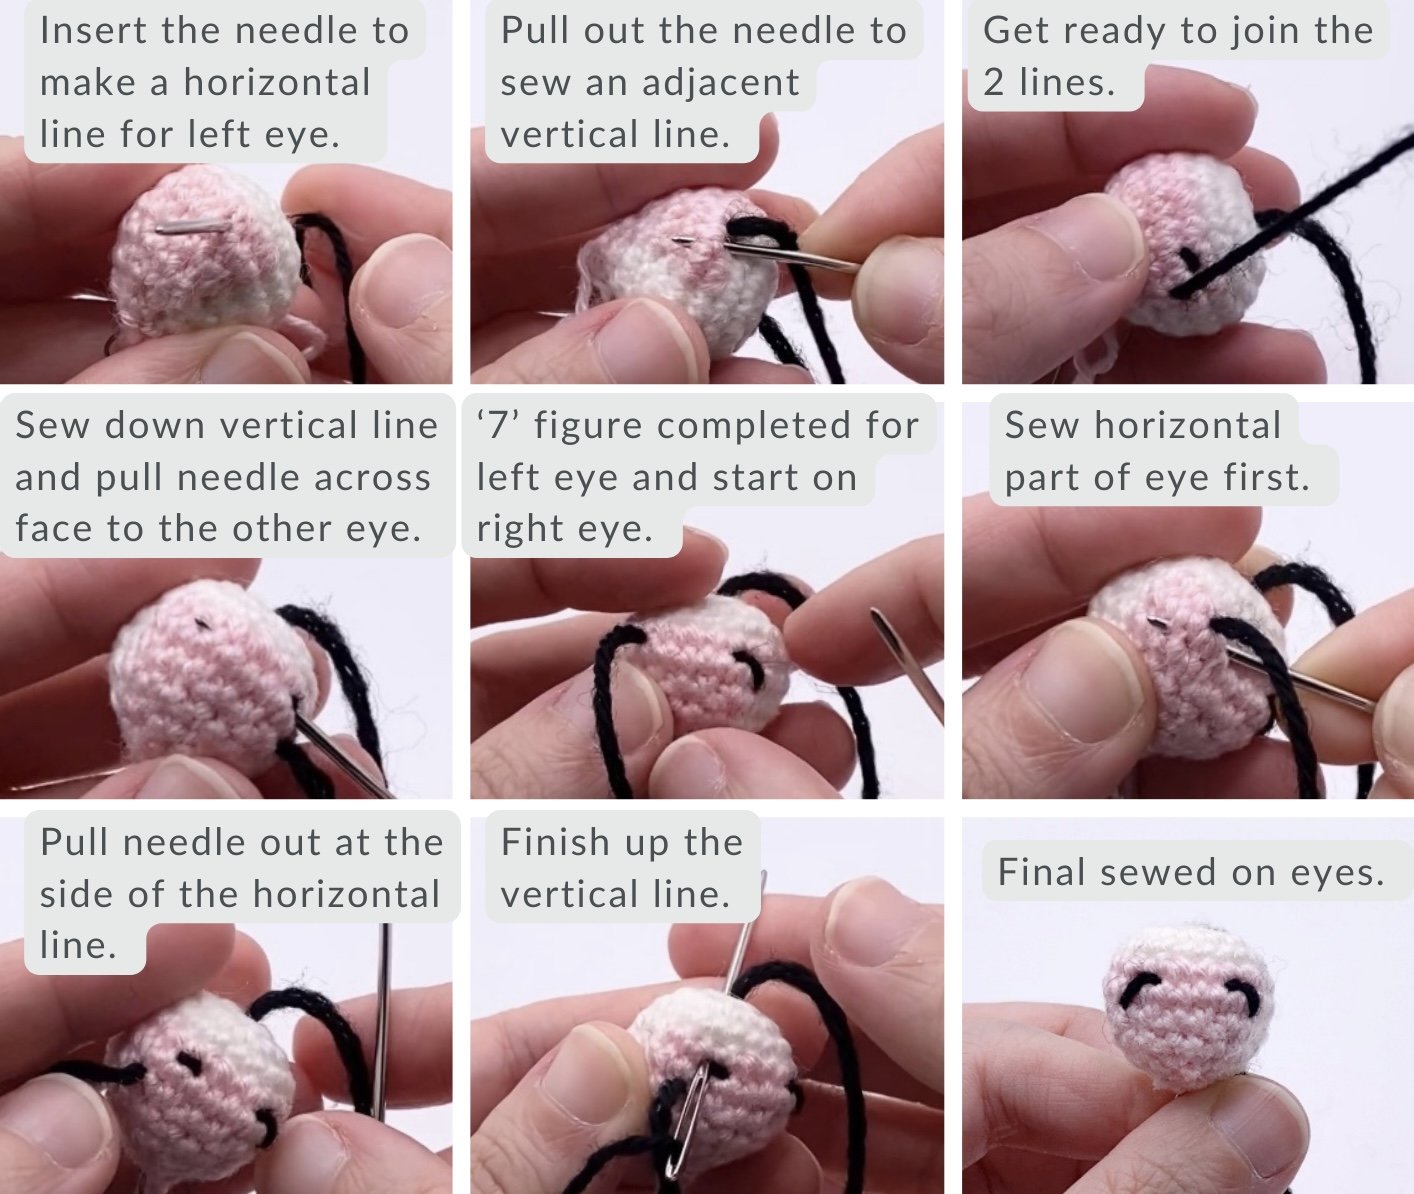
The steps involved in sewing on eyes include:
Thread yarn (using white one) through darning needle, insert into the head to make a horizontal line.
Pull needle out of side of face to make a perpendicular vertical line, so that have one ‘7’-figure.
Thread needle across the face and pull out to sew a horizontal line for the other eye.
Complete it with a perpendicular vertical line at the side of face.
Pull out both strands at the end, tie a dead knot and hide it back into the head.

Sew on amigurumi eyes
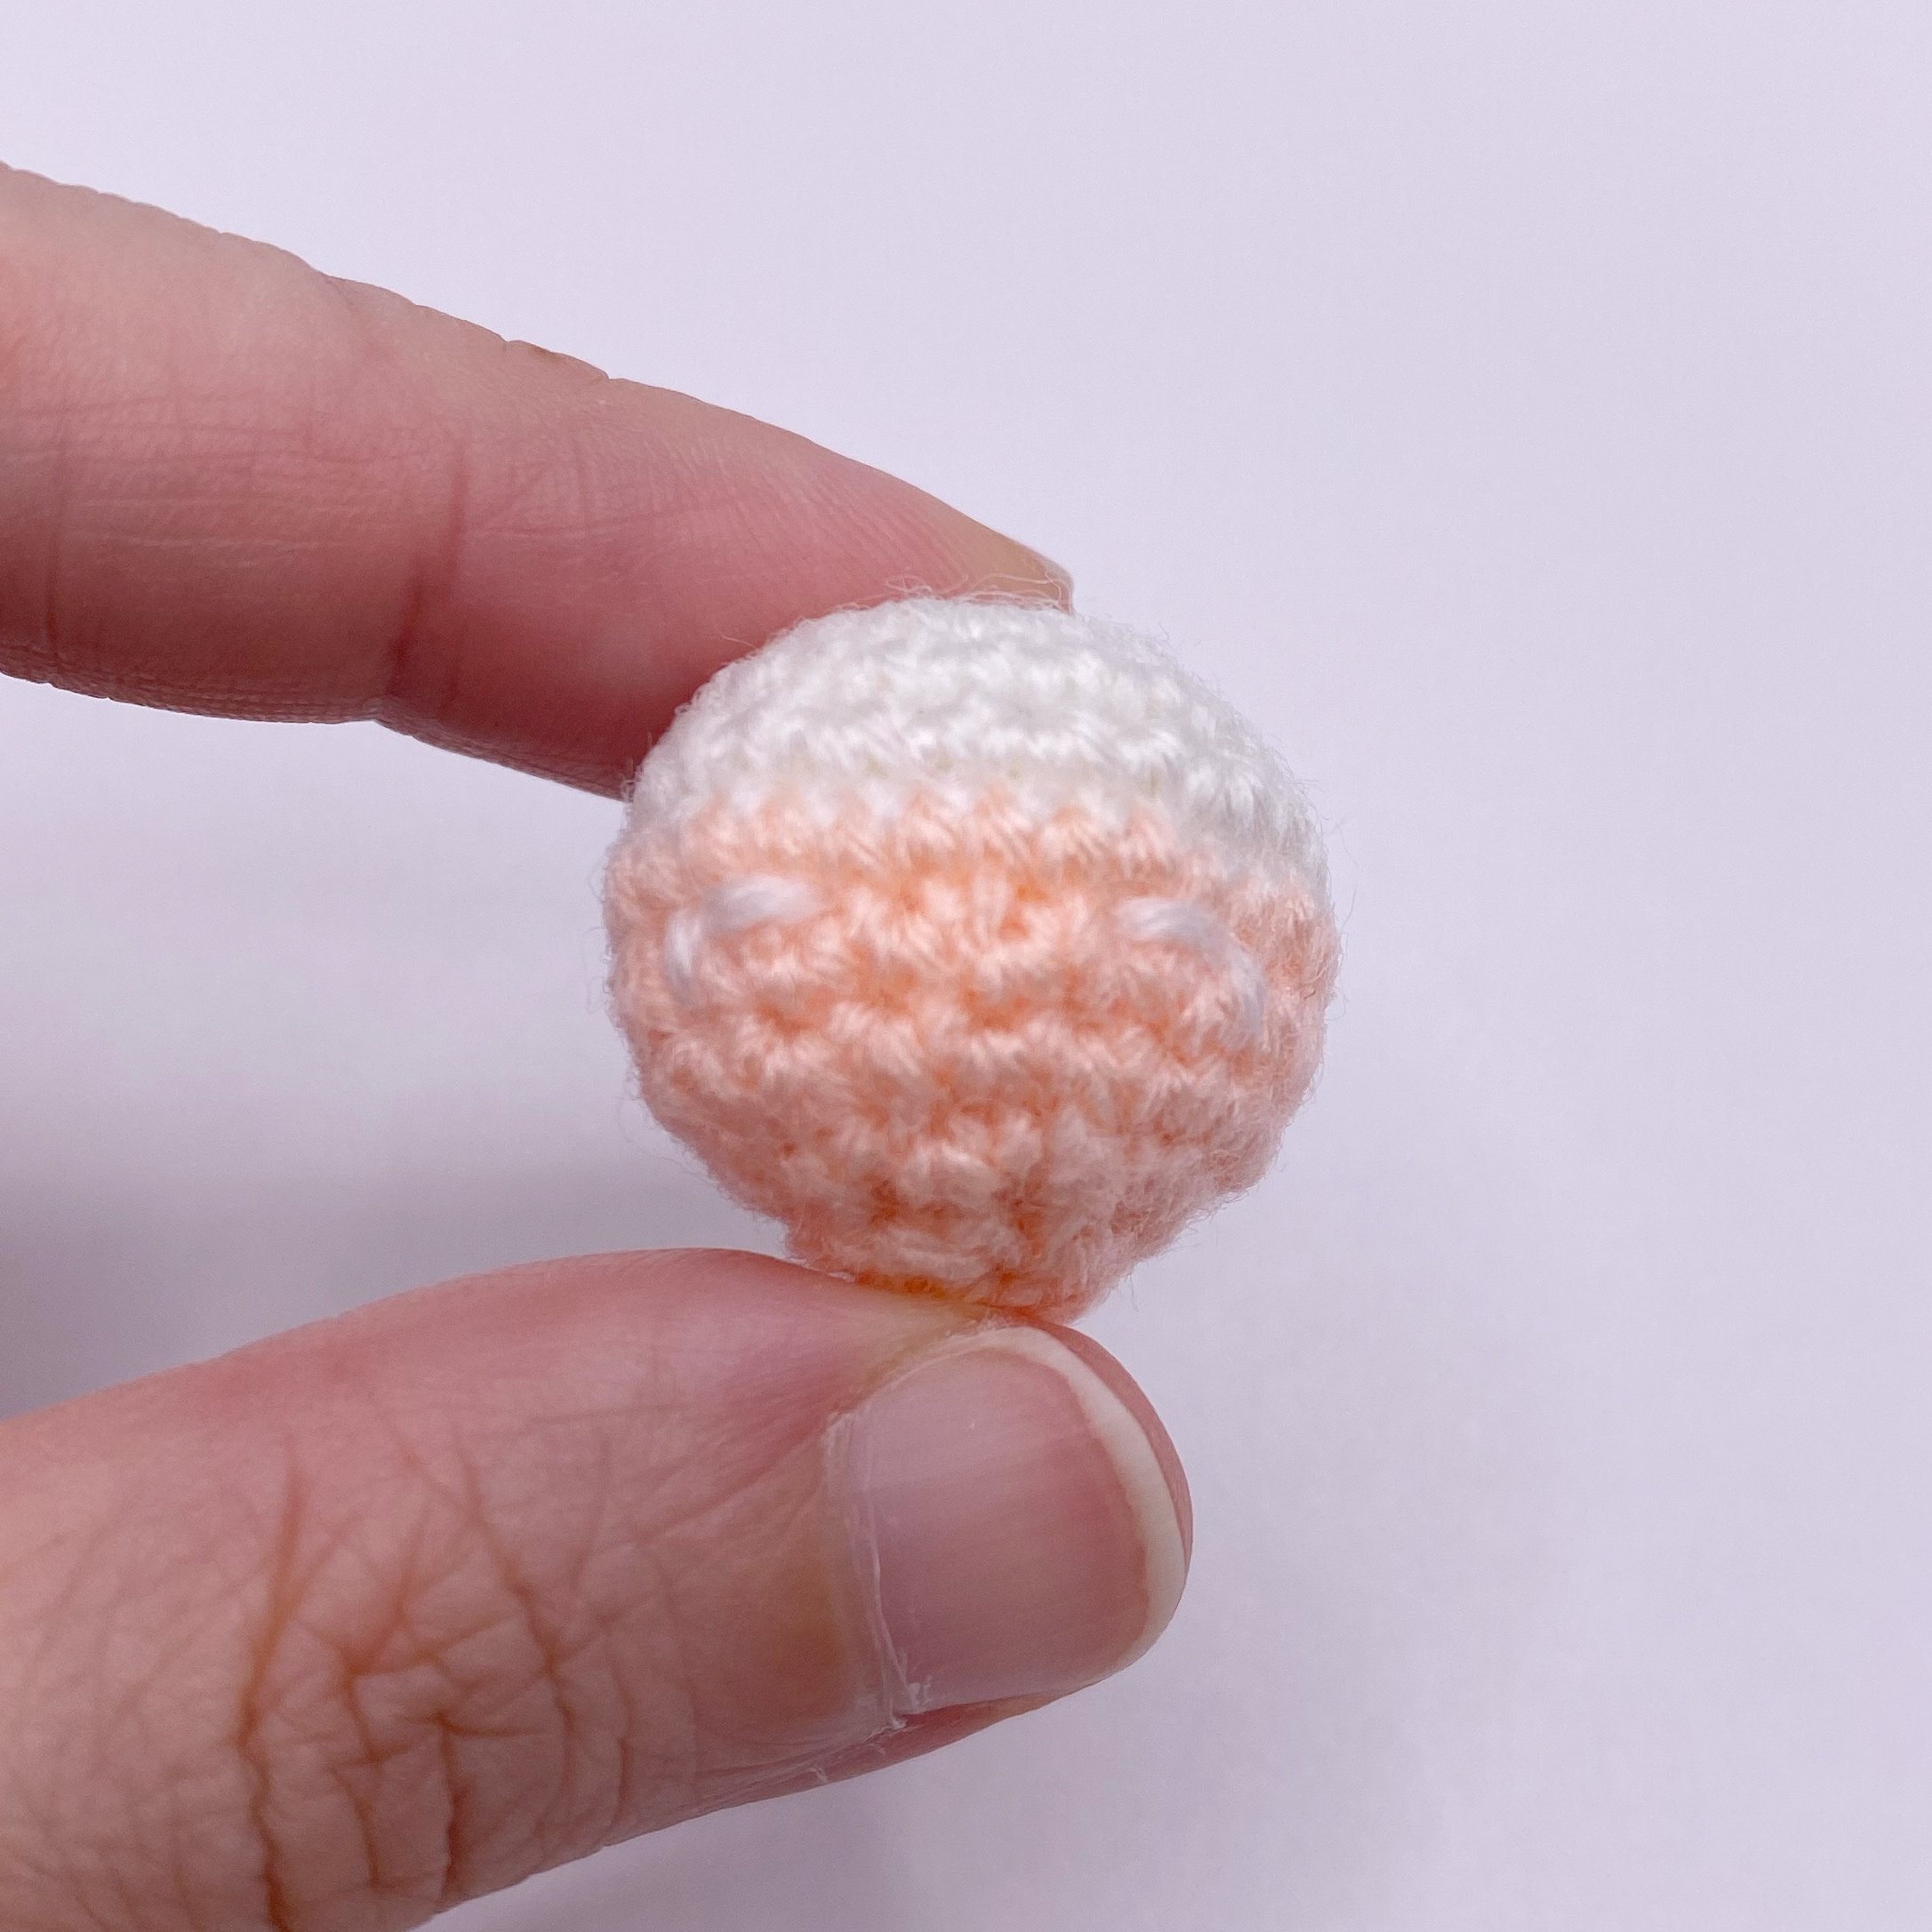
Ta-da! The final small spherical amigurumi head, just to start off! Wasn’t too difficult right?
If you’d rather have everything you’ve just learned — and more — in one beautifully organized guide, you’ll love my free 77-page Amigurumi Foundation eBook. It’s normally $17, but I’m giving it to Pocket Yarnlings readers to help you start your crochet journey with confidence.
💡 Want to learn all the basics of crocheting amigurumi in one place?
Grab my free 77-page Amigurumi Foundation eBook — your complete step-by-step guide to mastering tools, stitches, and beginner toy techniques (normally $17!).