

Step-by-Step Guide: How to Effortlessly Master the Slip Knot in Crochet for Beginners
Are you new to crochet and wondering how to get started? One important technique to learn is the slip knot. This simple knot is the foundation for many crochet projects, and once you master it, you'll be able to create a wide range of items, from scarves and hats to blankets and more.
Let's get started!
Table of Contents Show
What is a Slip Knot in Crochet?
A slip knot is a basic knot used in crochet to create the initial loop on your crochet hook. It is the first step before starting any crochet project.
The slip knot creates an adjustable loop that can be easily tightened or loosened by pulling on the yarn ends. It provides a secure starting point for your crochet project and allows you to easily begin working stitches onto your hook.
How to Make a Slip Knot in Crochet?
Materials Needed
To make a slip knot in crochet, you will need the following materials:
Crochet hook
Yarn

Easy way to do a Slip Knot in crochet
A slip knot is basically a small knot that is made on the crochet hook and is the basic starting point before you continue with crocheting a foundation chain.
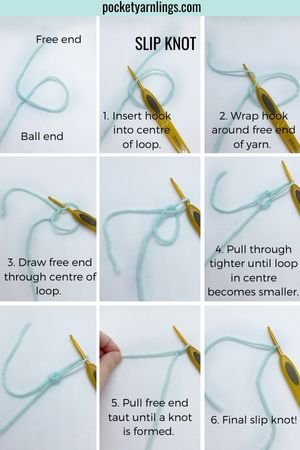
Cross the free end of yarn over the trailing end.
Insert hook into centre of loop.
Wrap hook around free end of yarn.
Draw free end through centre of loop.
Pull through tighter until loop in centre becomes smaller.
Do not let the free end of the yarn come out of the circle loop.
Pull free end taut until a knot is formed.
Make the loop on the hook smaller by pulling on the free end of the yarn.
When the final knot is taut on the hook, you have a slip knot!
Congratulations! You have successfully made a slip knot. This knot is the foundation for most crochet projects and is essential to learn for any beginner. Make sure to practice until you feel comfortable with the process.
What is a Crochet Chain Slip Knot?
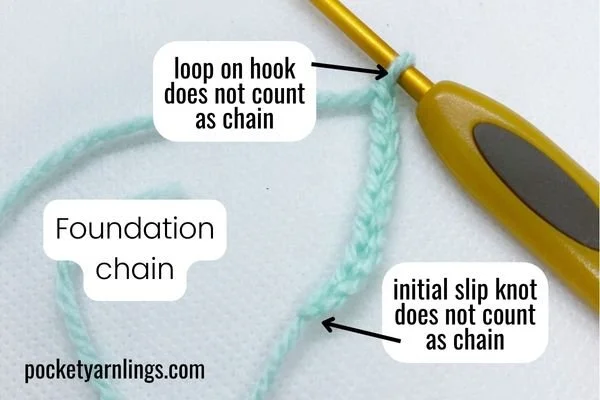
The crochet chain is generally what you move onto from the slip knot. There are 2 types of crochet chain stitches - foundation chain and turning chain. The next natural progression after a slip knot is a foundation chain. Just below here I will be talking about 1 basic crochet chain stitch first and then a foundation chain, which consists of multiple chain stitches.

How to Start a Crochet Chain Slip Knot?
First off, let us talk about crocheting a foundation chain. You should have a slip knot resting in the middle of your crochet hook, then simply yarn over the tip of your crochet hook and pull through the loop on the hook. Then you have your chain stitch, it’s as simple as that.
Repeat this process above a few more times, for example if a pattern says chain 7, then repeat this above process a total of 7 times to create 7 chain stitches. This forms the foundation chain in crochet.

As for a turning chain stitch, it only happens after you have completed rows of stitches and you intend to turn the whole piece, then you would chain 1 and turn. The process of crocheting the chain is the same but it is used in a different scenario. This would make more sense after you have mastered crocheting in rows.
To learn more about turning chains, check out this article on “18 detailed ways to figure out Turning Chains in Crochet“.
If you found this article useful, remember to pin to Pinterest for reference later or share there so that others might benefit from reading this too!
Common Mistakes and How to Avoid Them
Crocheting a slip knot is a basic skill that every beginner needs to learn. Although it may seem simple, there are some common mistakes that can make the process frustrating and time-consuming. Here are some tips to help you avoid these mistakes and make your slip knot crocheting experience more enjoyable.
Mistake 1: Tightening the Slip Knot Too Much
One of the most common mistakes when making a slip knot is tightening it too much. This can make it difficult to insert your hook and work your first few stitches. To avoid this mistake, make sure that you leave enough slack in the loop to allow your hook to easily slide through.
Mistake 2: Making the Loop Too Small
Another mistake that can make it difficult to work your first few stitches is making the loop too small. If the loop is too small, it will be difficult to insert your hook and work your stitches. To avoid this mistake, make sure that you create a loop that is large enough to easily accommodate your hook.
Mistake 3: Not Pulling the Working Yarn Tight Enough
When making a slip knot, it is important to pull the working yarn tight enough to create a secure knot. If the knot is not tight enough, it may come undone as you work your stitches. To avoid this mistake, make sure that you pull the working yarn tight enough to create a snug knot.
Mistake 4: Using the Wrong Type of Yarn
The type of yarn you use can also affect the ease of making a slip knot. If you are using a slippery or smooth yarn, it may be difficult to create a secure knot. To avoid this mistake, try using a yarn with more texture or grip, or adjust your tension to create a tighter knot.
By avoiding these common mistakes, you can make your slip knot crocheting experience more enjoyable and successful. Remember to take your time and practice, and soon you will be creating slip knots with ease.
Different Uses of Slip Knots in Crochet
Starting a Crochet Project
When starting a crochet project, the slip knot is the first step. It creates a loop at the end of the yarn, which is then used to begin the first stitch. To create a slip knot, make a loop with the yarn and then cross the end of the yarn over the loop. Next, insert the end of the yarn through the loop and pull it tight. The slip knot should be snug but not too tight.
Joining New Yarn in Crochet
Another use for the slip knot in crochet is to join a new ball or skein of yarn. To do this, create a slip knot with the new yarn and insert the hook into the last stitch of the previous row. Then, pull the loop of the slip knot through the stitch and continue with the next row using the new yarn.
When joining new yarn, it's important to make sure the knot is secure and won't come undone. One way to do this is to tie a knot with the old and new yarns together before continuing with the slip knot.
Overall, the slip knot is a versatile and important technique in crochet. By mastering this basic skill, you can create a wide range of beautiful and functional crochet projects.
Tips for Perfecting Your Slip Knot
If you're new to crochet, mastering the slip knot is one of the first steps you'll need to take. Here are a few tips to help you perfect your slip knot:
Choose the Right Yarn: The yarn you choose can make a big difference in how easy it is to create a slip knot. Choose a yarn that is smooth and not too slippery, so it will hold the knot well.
Use the Right Tension: When creating a slip knot, it's important to use the right tension. If you pull too tightly, the knot will be difficult to work with. If you don't pull tightly enough, the knot may slip out.
Practice, Practice, Practice: Like any new skill, mastering the slip knot takes practice. Don't be discouraged if your first few attempts don't turn out perfectly. Keep practicing, and you'll get the hang of it.
Use a Tutorial: There are many great tutorials available online that can help you perfect your slip knot. Find one that works for you and follow along step-by-step. Here is a free crochet basics mini course to start off with that will teach you how to create your first slip knot and first few basic stitches as well.
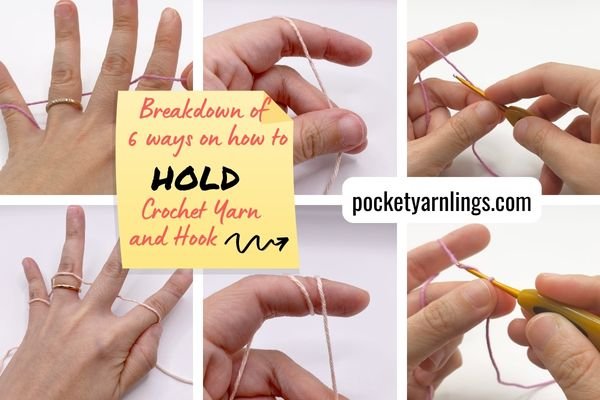
Make Adjustments: If you're having trouble with your slip knot, try making small adjustments to your technique. For example, try using a different tension or holding the yarn in a slightly different way. To learn all about different ways to hold your yarn, check out this article on “Breakdown of 6 ways on How to Hold Crochet Yarn and Hook”.
By following these tips, you'll be well on your way to creating perfect slip knots every time. Keep practicing, and before you know it, you'll be a crochet pro!
Also, remember to grab my free 45-paged cheat sheet on how to crochet for beginners step by step with pictures PDF download below. It is basically a beginner printable crochet stitch guide with free printable crochet instructions for complete beginners!
Free Beginners Step-by-step Guide
Grab these 45-pages of cheat sheets that will help you with crochet stitches, magic rings, increases and decreases, FLO and BLO. Click on image on left for access!
Differences between Slip Knot and Other Stitches
The slip knot in crochet is not technically considered a stitch but rather a knot used to start a project. Here are some common differences between a slip knot and other types of stitches.
Does the slip knot count as a stitch in crochet?
No, the slip knot is not considered a stitch in crochet. The slip knot is a knot that is made at the beginning of a crochet project to create an adjustable loop on the crochet hook. It serves as a starting point for creating the foundation chain or joining yarn. While it is an essential step in crochet, the slip knot itself does not count as a stitch in the final fabric or pattern. Stitches are typically formed by working yarn overs, insertions, and loops in subsequent steps after the slip knot.
Is the slip knot the first chain in crochet?
No, the slip knot is not considered the first chain in crochet. After creating the slip knot, you need to make the first chain stitch to begin your crochet project. The slip knot is used to secure the yarn onto the crochet hook, and then you proceed to make the first chain stitch by pulling the yarn through the slip knot loop.
This initial chain stitch establishes the foundation for subsequent stitches and sets the desired length or width of your crochet work. The slip knot and the first chain stitch work together as the starting point of your crochet project.
Can you use a slip knot instead of a magic ring?
While a slip knot and a magic ring are both techniques used to begin crocheting in the round, they serve different purposes and have distinct advantages.
While slip knots can be used to start crocheting in the round in some cases, they don't offer the same benefits as a magic ring. Slip knots tend to create a larger centre hole and can result in gaps in your work, especially when working with smaller stitches. The magic ring provides a more secure and adjustable starting point, allowing you to tighten the centre hole as needed.
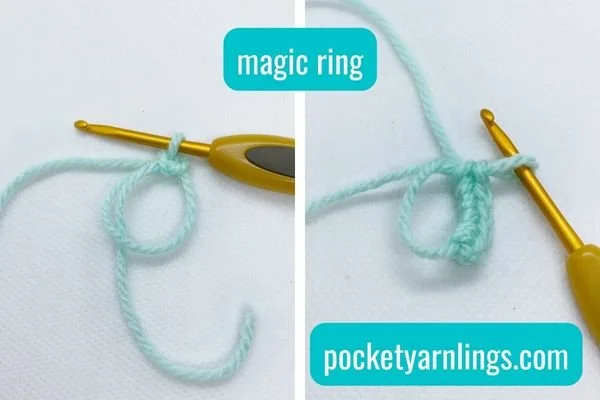
Therefore, if you are working on a project that specifically calls for a magic ring or if you want to ensure a tight centre when crocheting in the round, it is recommended to use the magic ring technique rather than relying solely on a slip knot.
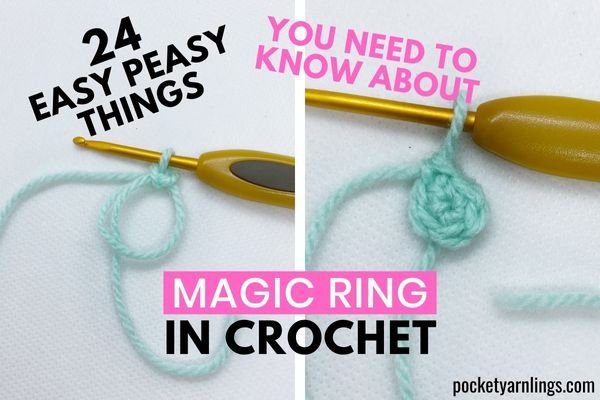
To learn all about using magic rings to start off amigurumi, check out this article on “24 Easy Peasy things you need to know about Magic Ring in Crochet“. Inside that article, I also talk about how using a slip knot, chain 2 and single crocheting into the 2nd chain from hook can be used to replace magic rings as well.
Conclusion of Slip Knot in crochet
Crocheting a slip knot is an essential skill that every crocheter must learn. It is the first step in starting any crochet project and mastering it will make your crochet experience smoother and more enjoyable.
If you found this article useful, remember to pin to Pinterest for reference later or share there so that others might benefit from reading this too!
Remember to always adjust the size of your slip knot to match the size of your crochet hook. A slip knot that is too tight will make it difficult to work your first few stitches, while a slip knot that is too loose may cause your stitches to unravel.To ensure your slip knot stays secure, make sure to hold the tail of the yarn tightly while pulling the loop snug around your crochet hook.
Now that you have mastered the slip knot, you are ready to start your next crochet project with confidence.
Also, remember to grab my free 45-paged cheat sheet on how to crochet for beginners step by step with pictures PDF download below. It is basically a beginner printable crochet stitch guide with free printable crochet instructions for complete beginners!
Free Beginners Step-by-step Guide
Grab these 45-pages of cheat sheets that will help you with crochet stitches, magic rings, increases and decreases, FLO and BLO. Click on image on left for access!
Related articles
How to Learn Basic Crochet Stitches step by step for Absolute Beginners - 6 Easy Steps!
Master the Art of Single Crochet Stitches: A Comprehensive Guide and Tips
Mastering Half Double Crochet Stitches: A Step-by-Step Guide and Tips
Mastering the Double Crochet Stitch: A Comprehensive Guide and Essential Techniques
Master the Treble Crochet Stitch: A Comprehensive Guide and Tips
Slip Stitch Crochet: A Comprehensive Beginner's Guide to Mastering the Technique