

Free Tweety Bird Crochet Pattern!

Since you have mastered the Circular series , aka circles, spheres and cylinders, (and some of Oval series), try your hand at this free Tweety Bird amigurumi pattern! It has all the circular elements you need to test out the new skills and works up fairly fast.
Terminology
Ch = chain
Sc = single crochet (2sc1 means 2 single crochet in same ch)
Sl st = slip stitch
St = stitch (refers to number of stitches in one round)
Hdc = half double crochet
Dc = double crochet (yarn over 1x)
Sc2tog1 = single crochet decrease
Bobble stitch = 4 double crochet bobble
Materials and Tools
2.0mm Clover crochet hook
Orion Top Deluxe Yarn, Crown Yarn (or any equivalent acrylic yarn) - white, beige, light blue, baby blue, silver
Darning needle
Stitch markers
Filling – use leftover yarn or polyester fiberfill
Scissors
4mm glass eyes or safety eyes
Recycled white cloth
Blue pen or marker
Craft wires
Head – yellow
Round 1: Magic ring 6 – 6st
Round 2: 2sc6 – 12st
Round 3: (Sc1, 2sc1) x 6 – 18st
Round 4: (Sc2, 2sc1) x 6 – 24st
Round 5: Sc24 – 24st
Round 6: (Sc2, sc2tog1) x 6 – 18st
Round 7: Sc18 – 18st
Round 8: (Sc1, sc2tog1) x 6 – 12st
Round 9: Sc12 – 12st
Lightly stuff the head before closing it up in the next round.
Round 10: Sc2tog6 – 6st
See the video on how to crochet a sphere using crochet in a round here or see whole blog post about it to get you started on Tweety’s head.

Body (continue from head) – yellow
Round 11: Sc2, 2sc4 – 10st
Round 12: Sc10 – 10st
Round 13: Sc4, 5th arm, sc3, 9th arm, sc1 – 10st Arms (at 5th and 9th position): 4dc bobble stitch, top and bottom half all yellow
Round 14: Sc10 – 10st
Round 15: Magic ring 10, to join up to round 14 – 10st
See the video on how to crochet a sphere using bobble stitch here or see whole blog post about it to get you started on Tweety’s arms.
Mouth / Beak x 2 – orange
Ch3, sl st 1, hdc1
Make 2 triangular pieces and sew 1 side of it together, so that it forms a sharp beak.
Cheeks x 2 – yellow
Round 1: Magic ring 5 – 5st
Round 2: Sc5 – 5st
Similarly using the same technique as above in crocheting a round to create a sphere.
Legs x 2 – orange
Round 1: Magic ring 5 – 5st
Round 2: Sc5 – 5st
Round 3: Repeat round 2 – 5st
Round 4: Sc2tog2, sc1 – 3st
Round 5: Sc3 – 3st
String a wire inside to make the legs bendable, on both sides.
Tail – yellow
Do a basic crochet cord:
Row 1: Ch2, sc1, turn work slightly clockwise
Row 2: Sc1 into horizontal bar on the side of previous sc, turn the work such that horizontal bars are facing forward towards you
Row 3: Sc1 into both horizontal bars on side of previous sc
Row 4-7: Repeat rounds 2-3 another 2 more times
This step is more complex, there’s also a whole tutorial here on how to make basic crochet stitches. Or if you are not ready to tackle this yet, you can try this simpler version to make the tail:
Round 1: Ch2 then sc3 – 3st
Round 2: Sc3 – 3st
Round 3-5: Repeat round 2 – 3st

Assembly
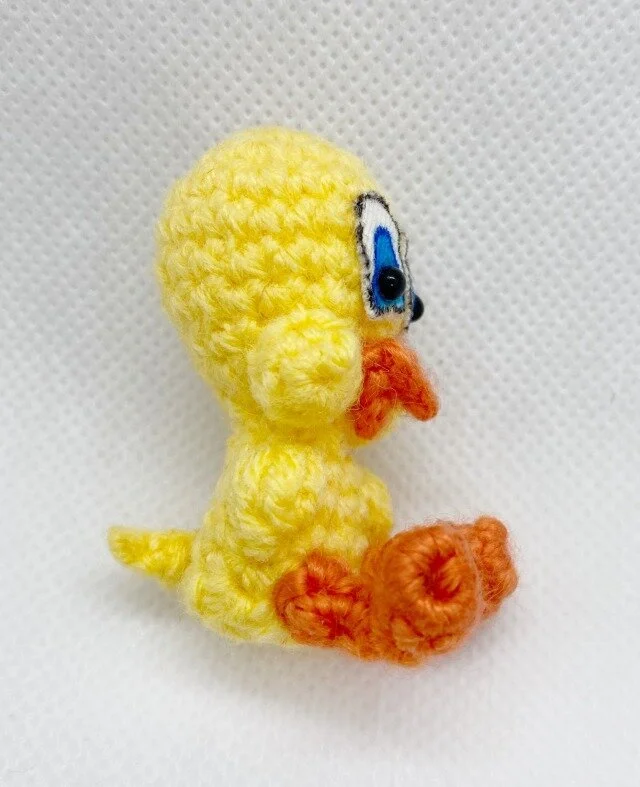
1. Mouth / beak
Attach the beak over the bottom 1/3 of face in the midline.
2. Cheeks
Attach the cheeks to either side of the beak, over the lower half of the face.
3. Eyes
Use blue marker or blue pen to colour a small bottom oval section of the white oval cloth patches.
Place the 2 white oval cloth patches just above the beak.
Attach the glass eyes at bottom of the white eye patches, over the coloured blue region.
4. Legs
Sew on the legs to round 14 of the main body, just below both bobble arms, such that they are facing outwards in a sitting position.
5. Tail
Attach joint tail piece to the back of main body piece, at bottom and in the midline.

Ta-da the final Tweety! The eyes I used good old fashioned cloth and markers, much easier to start off with than using felting tools. Of course, Tweety is often accompanied by Sylvester below! Stay tuned for the full Looney Tunes patterns!
Hope you enjoy using this pattern to make your own little Tweeties! It’s fairly simple and quick to finish. I would love to see them if you finished them, tag me on instagram so I can see them. I will make the PDF download available soon on Ravelry as well!