

Making the Basic Crochet Cords in Loki

Mastering how to make the basic crochet cord makes for a useful skill in making amigurumi. In this particular case, I used that technique to make Loki’s horned helmet as well as his embellishments on his clothes. Read on to see how to make a basic crochet cord.

Making a basic crochet cord step-by-step
Start off with a slip knot, then ch2. Sc1 in the stitch away from the hook. If you don’t know the basics like slip knots and single crochet - go download my free 30-page ebook here to start off with.

The outlined part in the picture above shows the FLO (front loop only) of stitch closest to hook. This is where to first insert hook to make the first single crochet.

Pictures 2 and 3 are the same but with different view points, just flip the whole cord upwards to get the view in picture 3.

After completing the 1st single crochet in the cord, aim the insertion of hook into the outlined part in the picture. That outline actually represents the FLO (front loop only) of the stitch closest to the hook and the parallel loop just below it (= previous round FLO). Flip cord upwards in picture 7 (same step as picture 6 with different view).
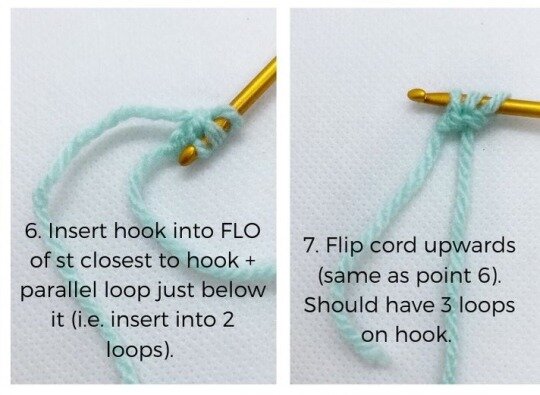
This time after you yarn over, draw yarn only through 2 loops, not all 3. (Similar to last part of a double crochet.)

Complete 2nd single crochet in cord, now you have 2 layers in the cord!

Continue repeating above steps until you get a longer cord.

Lower pictures show a cord of 3 layers and a cord of 10 layers.

So back to Loki again:
For his helmet, I did a longer basic crochet cord and inserted metal wires inside to make the horned part, so it can be bent into shape. As for the green embellishment on his clothes, it was only 3 layers to get the effect I wanted!
For the full step-by-step guide in PDF form, download free 30-page ebook on basic crochet stitches here.
As for if you want to try making the classical Loki you see above, check it out here.
Hope you learnt something useful for your amigurumi!