

8 effortless ways to tell Which side of yarn is Right side in Crochet
If you have always wondered which side of the crochet project is the right side or the wrong side, then hopefully you get the answers here! There is a combination of various ways to do this, some by just visually looking at your project and some by the techniques you actuallly use when crocheting. By the end of this post, you should know your right from your wrong very easily!
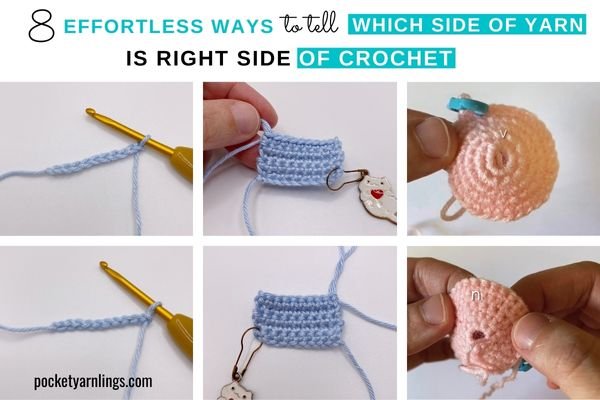
Table of Contents Show
What is RS and WS in Crochet?
RS refers to the right side while WS refers to the wrong side. Let us start off with a simple question first, which is does the crochet project even look the same on both sides. This could refer to an amigurumi project which involves rounds, or it could refer to a flat 2D project like a coaster or blanket which involves rows.
Does crochet look the same on both sides?
The quick answer is of course, crochet does not look the same on both sides. Here I will go through a rundown of how to differentiate RS from WS visually in 3 different situations so that at a glance, you can make a quick judgement, which side you are looking at - in a chain, row and round.
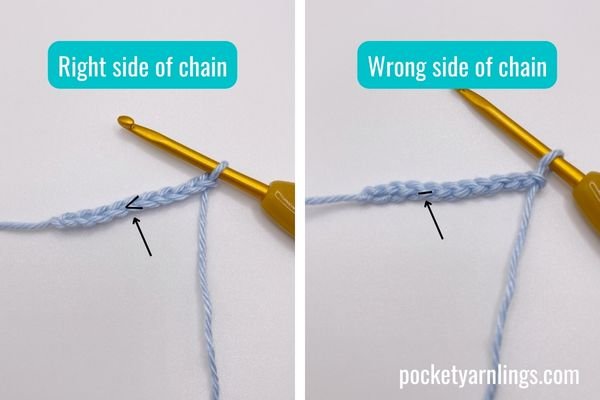
Chain
A foundation chain is usually how you first start off after completing a slip knot and before you progress to rows. To differentiate the right side, it has the most classical looking row of 'V's on the right side, while the wrong side has the horizontal bars. Just from visually looking at both sides of the chain, you can determine which is RS from WS.
Row
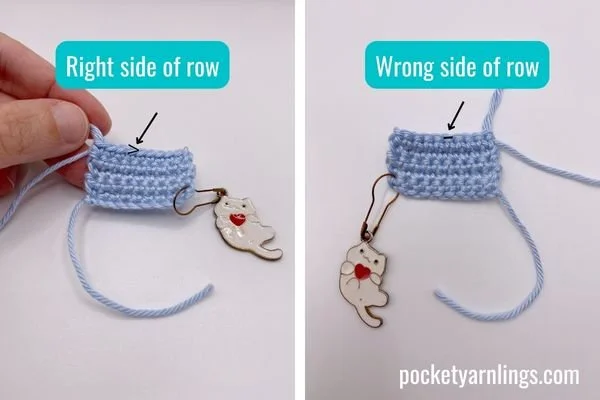
After finishing up a chain and moving onto a row and then completing many rows, then try spotting the difference between RS and WS. The top row where you are crocheting along is the key to identifying.
If you can see the obvious 'V's along the row, then that side facing you is the right side. The wrong side on the other hand, has the 'V's in a row pointing away from you. There are other ways of differentiating in rows that I will go through later on.
Round
Rounds are most commonly used in making amigurumi. When you start off the rounds and then you continue on for the next 10 rounds, sometimes you might find yourself wondering which side is supposed to be facing out. Look closely at your stitches, the ones that are on the RS or facing outwards, should have very clear 'V' stitches, while the ones facing inwards or the WS, will have 'n' stitches instead. I will go through even more differentiating factors later below.

With thes 3 suggestions above, at a glance you could possibly have an idea which is the right and wrong sides of your crochet projects. Now you must be wondering, does it even really matter?
Free Beginners Step-by-step Guide
Grab these 45-pages of cheat sheets that will help you with crochet stitches, magic rings, increases and decreases, FLO and BLO. Click on image on left for access!
Does it matter if I crochet with right or wrong side out?
Some crocheters have been doing crocheting for a long time and sometimes might not even know they were crocheting the wrong side facing outwards. To be really honest, if that is what you are used to and all your projects have been like this all along, there is no hard and fast rule that you must crochet the RS facing out and WS facing in. However, here are a few considerations below as to why most crocheters still do it the right way.
Appearance
Let us go through some reasons to convince you that you should crochet the 'right' way. To be honest, my general philosophy is to do what you enjoy most, after all, crocheting is supposed to be relaxing right - so you do what you like best. Here are some of my reasons why doing it the right way might make crocheting easier for you.
Most patterns are written in the right way
First off, if you like to download free crochet patterns or even willing to spend money on them, then you need to know how to read them. Most amigurumi and crochet patterns are written with the RS facing outwards and WS facing inwards in mind. So if you want your final project to look like the photo you purchased, then you have to follow the designer's instructions!
Neater and less fuzzy appearance
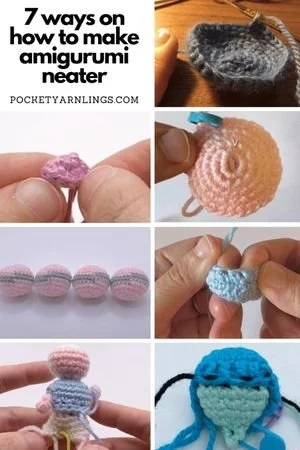
This is relative though, each crocheter has their own personal preference. But in general, you would see that the stitches inside the amigurumi project tend to look a little fuzzier, so if you have it facing outwards, then it might appear a bit messier. You would want your amigurumi at the end to look neater, so aim for the RS outside. You can also check out this post on '7 Useful Ways on How to Make Amigurumi Neater?'.
Better shaping
Make unique and polished amigurumi is all about combining many different types of 3D shapes. So amigurumi shaping is the process of crocheting and bringing together many different 3-dimensional shapes to form one unified figure or toy. You will find that you can get better shaping with the RS pointing outwards and the WS inwards with the stuffing inside. Sometimes it has to do with sewing separate pieces together or sometimes it could be from surface crocheting. Working with the 'V' stitches outwards makes those steps easier to carry out.
To find out more about amigurumi shaping, check out this post on 'How do you Shape Amigurumi?' or you can grab my free Amigurumi Shaping Starter Guide here!

Techniques
Now that we have gone through some of the appearance reasons for crocheting the right and wrong sides correctly, let us talk about how it actually makes the crocheting process and techniques easier as well.
Easier to work the rounds
When crocheting in rounds, with the wrong side facing outwards, there is a tendency for the project to curve inwards. On the other hand, when you crochet with the correct side facing outwards, when working the rounds, you would tend to project outwards and frankly, the stitches are much easier to see!
Easier to work into FLO and BLO
The reason for the above is probably because the front and back loops are much more obvious when the right side is on the outside. They tend to tilt facing out, making each individual stitch easier to see and easier to insert into - which can be very important for darker coloured yarn like black!
Invisible decrease is easier
Along the same lines, because the FLO is more obvious, invisible decreases are easier. Invisible decrease or sc2tog inv dec, as you know, involves inserting the hook into 2 adjacent FLO and bringing them together to decrease. If you are not sure what I am talking about here, remember to check out this article on '15 different detailed Ways on How to Decrease in Crochet'.

So with the FLO being easier to see, means any crochet techniques involving the outward facing FLO will be easier!
If you found this tutorial useful, please remember to share it or pin it to Pinterest with the image below!

What does it mean to crochet on the right side?
Ok so now that you are convinced that you should be crocheting the right way, let us get to get to crochet on the right side. Above I talked about identifying the right and wrong sides when looking at the crochet project itself, while below I will talk further on how during the process of crocheting, you can also get other clues whether you are working on the right side.
First we will talk about chains, then rows then finally rounds.
Chains
So I briefly did mention above the differences between the right and wrong sides of a chain, the right side having the 'V' stitches while the wrong side having the horizontal bars. Here I will talk about the process of crocheting into the RS and WS.
How do you crochet on the right side of a chain?
Traditionally, after you have completed the foundation chain, you would insert the hook into the 2nd chain from hook, in between the front and the back loops, then yarn over, pull through and proceed to work a single crochet. Then you continue working down the rest of the chain with repeatedly inserting the hook in between the FLO and BLO.

How do you crochet on the wrong side of a chain?
This on the other hand is not commonly done, even though I have used this technique in my amigurumi projects in select situations. Once you have completed the foundation chain, flip the whole piece around such that the horizontal bars are facing you. Then proceed to insert the hook into the chain just below the horizontal bar, then as always, yarn over, pull through and continue into a sc.

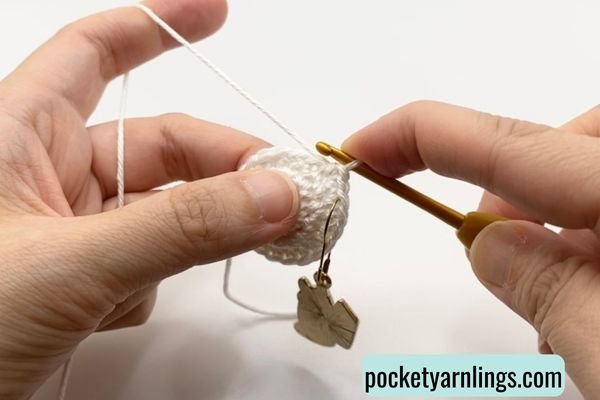
The appearance is definitely slightly different from the above and might be used in special situations. One example I have is when I am trying to make a separate attachment for my amigurumi and I am trying to make the flat 2D piece symmetrical on both sides, sometimes I might have to work into the wrong side of a chain. See the example of making facial hair for my amigurumi here.
Rows
Moving onto rows, which is actually quite different from just crocheting into chains. First we clarify a few common questions first before moving onto which is the right side in crochet in rows. I have to admit that while I was researching for this post, I learnt about some nuances with writing patterns that I made mistakes with (honestly, even though I have written for magazines lol!).
What counts as the first row in crochet?
The first row in crochet is the first row that you actually crocheted, meaning the starting chain is not considered the first row. This is the mistake that I mentioned I made inside my patterns because I was always writing row 1 as the chain. Looking back now, all the magazine submissions I believe I was corrected!
To be honest, it might not make a big difference in your final project but for the sake of references to terminology here in this post, I wanted to get things right so you would understand RS from WS.

Is the first row of crochet the right side?
Yes the first row in crocheting is considered the right side, like I mentioned, this does not involve the foundation chain. So technically, the right side of the rows in crochet will be in odd numbers and alternate with the wrong sides. Here is an simple example below:
Chain 11. (<-- not considered into the row count)
Row 1: Sc10, ch1 and turn - 10st (<-- this is considered the first row and RS)
Row 2: Sc10, ch1 and turn - 10st (<-- wrong side and even number)
Row 3: Sc10, ch1 and turn - 10st (<-- right side and odd number)
How do you know which is the right side in crochet in rows?
Here are 4 simple tips below on how to tell which is right side from wrong side in crocheting rows. Some of the points are mentioned briefly above but I have included all of them here:
1) Odd numbered rows
With the example above, you should know that the odd numbered rows are the right side while the even numbered rows are the wrong side. So take reference to your crochet pattern, but also check that the pattern designer is writing correctly - the initial chain is not counted as row 1.
2) Obvious 'V' stitches facing you
Also mentioned right above, when crocheting along a row, the topmost row or the active working row, will have the 'V' stitches more prominent and facing towards you when you are on the right side. Conversely, it will face away from you when working the wrong sides.
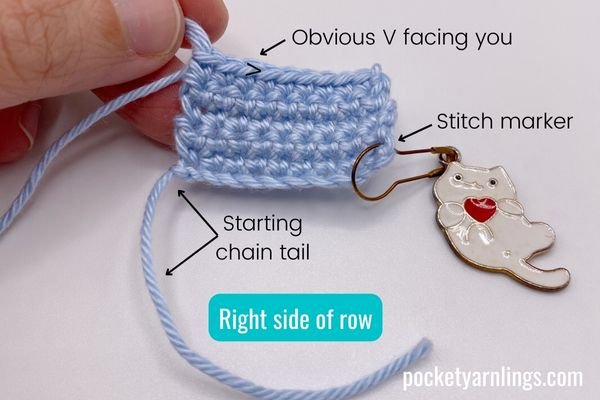
3) Starting chain tail
The foundation chain would have started with an initial slip knot and then initial yarn tail. This can be used as a reference point, here I will be talking about right-handers, just for clarification. When working into the right side, the chain tail should always be on your left side. Likewise, when you flip the crochet project to the wrong side, the chain tail will appear on the your right side.
Just remember, when working in right side, chain tail is on your LEFT.
4) Keeping count
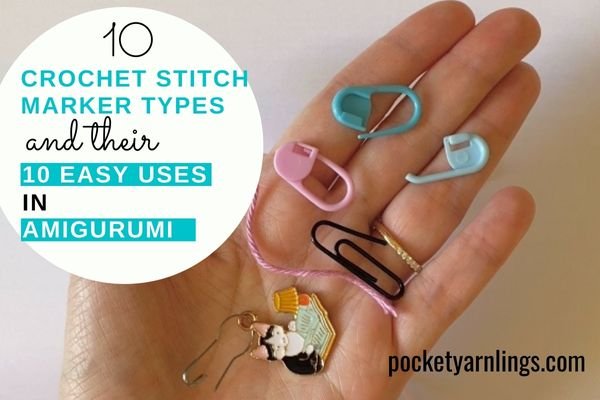
If you get confused especially for very big crochet projects, you could simply keep count of the right sided rows with a stitch marker. A stitch marker has a lot of uses and this is one of them! Never heard of a stitch marker? Then check out this post on '10 Crochet Stitch Marker Types and their 10 easy Uses in Amigurumi' and see why I love using them!
How do you mark a row in crocheting?
Finish your initial foundation chain then continue working into the first row. Using a stitch marker (or a paper clip or a safety pin), insert it into the start of the first row, i.e. the first single crochet stitch of the first row. From there, you can count, the next row will be the WS, and the next next row will be the RS.
Or if you have many stitch markers, then just insert it into every alternate row right after you placed the first one in the first row! If you have no idea what stitch markers are, then check out this post below on ‘10 crochet stitch marker types and their easy uses in amigurumi’!
What does ending on a wrong side row mean in crochet?
Ending on a wrong side row simply means ending on an even-numbered row and then finishing off. Alternatively, when you end off on a wrong side row, the ending tail yarn is opposite side from the starting chain tail - this might be easier to see and localise.
Rounds
Finally let us move onto rounds, especially with amigurumi projects. Most of the suggestions are totally different from that of rows above, because the appearance of rows and rounds are different! We will go through how to tell RS from WS and then talk about some other tips to help with differentiating the inside from the outside of the project.
How to tell right side of crochet in the round?
There are total 7 simple tips on how to tell which is right side from wrong side in crocheting rounds. Some of the points are mentioned briefly above but I have included all of them here for completedness:
1) 'V' stitches facing you and 'n' stitches away from you
Just look closely at the individual stitches and you will see the ones that are supposed to be facing outwards include the 'V' stitches, while the ones pointing inwards include the 'n' stitches (note that it looks like small n, not large capital 'N').
2) Neater and less fuzzy appearance
Even though this can be kind of subjective but if you are wondering why your amigurumi looks so fuzzy on the outside (unless that is the intended effect) then you could be crocheting the wrong way outwards.
3) Starting chain tail
When you first start off an amigurumi round, tuck the starting chain tail on the wrong side (or the inside). This is a quick and easy landmark for the wrong side of the project, after all you want to tuck the stray ends hidden within the amigurumi, am I right?

4) Anti-Clockwise direction of crocheting
If you have always been wondering, do I crochet right to left or left to right - then an easier way to answer that would be whether in clockwise or anti-clockwise direction. For the row example above, whether you are working into the RS or the WS, you will always be crocheting right to left (or clockwise), so this is not a good example to differentiate the sides for rows.
As for rounds though, take note of the general direction of the whole round. If you are working anti-clockwise then you are crocheting on the right side outwards, while conversely, working in an clockwise direction means the wrong side is facing outwards.

This technique of identification has been most useful for me, especially when I am surface crocheting on limbs for my amigurumi, I have confused myself a few times! Also, when I work in rows and then choose to continue on rounds, meaning that I join end to end, I always make it a point that the eventual round is to be worked in a anti-clockwise direction.
How do you tell if crochet is inside out?
Here are the remaining 3 additional tips you can use to make sure the crochet in not inside out.
5) Obvious FLO and BLO on the outside
Similar to working along rows, the front and back loops are most obvious facing outwards on the right side, which actually makes crocheting your project easier! If you are wondering why it is so difficult to see the FLO and BLO and they are facing away from you, chances are you are crocheting with the WS inside out.
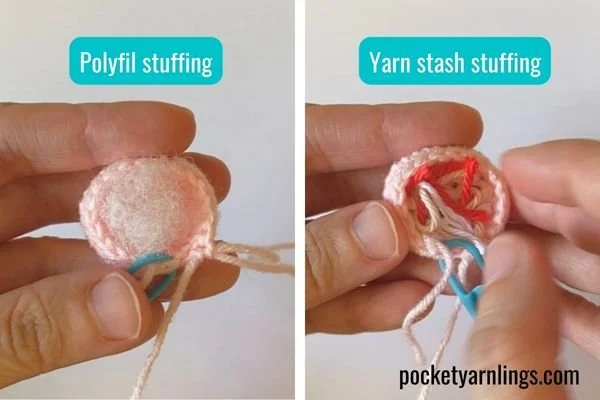
6) Add stuffing quickly to mark wrong side
Use other accessories to help with identifying the right side. Once you have made most of the initial hemispheres (for amigurumi heads) and the project starts to curl inwards, add stuffing quickly so you know that side is the wrong side. You should be stuffing where you see the initial chain tail.
7) Place stitch marker facing outwards
Another accessory you could use is a stitch marker, which is super essential for crocheting amigurumi in rounds, because you could easily lose track of the start of the round! Just from the position of the stitch marker after you insert it in, it should be facing outwards, which is the correct side. It is the same concept as FLO and BLO facing outwards.
How do you change direction when crocheting?
Just before ending off, I thought I would briefly talk about changing direction when crocheting because I often employ this technique for special situations in my amigurumi. For the example of crocheting in rows, it is fairly simple, work down the row, then chain 1 and turn the whole piece and then resume working along the next row.
As for the example of crocheting along rounds, when working correctly, you should be crocheting in a clockwise direction. Sometimes you might choose to change direction, if so, similarly chain 1 and turn, then reverse the direction and continue working in a new anti-clockwise direction.
Some examples of why I would do this include crocheting a simple wig cap. I usuallly start off with a standard hemisphere and then when I want to continue the make the hair that only wraps around the back of the head, I switch to rows - crochet clockwise, chain 1 and turn, then anti-clockwise, then reverse again and back and forth.
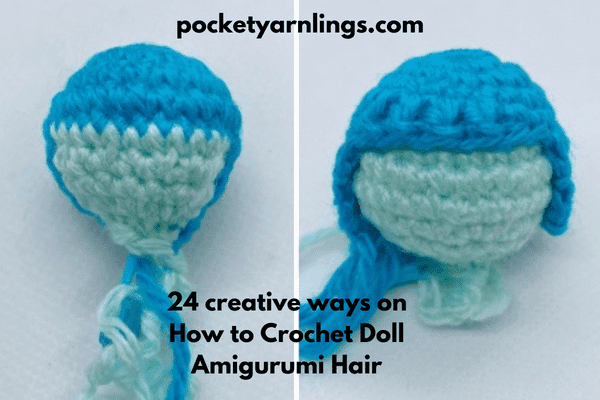
Finally I would get the hemisphere at the top and the continuous rectangle piece just below, so that it can wrap around the posterior head. For more ideas on crocheting amigurumi hair, refer to this post '24 creative ways on How to Crochet Doll Amigurumi Hair'.
Another example is when I am crocheting a bend in a cylinder, which can be done by crocheting a small triangle only on one side of the cylinder by working back and forth in alternating directions. Then finish off by continuing back into a regular clockwise round, and proceed to crochet the next round around the triangle. Some of these examples are slightly more advanced techniques that you can try when you are more confident. I thought just to include some examples!

Conclusion of how to tell right from wrong side in crochet
I hope this has been most helpful for you in identifying the right and wrong sides in your projects, for both flat projects and 3D amigurumi! First we started off with identifying physical appearances in chains, rows and rounds to determine the correct sides. Then I talked about why this is important - appearance-wise and technique-wise. Then finally for each of the situations, whether chain or row or rounds, I listed tips on how to identify the RS from the WS, during the process of crocheting itself.
If you found this article useful, I would really appreciate it if you would share this or pin it to Pinterest so that other crocheters may make use of these tips and tricks!
Free Beginners Step-by-step Guide
Grab these 45-pages of cheat sheets that will help you with crochet stitches, magic rings, increases and decreases, FLO and BLO. Click on image on left for access!
Related articles
How to Learn Basic Crochet Stitches step by step for Absolute Beginners - 6 Easy Steps!
24 Easy Peasy things you need to know about Magic Ring in Crochet
15 different detailed Ways on How to Increase in Crochet
15 different detailed Ways on How to Decrease in Crochet
Front Loop and Back Loop in Crochet - the easy way to know everything