How to Crochet a 90 Degree Bend in Amigurumi (Using Short Rows)
Learn how to crochet a 90 degree bend in amigurumi using short rows to build height on one side and create a clear directional angle.
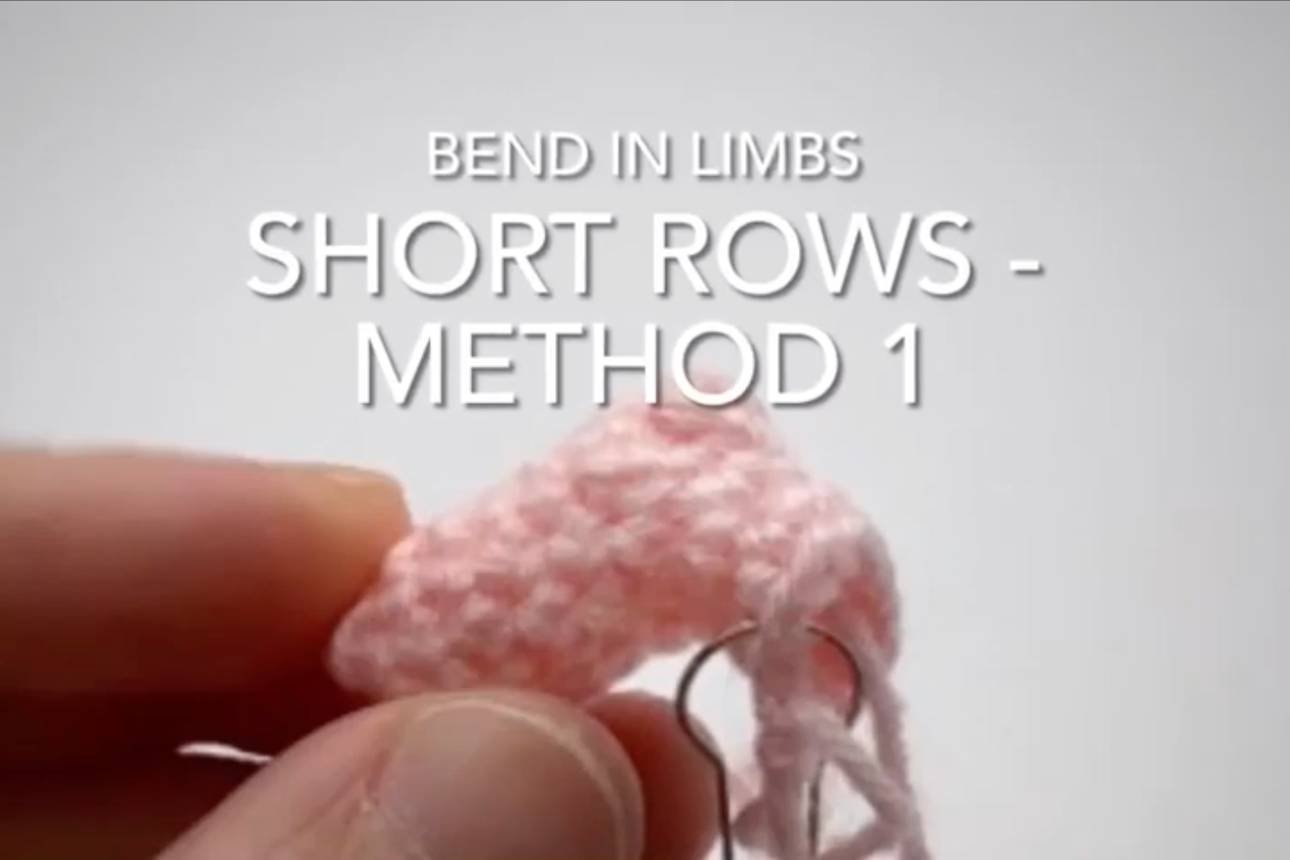
Table of Contents Show
Where This Fits in Amigurumi Shaping
There are a few different types of bends you can create in amigurumi:
Gentle curves (smooth, gradual shaping)
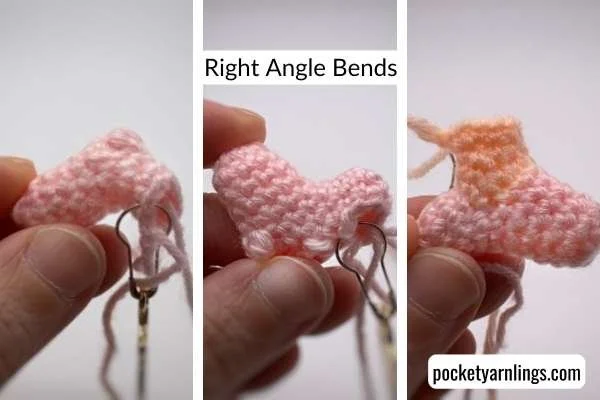
Right angle bends (90° turns)
Sharp bends (steeper, more dramatic angles)
👉 In this tutorial, we’re focusing on angled bends — where the shape changes direction more clearly.
This method creates a bend by using short rows to extend one side more than the other.
While curved techniques create smooth bends, short rows allow you to create more defined angles by building extra height on one side.
How Short Rows Create an Angled Bend
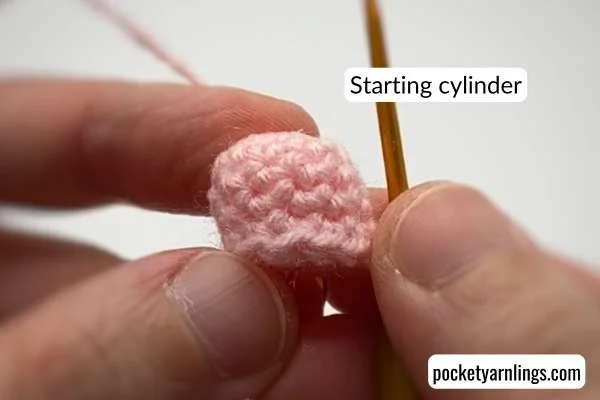
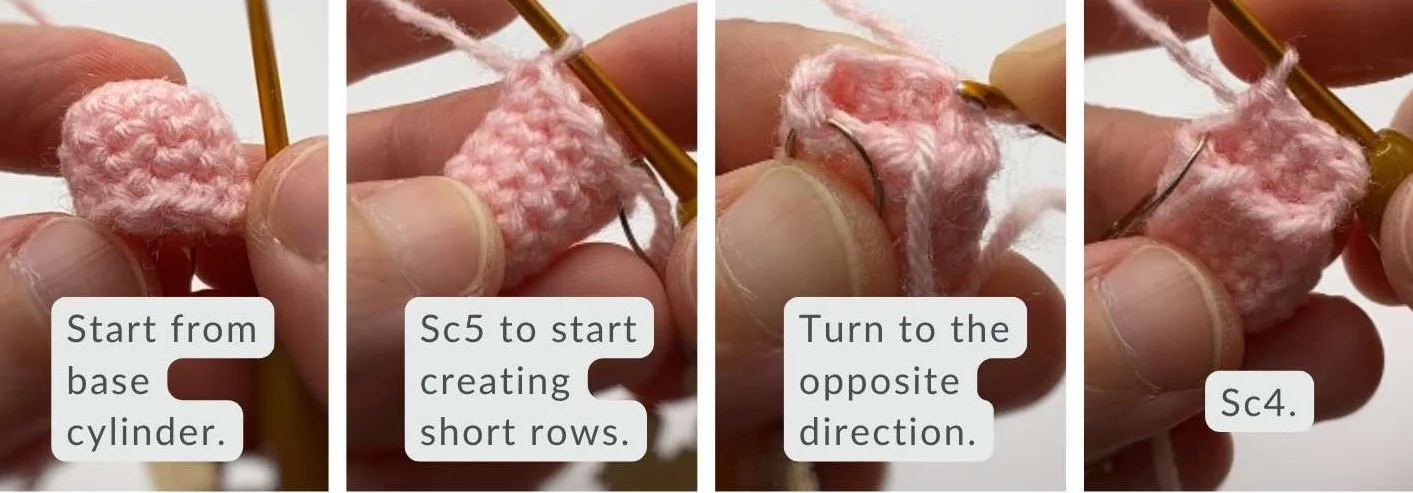
Start with a Base Cylinder
Begin with a simple crochet cylinder:
Round 1: Magic ring sc10 – 10 sts
Round 2: Sc10 – 10 sts
Rounds 3–5: Repeat Round 2 – 10 sts
👉 This forms the same neutral base used before shaping begins.
The Key Idea: Building One Side Longer
This method works differently from curves.
Work partial rows (short rows)
Turn your work before completing the full round
Repeat this to build up stitches on one side
👉 This creates uneven height, which becomes the bend.
How the Angle Forms
One side becomes taller from repeated short rows
The opposite side remains shorter
The fabric naturally bends toward the shorter side
The round begins to slant, forming an angle
👉 This is what creates the directional change.
What the Finished Bend Should Look Like
A more defined angle (not a smooth curve)
A clear directional change
Holds its shape strongly
No gaps (since all stitches remain single crochet height)
👉 Unlike curved methods, this creates a more noticeable bend that can resemble a corner.
Basic Short Row Pattern for an Angled Bend
Here’s a simplified example:
Pattern Snippet
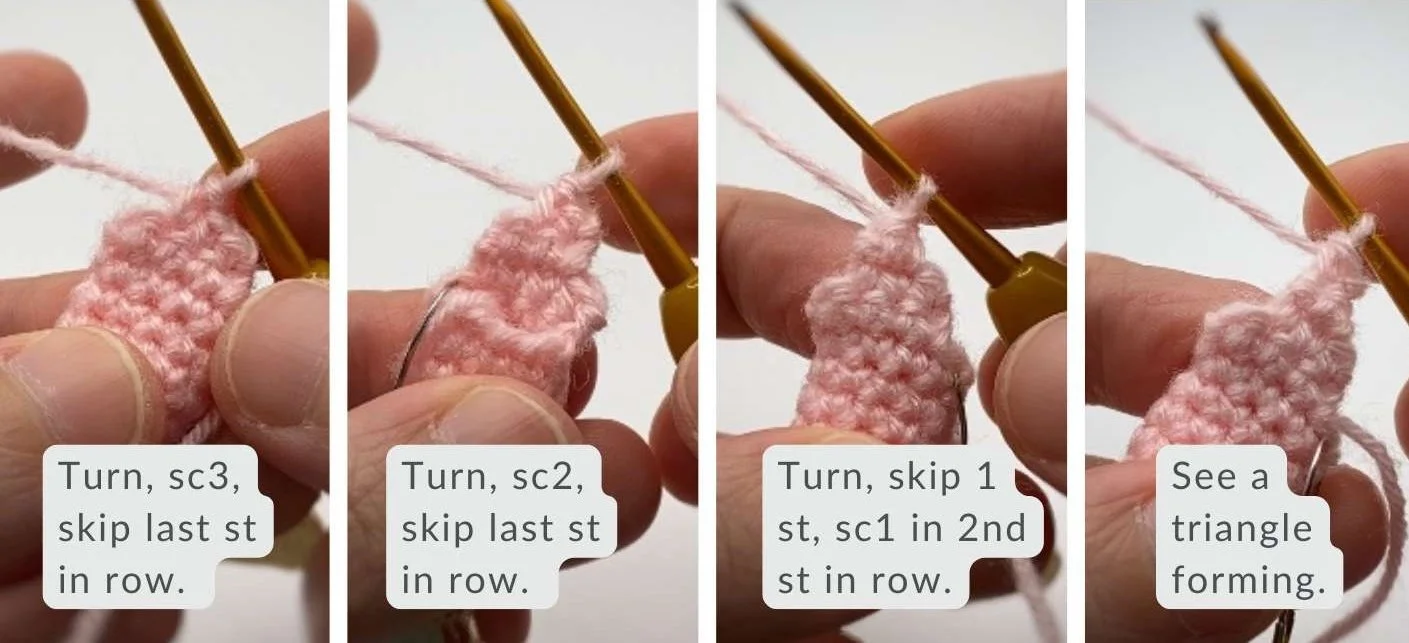
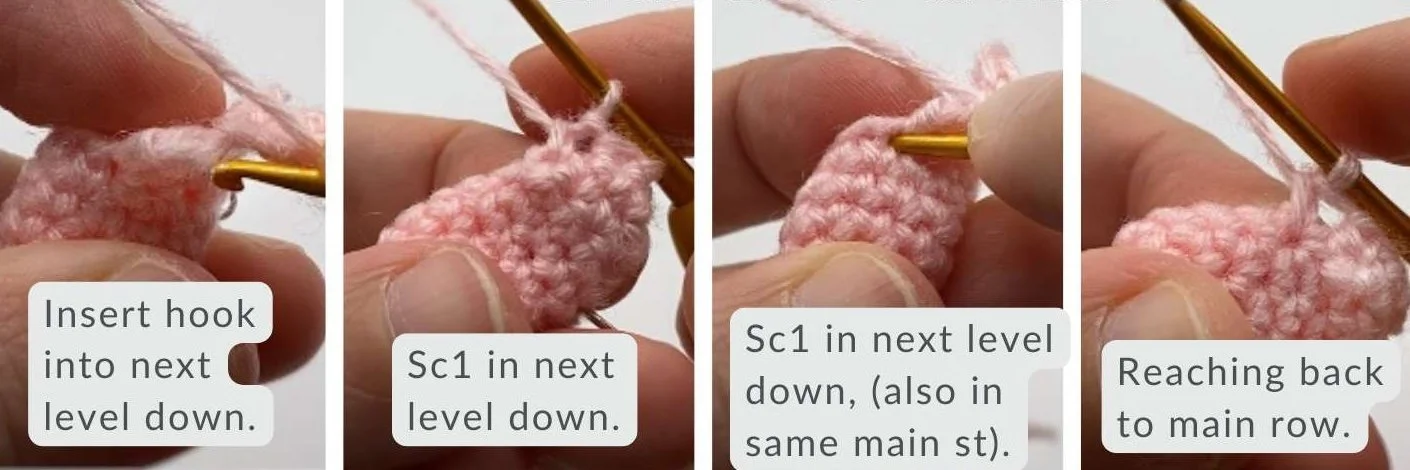
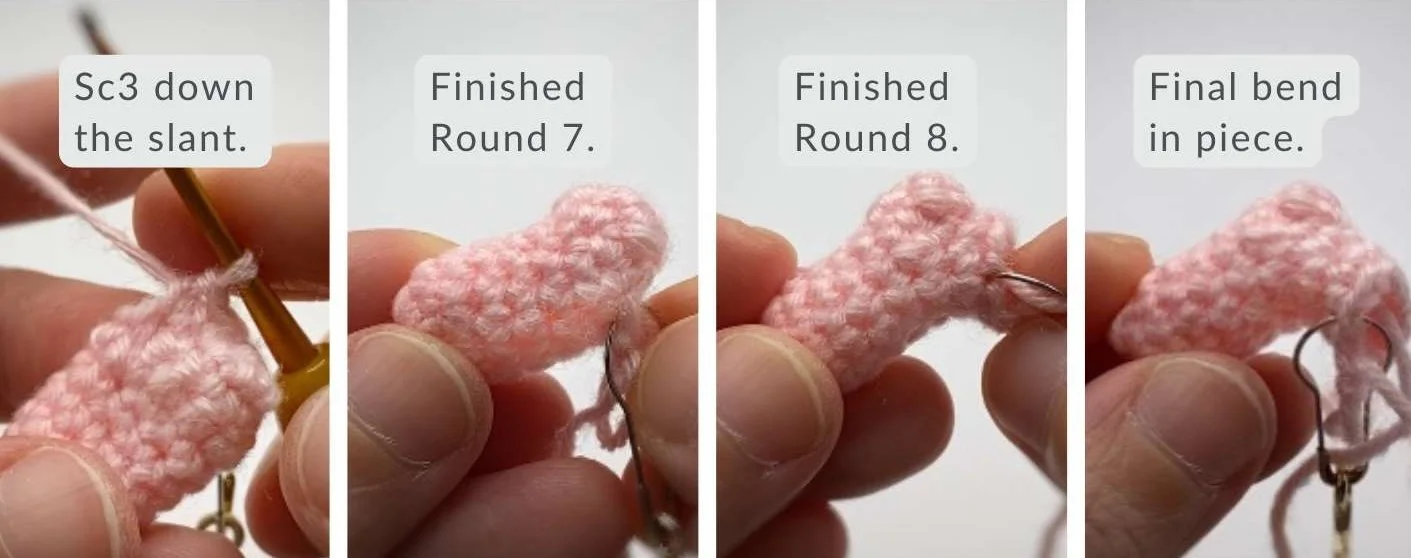
Round 6: (Sc5, turn, sc4, turn, sc3, skip 1 st, turn, sc2, skip 1 st, turn, skip 1 st, sc1),
sc1 in next level down, sc1 in next level down (in same main st), sc5 – 10 sts
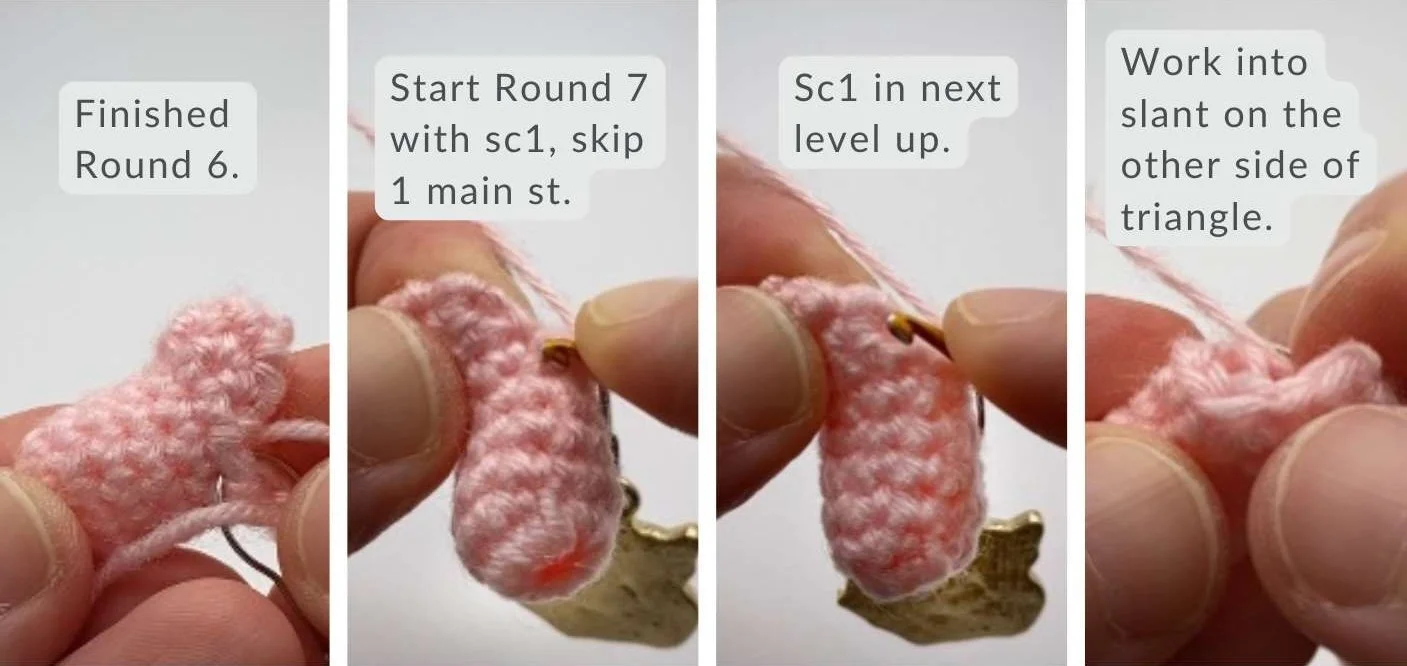
Round 7: Sc1, skip 1 main st, sc1 in next level up, sc3 down slant,
sc1 in next level down (in same main st), sc4 – 10 sts
Round 8: Sc10 – 10 sts
Round 9: Repeat Round 8 – 10 sts
Watch How the Bend Forms Step-by-Step
If you prefer to see how the stitches come together, you can follow along in this video below. Notice how working short rows builds height on one side, creating a more angled bend.
How to Control the Angle of Your Bend
Why Short Rows Create a Stronger Bend
Short rows create a bend more quickly because:
They build height difference in fewer stitches
The imbalance is more concentrated
The angle forms faster than with curve methods
👉 This makes the bend more dramatic and defined.
How to Adjust the Angle
You can control the sharpness of the bend by adjusting the short rows:
More short rows → sharper angle
Fewer short rows → softer bend
Placement of short rows → controls direction
👉 This gives you precise control over how the bend looks.
How to Use Short Rows in Amigurumi Designs
This technique is especially useful for:
Elbows
Knees
Sitting posture
Bent limbs
It’s one of the most effective ways to create intentional, structured bends in your designs.
👉 For example, in my Meadow from the Meadow Mystery CAL, I used short rows across the back to build extra height there, making the back slightly longer than the front legs. This creates a natural forward curve into the front legs, giving the body a more grounded and realistic posture.
Other Ways to Create Bends in Amigurumi
If you’re exploring different shaping techniques:
Stitch count → gentle, gradual curves
Stitch height → stronger curves
BLO/FLO → subtle, controlled curves
Each method creates a different type of bend depending on how much control you need.
👉 If you’d like a bigger picture of how all the bend techniques fit together, you can find them in the Ultimate Guide on How to Crochet Bends in Amigurumi (9 Ways to Shape and Control Curves).
Try Your First Amigurumi Bends
Put what you’ve learned into practice with easy arm, leg, and bend patterns. Grab it free over here.
Want to Explore More Types of Bends?
Short rows are just one way to create angled bends.
There are also:
gradual bends
sharper angles
steep and split bends
👉 Each technique gives you a different level of control over shape and direction.