

Mastering Amigurumi Pattern Reading for Beginners: From Confusion to Confidence
Are you a beginner in the world of amigurumi? Are you struggling to understand how to read the patterns? Reading amigurumi patterns can be daunting at first, but with a little practice and patience, you can easily master it. In this article, we will guide you through the basics of reading amigurumi patterns, so you can start creating adorable crochet toys in no time.
Table of Contents Show
Firstly, it's essential to understand that amigurumi patterns are different from regular crochet patterns. They are written in a unique language that uses abbreviations and symbols to represent different stitches and techniques. Don't worry; it's not as complicated as it sounds. Once you get the hang of it, you'll find it easier to read amigurumi patterns than regular crochet patterns.
Getting Started with Amigurumi Patterns
If you're new to the world of amigurumi, reading patterns can seem overwhelming at first. But don't worry, with a little bit of practice, you'll be able to decipher them with ease. In this section, we'll go over some tips and tricks to help you understand amigurumi patterns.
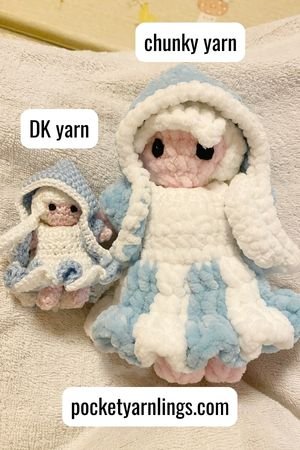
Before you start reading the pattern, it's crucial to choose the right yarn and hook size. Amigurumi patterns usually suggest a specific yarn weight and hook size to achieve the desired size and shape of the toy. Make sure you follow the recommendations to avoid any disappointments later on. With these basics in mind, let's dive into the world of amigurumi patterns and start creating cute crochet toys.
Common Crochet abbreviations and Terminology
Crochet and amigurumi patterns both use a variety of symbols to represent different stitches and techniques. Here are some of the most common symbols you'll encounter:
Symbol = Meaning
Sc = Single crochet
Hdc = Half double crochet
Dc = Double crochet
Tr = Treble crochet
Inc or 2sc = Increase
Dec or sc2tog = Decrease
Sl st = Slip stitch
It's important to pay attention to the placement of these symbols in the pattern. They will often be accompanied by numbers, indicating how many stitches to make or how many times to repeat a certain sequence.
Deciphering Amigurumi Terminology
It's important to understand some common terminology used in amigurumi patterns that may not necessarily be commonly used for other types of crochet patterns.
Magic ring: A technique used to start crocheting in the round without leaving a hole in the centre.
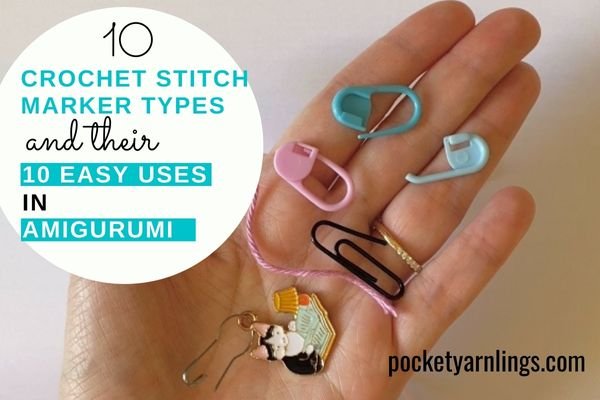
Stitch marker: A tool used to mark the beginning of a round or a specific stitch.
Invisible decrease: A decrease stitch that creates a neater finish than a regular decrease.
Stuffing: The process of filling your amigurumi with stuffing material to give it shape.
Closing up and fastening off: Used when closing up the stitches of the amigurumi right at the end.
With these tips in mind, you'll be well on your way to understanding amigurumi patterns. Don't be afraid to take it slow and ask for help if you need it. Happy crocheting!
Crochet Terms Glossary
Look out for the crochet pattern’s glossary at the beginning of the pattern because different crochet designers tend to write their patterns slightly differently! They will also often include the breakdown of the steps involved for special stitches like bobble, popcorn, cluster stitches and so forth.
For example, if a certain pattern only calls for a 4 double crochet bobble stitch every time ‘bob’ appears then follow those steps only for that pattern. Here is an example of how that would look like:

Reading the Pattern Instructions
For this section, I am showing examples of amigurumi pattern being written for
Starting off in a round
Continuing in a round
Increases in stitches
Decreases in stitches
For each part, there is a snippet of a US version, UK version and my version. As for my own version, I’m not one to be particular about following a golden standard, for me, having the pattern easiest to read is the most important. Always remember to check out the writer’s style guide before embarking on the pattern.
Starting off in a Round
When starting off amigurumi, use a magic ring and here are some examples of how they are written into the pattern. I have classified the examples in each part as the US version, UK version and my version. Do note that a double crochet stitch in UK terms corresponds to a single crochet stitch in US terms.
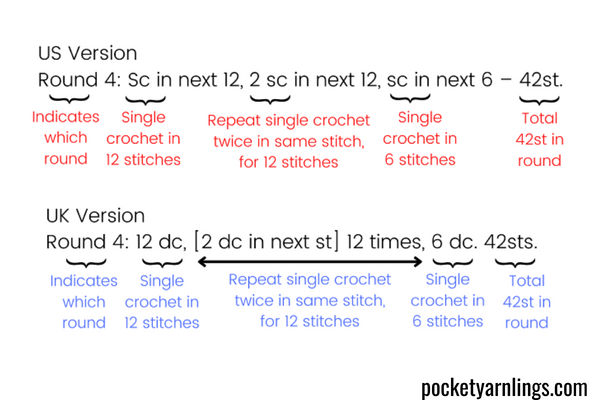
The red words are for the US version, blue for the UK version and purple for my version. I break down the symbols in each sentence into smaller phrases that are hopefully easier to understand. Do note that the writing in a row is slightly different from writing in a round.

Continuing in a Round
Here when I mean continue in a round, I mean the same stitch throughout the round. So in this Round 2 example below, I am referring to single crocheting one stitch throughout in the round. The convention is to write the stitch involved and then 'around' after that. As for my version, because I want to include the number of stitches inside, so instead of sc all around, I usually write sc10.

Increases in Stitches
Here I have included another example apart from US, UK and my version as I know of many other patterns which are written with the convention of 'increase'. For the most part as you can see, the number 2 is written in front of the stitch that is to be increased, which is what I do for my own version as well.

Decreases in Stitches
Similarly for decrease, as for increase, it is often written as sc2tog, with the 12 written either in front or behind it. See the differences below or simply just use 'decrease' as well. See the examples below for the different situations to use sc2tog or decrease.


Counting Stitches
Counting stitches is an essential part of crocheting. Whether you're a beginner or an experienced crocheter, accurate stitch counting is crucial for maintaining stitch patterns, achieving the right size and shape, and ensuring your crochet creations turn out as envisioned.
Why Do You Count the Stitches in Crochet?
It helps you keep track of the number of stitches in each row or round, which is important for maintaining the correct size and shape of your project. Counting stitches can also help you avoid mistakes, such as adding or skipping stitches, which can cause your project to be uneven or misshapen.
Counting stitches can also help you identify where you made a mistake if you need to rip back a few rows. By counting the stitches in the previous row or round, you can easily identify where the mistake was made and fix it.

What does stitch count mean in crochet?
In crochet, the term "stitch count" refers to the total number of individual stitches present in a row, round, or a specific section of your crochet project. It represents the numerical tally of all the stitches you've made and is an important aspect of following crochet patterns and ensuring the correct size and shape of your project.
The stitch count is determined by the number and types of stitches worked into the foundation chain or the previous row/round. Different crochet stitches, such as single crochet, double crochet, half double crochet, and treble crochet, will each contribute to the overall stitch count in their own unique way.
How do you keep track of crochet stitch count?
Maintaining an accurate stitch count is crucial for the successful completion of your crochet project. It allows you to follow pattern instructions correctly, avoid mistakes, and achieve the desired design, fit, and proportions. Properly counting stitches helps ensure that your work progresses smoothly and that your finished project turns out just as intended by the pattern designer.
Keep track of crochet stitch count by using stitch markers and row counters at regular intervals and also, count frequently at the end of each row or round. Then double check the stitch count you counted yourself together with what is suggested at the end of each row or round in the crochet pattern.
If you found this article useful, remember to pin it to Pinterest for reference later or so that others can get inspiration from here too!


💡 Want to learn all the basics of crocheting amigurumi in one place?
Grab my free 77-page Amigurumi Foundation eBook — your complete step-by-step guide to mastering tools, stitches, and beginner toy techniques (normally $17!).
Tips for Reading Patterns for Amigurumi Beginners
Reading amigurumi patterns can be intimidating at first, but with a little practice, you'll get the hang of it. Here are some tips to help you read the pattern instructions:
Start with a simple pattern
Choose a pattern with fewer details and stitches to get started. It will help you understand the basic structure of amigurumi patterns. Starting with simple patterns will help you build your confidence and skills before moving on to more complex projects.
Before you start crocheting, read the pattern instructions carefully. Make sure you understand each step before moving on to the next one.
Read the entire pattern before starting
This will help you understand the overall structure of the project and prevent any surprises later on. Also, amigurumi patterns use a lot of abbreviations. Make sure you understand the meaning of each abbreviation before you start crocheting.
Count your stitches
Count your stitches after each round to make sure you're on track. It will help you catch mistakes early and avoid frustration later on.
Pay attention to the stitch count. Each row or round should have a specific number of stitches, and it's important to keep track of this as you work. You may find it helpful to use stitch markers to keep track of the beginning and end of each round.
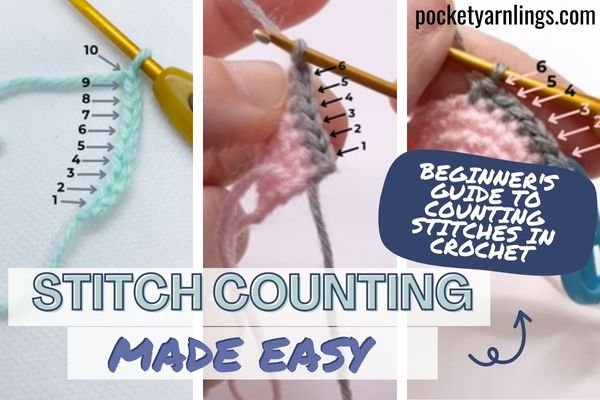
To find out more about count stitches, remember to check out this comprehensive article on “Stitch Counting Made Easy: Beginner’s Guide to Counting Stitches in Crochet”.
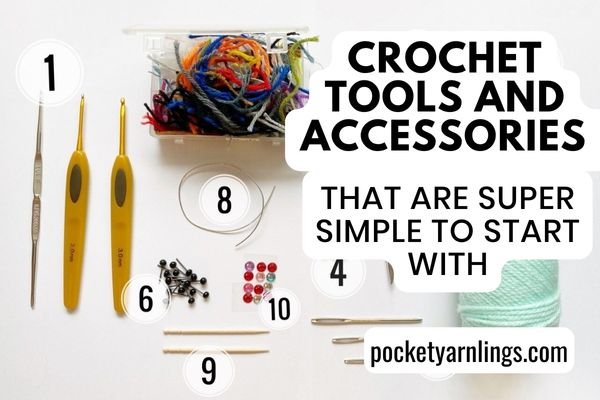
Use the right crochet equipment
Using the right hook size is crucial to achieving the correct gauge and size of your finished project. Make sure to check the pattern for the recommended hook size. Also remember to use the correct corresponding yarn to achieve the amigurumi of the desired size as suggested by the crochet pattern.
Keep your tension consistent
Amigurumi is typically worked with a smaller hook than you might use for other crochet projects, and it's important to keep your tension even throughout. This will help ensure that your finished piece is the right size and shape.
Don't be afraid to ask for help
If you're stuck on a pattern or don't understand a particular technique, don't hesitate to ask for help from a friend or online community.
By following these tips, you'll be able to read amigurumi patterns with ease and create beautiful crocheted toys.
Troubleshooting Common Issues
When it comes to reading amigurumi patterns, you may run into some common issues. Here are some troubleshooting tips to help you overcome these problems:
Issue: Your stitches are too tight or too loose.
If your stitches are too tight, it can be difficult to insert your hook and work the next stitch. On the other hand, if your stitches are too loose, your amigurumi may not hold its shape properly.
Solution: Practice, practice, practice! It takes time and patience to get your tension just right. Try working on a small swatch to get a feel for the correct tension before starting on your project. You can also try using a smaller or larger hook to adjust your tension.

Issue: You're having trouble understanding the pattern.
Sometimes, amigurumi patterns can be confusing, especially if you're new to reading them.
Solution: Take a deep breath and read through the pattern slowly and carefully. If you're still having trouble, try breaking the pattern down into smaller sections and working on one section at a time. Just scroll down to the bottom to see further resources that might help you.
Issue: Your amigurumi is coming out the wrong size.
If your amigurumi is too big or too small, it may be frustrating, especially if you've already put a lot of time and effort into it.
Solution: Make sure you're using the correct hook size and yarn weight specified in the pattern. If you're still having trouble, try adjusting your tension or using a different yarn weight or hook size. You can also try working a gauge swatch to ensure that your tension is correct.
By following these troubleshooting tips, you can overcome common issues and successfully read amigurumi patterns as a beginner. Remember to pin this article to Pinterest so that you can reference back later!
Conclusion of Reading Amigurumi Patterns
In conclusion, reading amigurumi patterns may seem overwhelming at first, but with practice and understanding, it becomes an enjoyable and rewarding experience. Throughout this guide, we've explored the essential elements of amigurumi patterns, from deciphering abbreviations to interpreting pattern instructions.
With practice and patience, you'll gain confidence in understanding amigurumi patterns and be able to create adorable crochet toys with ease. So, grab your favourite yarn, a crochet hook, and let your creativity soar as you bring delightful amigurumi creatures to life! Happy crocheting!
If you’re feeling excited to start crocheting your first amigurumi but wish all the essentials were in one easy place, I’ve got you covered! You can download my free 77-page Amigurumi Foundation eBook — a complete step-by-step guide to mastering tools, stitches, and beginner toy techniques (normally $17!).
💡 Want to learn all the basics of crocheting amigurumi in one place?
Grab my free 77-page Amigurumi Foundation eBook — your complete step-by-step guide to mastering tools, stitches, and beginner toy techniques (normally $17!).
Related articles
Yarn Weight Chart for Crocheting: Ultimate Comprehensive Detailed Guide
12-point Checklist to Select the Best Yarn for Amigurumi
Crochet Hook Size Chart for Amigurumi: Absolutely Everything You Need to Know
How to Learn Basic Crochet Stitches step by step for Absolute Beginners - 6 Easy Steps!
24 Easy Peasy things you need to know about Magic Ring in Crochet